
Table of Contents >> Show >> Hide
- Why Tie Braid to Mono in the First Place?
- What You’ll Need
- Before You Start: Quick Setup Tips
- The Simple 11-Step Method: Double Uni Knot (Braid to Mono)
- Dialing It In: Wrap Counts That Actually Work
- Common Mistakes (And How to Avoid the “Mystery Break-Off”)
- When the Double Uni Is Great (And When You Might Switch Knots)
- Mini Example Setups (So You Can Copy-Paste Into Real Life)
- FAQ: Quick Answers for Common “Braid to Mono” Questions
- Experience Notes: What Actually Happens on the Water (Extra )
- Conclusion
Braided line is the superhero of sensitivity and strengthuntil you remember it has the personality of a slick shoelace.
Monofilament, meanwhile, is the forgiving friend with a little stretch and better abrasion resistance. Put them together,
and you get a combo that casts well, fights fish smoothly, and survives the “oops, that rock was closer than I thought” moments.
This guide walks you through a beginner-friendly, proven connection: the Double Uni (Uni-to-Uni) knot.
It’s not the absolute skinniest knot on planet Earth, but it’s reliable, easy to learn, and forgiving when your hands are cold,
your boat is bouncing, or your buddy is “helping” by shining a flashlight directly into your eyes.
Why Tie Braid to Mono in the First Place?
- Stealth: Mono can be less visible than braid in many conditions.
- Shock absorption: Mono’s stretch helps prevent pull-outs on hard strikes and head shakes.
- Better abrasion resistance: Useful around rocks, docks, oyster beds, and rough structure.
- Cost control: Keep braid on the spool long-term and replace only the leader.
- Easy rig swaps: Tie a fresh leader instead of respooling the whole reel.
What You’ll Need
- Braided main line (example: 10–30 lb for freshwater, higher for saltwater depending on target)
- Monofilament leader (commonly 8–25 lb for freshwater, heavier if needed)
- Sharp line cutters (clean cuts matter more than you’d think)
- Optional: A small towel (for grip), headlamp, and something to keep tension (your knee works great)
Before You Start: Quick Setup Tips
1) Match diameters, not just pound test
Braid is thinner than mono at the same “lb test,” so don’t be shocked if 20 lb braid looks like sewing thread next to 20 lb mono.
When the diameter difference is huge, the Double Uni can get bulky. If you’re using very heavy mono (like a thick shock leader),
you may prefer a slimmer knot like the FG or Alberto for guide-friendliness.
2) Use enough wraps
Braid is slippery. If you treat it like mono and use too few wraps, it may slide. The cure is simple: more wraps on the braid side.
For many setups, 6–8 wraps on braid and 4–6 wraps on mono is a strong starting point.
3) Lubricate and cinch slowly
Tightening too fast can create heat and friction that weakens mono. A little moisture (water or saliva) and a slow, steady cinch
help the knot seat cleanly.
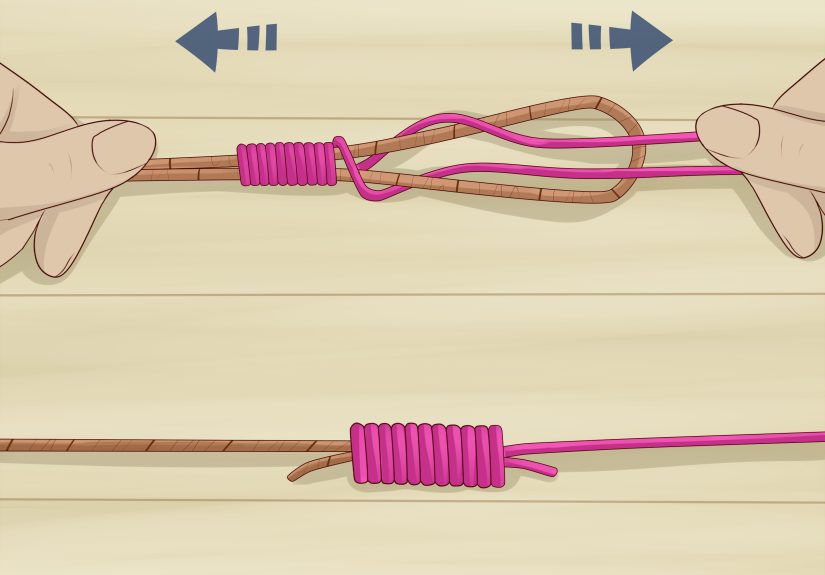
The Simple 11-Step Method: Double Uni Knot (Braid to Mono)
The goal is to tie two uni knotsone with braid, one with monothen slide them together until they “kiss” into a single connection.
-
Overlap the lines.
Lay the braid and mono parallel with about 6–10 inches of overlap. More overlap = easier tying, especially at night or in wind. -
Form a loop with the braid.
Take the braid tag end and fold it back to make a loop over both lines. Pinch the overlap point between thumb and forefinger. -
Wrap the braid around both lines.
Wrap the braid tag end around both lines and through the loop 6–8 times. (If your braid is very slick or thin, lean toward 8.) -
Dress the braid wraps.
Make sure the wraps sit neatly side-by-side. Messy, crossing wraps are the knot version of stepping on a rake: it works… until it doesn’t. -
Snug the braid uni knot.
Lightly pull the braid tag end to start tightening that first uni. Don’t fully cinch it down yetjust snug it so it holds its shape. -
Form a loop with the mono.
Now take the mono tag end and fold it back to form a loop around both lines, mirroring what you did with the braid. -
Wrap the mono around both lines.
Wrap the mono tag end through its loop 4–6 times. Thicker mono usually needs fewer wraps; thinner mono can use more. -
Neaten the mono wraps.
Like the braid side, keep wraps tidy and aligned. Clean wraps seat better and create a stronger connection. -
Lubricate both knots.
Wet the knot area. This reduces friction and helps the mono tighten smoothly without getting “burned.” -
Cinch both uni knots separately.
Pull the braid tag end to tighten the braid uni; pull the mono tag end to tighten the mono uni. Then pull the standing lines to firm each side.
You’re aiming for two compact barrel shapes facing each other. -
Slide them together and finish.
Pull the standing braid and standing mono in opposite directions. The two uni knots will slide together and lock.
Give a final steady pull, then trim tag ends closeleaving about 1/8 inch if you want extra safety (especially on braid).
Quick “Did I Tie It Right?” Checklist
- Wraps are tidy (not crossed like spaghetti)
- Knot tightens smoothly and doesn’t “pop” or slip while seating
- Two uni knots meet cleanly in the middle
- When you pull hard, the knot holds without creeping
Dialing It In: Wrap Counts That Actually Work
There’s no single magic number, but here are practical starting points:
- 10–15 lb braid to 6–10 lb mono: 7–8 braid wraps, 5–6 mono wraps
- 20–30 lb braid to 12–20 lb mono: 6–8 braid wraps, 4–5 mono wraps
- Heavier mono leaders: reduce mono wraps slightly to prevent a big bulky barrel
Common Mistakes (And How to Avoid the “Mystery Break-Off”)
Too few braid wraps
If your knot slips, this is the #1 suspect. Braid likes extra wraps. Add one or two and try again.
Crossed wraps
Crossed wraps can create uneven pressure points. When you cinch, the knot may cut into the mono or fail under load.
Take five extra seconds to “dress” the knot before tightening.
Cinching dry
Dry mono + friction = weaker mono. Always lubricate before the final cinch.
Yanking instead of tightening
A slow, firm cinch seats the knot better than a dramatic tug worthy of a soap opera. Save the drama for the fish.
When the Double Uni Is Great (And When You Might Switch Knots)
The Double Uni is excellent for everyday fishing, especially when you want speed and reliability.
But if you’re running a long leader through guides all day, or using very thick mono, you might prefer a slimmer knot.
| Knot | Best For | Why People Like It | Trade-Off |
|---|---|---|---|
| Double Uni | Fast, simple braid-to-mono connections | Easy to learn, dependable, quick to tie on the water | Bulkier than some options |
| Alberto | Smaller knot that still ties quickly | Compact and strong when tied cleanly | Can slip if you rush or mis-thread the final pass |
| FG | Long leaders, heavy use through guides | Very slim profile and high strength when done right | More steps, needs practice and tension |
Mini Example Setups (So You Can Copy-Paste Into Real Life)
Spinning gear for clear water
Try 10–15 lb braid to 8–10 lb mono leader, about 4–6 feet long.
Great for finesse baits, small swimbaits, and situations where you want a little stretch on the bite.
Baitcaster around cover
Try 30 lb braid to 15–20 lb mono leader, about 12–24 inches long.
Shorter leaders keep the knot out of the guides and give you abrasion resistance right where it counts.
Inshore saltwater (general)
Try 20–30 lb braid to 20–30 lb mono leader. Leader length depends on structure and casting needs,
but many anglers stay in the 2–5 feet range.
FAQ: Quick Answers for Common “Braid to Mono” Questions
Should I leave a long tag end on braid?
You can trim fairly close, but leaving about 1/8 inch on braid adds a little peace of mind, especially if your braid is extra slick.
Why does my knot keep breaking at the connection?
Usually it’s one of three things: not enough braid wraps, crossed wraps, or tightening dry/too fast.
Retie slowly, add wraps on braid, lubricate, and seat the knot firmly.
Can I tie braid directly to mono without a leader?
Technically yes, but most people use mono as a leader for abrasion resistance and controlled stretch.
If you want mono on the spool, that’s a different setup (and a different set of trade-offs).
How often should I retie?
If the knot bangs through guides all day, or if you’ve been rubbing structure, retie sooner.
A good rule: if you can see damage, feel roughness, or you’ve had a big fish pull hard, it’s worth a fresh connection.
Is the FG knot stronger?
In many tests and angler reports, the FG is often among the strongest and slimmest braid-to-leader optionswhen tied correctly.
The key phrase is “when tied correctly.” If you tie the Double Uni perfectly and tie the FG poorly, the Double Uni wins every time.
Experience Notes: What Actually Happens on the Water (Extra )
Here’s the honest truth anglers learn the “expensive” way: the best knot isn’t just the one with the highest lab strengthit’s the one you can tie
correctly under real conditions. Real conditions include wind that turns loose tag ends into modern art, cold fingers that forget how thumbs work,
and a headlamp that’s either too dim to see anything or so bright it summons moths from another ZIP code.
The Double Uni shines in that messy reality. It’s simple, repeatable, and you can feel whether it’s seating properly. If something looks offwraps crossed,
a barrel shape that’s lumpy, or a “creep” as you pullyou know immediately. That feedback is gold, especially when you’re learning. Many anglers also like
that they can tie it fast without needing perfect tension tools. If you can pinch two lines and count to eight, you can get back to fishing.
One common experience: the first few times you tie braid to mono, you trim the tags too confidently. Then you cast, your knot ticks the guides, and you
start imagining doom. The funny part is, a well-tied Double Uni is usually finebut your brain will still narrate every cast like a suspense movie.
The confidence comes from testing. After tying, wrap the standing lines around your hands (use a towel for grip) and pull steadily. If it holds through that,
it’ll usually hold through a fish. That simple “pull test” turns anxiety into trust.
Another real-world lesson: knot problems often aren’t “knot problems.” They’re line-damage problems. Braid can fray after rubbing rocks; mono can get nicked
by shells or dock posts. If you’re breaking off near the knot, inspect the leader above the knot and the braid below it. Sometimes the connection is innocent
and the crime scene is two inches away. Retie a fresh leader, cut back to clean braid, and suddenly your “bad knot” becomes a “great knot.”
And yespeople absolutely pre-tie leaders at home. It’s not cheating; it’s being smart. If you’re fishing early mornings, surf, or saltwater, tying in calm
light with dry hands is a gift you give your future self. Store leaders on small foam spools or leader wallets. On the water, you only need to tie one knot
to your lure and you’re done. The result: more casts, fewer tangles, less muttering.
Finally, the most underrated experience-based trick: slow down on the cinch. Most failures happen at the tightening stage. Lubricate, snug each uni neatly,
then bring them together with steady pressure. When you start treating knot tying like a mini ritual instead of a race, your break-offs drop fast. And the only
thing snapping becomes your photosof the fish, not the line.
Conclusion
If you want a straightforward, dependable way to connect braid to mono, the Double Uni knot is hard to beat.
Follow the 11 steps, add enough wraps on the braid, lubricate before cinching, and test the knot with a firm pull.
Once it becomes muscle memory, you’ll tie it quickly and confidentlywhether you’re on a calm dock or in the chaos of “one more cast” o’clock.


