
Table of Contents >> Show >> Hide
- What Are Sugar Corkscrews?
- Before You Start: The 3 Rules of Sugar Corkscrew Success
- Ingredients and Equipment
- Classic Sugar Corkscrew Recipe (Step-by-Step)
- Temperature and Texture Cheat Sheet (Because Sugar Has Opinions)
- Flavor and Style Variations
- Troubleshooting: Fix the Drama Before It Becomes a Soap Opera
- How to Store Sugar Corkscrews (So They Don’t Melt Into Sadness)
- What to Serve with Sugar Corkscrews (Dessert Pairing Ideas)
- FAQ
- Kitchen Experiences: The Real-Life Side of Making Sugar Corkscrews (Extra )
- Conclusion
If you’ve ever looked at a fancy dessert and thought, “Wow, who has the time (or the nerves) for that?”
let me introduce you to your new favorite show-off garnish: sugar corkscrews.
They’re glossy, amber spirals of caramelized sugar that instantly make cakes, puddings, parfaits, and plated desserts
look like they have a publicist.
The best part? The classic version is basically a one-ingredient recipe. The other part?
You’re working with molten sugar, which is delicious, dramatic, and absolutely not here to play nice.
But don’t worrythis guide walks you through it with clear steps, smart shortcuts, and a few “learn from my kitchen’s mistakes”
moments (theoretical mistakes… definitely not mine…).
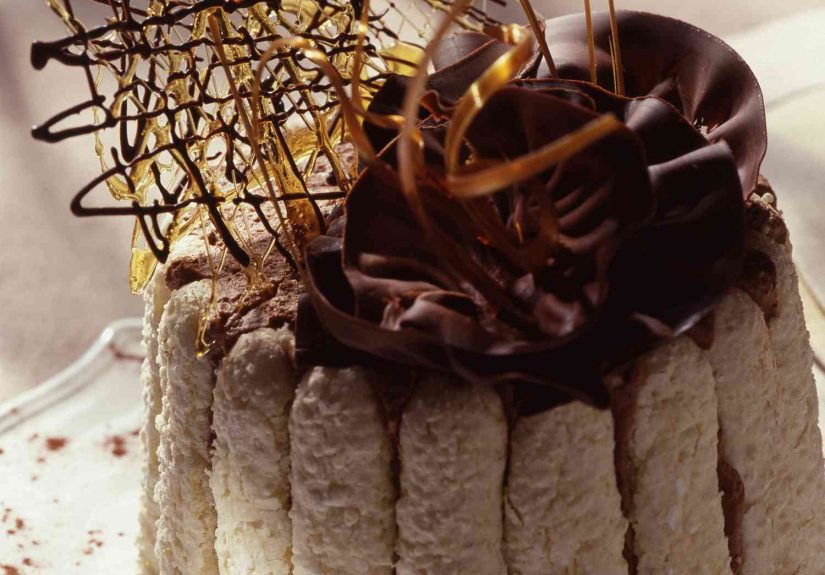
What Are Sugar Corkscrews?
Sugar corkscrews are thin ribbons of caramelized sugar formed into spiral curlslike edible amber springs.
They’re used as a decorative topper for desserts: think chocolate mousse, crème brûlée, panna cotta, cupcakes, layer cakes,
and any dessert that needs a glow-up.
Technically, you’re cooking sugar to the caramel stage, then wrapping it around a greased handle (like a wooden spoon,
metal dowel, or rolling pin handle) so it sets in a twist. The result is crisp, glassy, and lightly bitter-sweetlike caramel’s
more sophisticated cousin who owns actual glassware.
Before You Start: The 3 Rules of Sugar Corkscrew Success
1) Pick a dry day
Sugar decorations and humidity have the kind of relationship that ends with someone crying in a pantry.
Moist air makes sugar turn sticky, droop, and lose its snap. If it’s raining or your kitchen feels like a rainforest,
save this for another day.
2) Hot sugar is no joke
Molten caramel can cause serious burns. Wear long sleeves, keep kids/pets out of the area, and move slowly.
This is not a “let me just multitask while scrolling” recipe.
3) Have everything ready first
Sugar goes from “not ready” to “ready” to “burnt” in the time it takes to wonder if you should’ve gone to law school.
Prep your tools, your greased handles, and your workspace before heat ever touches sugar.
Ingredients and Equipment
Ingredients (Classic One-Ingredient Version)
- 1 cup granulated sugar (regular white sugar)
Optional Helpers (Not Required, but Very Nice)
- 2–3 tablespoons water (helps sugar melt more evenly; “wet method-lite”)
- 1–2 teaspoons light corn syrup (helps reduce crystallization)
- Pinch of cream of tartar (another anti-crystallization helper)
Equipment
- Heavy-bottomed saucepan (light-colored if possible so you can see color changes)
- Candy thermometer (helpful for confidence and consistency)
- Heatproof spatula or wooden spoon (for gentle guiding, not aggressive stirring)
- Pastry brush + small bowl of water (to wash down crystals)
- Parchment paper or silicone mat (your caramel landing zone)
- 1–2 “forming tools”: wooden spoon handle, metal dowel, rolling pin handle, or thick chopstick
- Neutral oil or nonstick spray (for greasing the forming tools)
- Heatproof gloves (optional, but your future self may write you a thank-you note)
Classic Sugar Corkscrew Recipe (Step-by-Step)
This method gives you that deep amber, elegant caramel flavor and the cleanest corkscrew shape.
You can do it as a true one-ingredient dry caramel, or add a splash of water for a gentler melt.
-
Prepare your setting station.
Line a baking sheet with parchment or a silicone mat. Lightly grease your spoon handle/dowel/rolling pin handle.
Set it near your lined sheet so you’re not carrying molten sugar across the kitchen like a suspense scene in a thriller. -
Set up a crystal-control plan.
Pour a little water into a small bowl and keep a pastry brush nearby.
If sugar crystals climb the sides of the pot, you’ll brush them down. -
Add sugar to the pan.
For a true one-ingredient approach, add sugar directly to a dry saucepan.
For a slightly more forgiving approach, add 2–3 tablespoons water first, then the sugar. -
Heat gently and be patient.
Set heat to medium. If using water, stir only until the sugar dissolves and the mixture looks like wet sand turning into syrup.
Once it starts simmering, stop stirring. Stirring later can encourage crystallization. -
Let it melt and turn clear.
In the dry method, the sugar will start melting in patches. Gently swirl the pan to help it melt evenly.
If there are stubborn islands of sugar, tilt and swirldon’t scrape aggressively. -
Brush away crystals (if needed).
If you see sugar crystals on the sides of the pot, lightly brush them with water so they dissolve back into the syrup.
(This is one of the most useful “pro moves” in caramel work.) -
Cook to a rich amber caramel.
Watch the color closely. You’re aiming for a deep golden ambercomplex, not bitter.
If using a thermometer, caramel typically develops in the 320–350°F range, and the color deepens quickly near the end. -
Stop the cooking at the right moment.
When the caramel is the shade of a shiny copper penny (or a little lighter), remove the pan from heat.
The residual heat will continue darkening it for a moment. -
Cool briefly until it thickens.
Let the caramel sit 30–60 seconds. You want it fluid enough to pour in thin ribbons,
but thick enough to hold a line instead of pooling like a sugar puddle. -
Form the “ribbon.”
Using a spoon, drizzle a thin line of caramel onto the greased handle (or drizzle onto the parchment and lift with a greased tool).
Work in short lengths at firstconfidence comes fast once you see how it behaves. -
Wrap into a corkscrew.
Quickly (but calmly), spiral the caramel ribbon around the greased handle.
Hold for a few seconds as it sets, then gently slide it off onto the lined sheet.
If it sticks, your handle needs more grease or the sugar was too hot and thin. -
Repeat and adjust.
If the caramel gets too thick to work with, warm it over low heat for 5–10 seconds.
If it’s too runny, wait another 20–30 seconds. You’re aiming for that sweet spot where it behaves like warm honey.
Temperature and Texture Cheat Sheet (Because Sugar Has Opinions)
You don’t have to obsess over temperatures, but it helps to understand what’s happening:
- Hard crack stage (300–310°F): sugar is very concentrated and sets hard/brittleuseful for hard candy and brittle.
- Caramel range (about 320–350°F): sugar begins to brown and develop deeper flavor; color changes accelerate quickly.
For corkscrews, you want caramel that’s cooked enough to taste amazing and set crisp, but not so dark it turns bitter.
Visual cues matter: if it smells sharp or looks like dark mahogany, you’ve gone a little too far.
Flavor and Style Variations
1) Lighter “golden” corkscrews
Pull the caramel off heat earlier for a pale amber color. These look delicate and taste sweetergreat for vanilla desserts
and fruit-forward plates.
2) Deeper “toasted caramel” corkscrews
Let the caramel go a shade darker for a more complex, slightly bitter edge. Perfect for chocolate, coffee, and nuts.
3) Citrus shine
Add a tiny drop of lemon juice (or a pinch of cream of tartar dissolved in water) early in the cooking process to help
reduce crystallization and give a subtle brightness.
4) Spun-sugar style corkscrews (thin and airy)
If you want lighter, thread-like curls, you can use a spun sugar syrup (sugar + water + corn syrup) and work with fork-flicked strands.
It’s fussier, but the look is pure dessert theater.
Troubleshooting: Fix the Drama Before It Becomes a Soap Opera
My sugar crystallized and turned grainy
- Common causes: stirring after boiling, sugar crystals on the pan sides, or agitation.
- Fix: start over (sad but true). Next time, brush down the sides and avoid stirring once it’s simmering.
- Prevention: a small amount of corn syrup or acid helps discourage crystals.
My caramel burned
- Cause: too much heat or walking away at the wrong moment.
- Fix: unfortunately, burned caramel tastes like regret. Discard and try again.
- Prevention: use medium heat and watch color, not the clock.
My corkscrews won’t hold shape
- Cause: caramel was too hot/thin or your kitchen is humid.
- Fix: cool the caramel a bit longer before shaping; work in a drier space if possible.
They turned sticky after I made them
- Cause: humidity (again, the villain of sugar art).
- Fix: store airtight with a desiccant packet or dry rice; avoid the refrigerator.
How to Store Sugar Corkscrews (So They Don’t Melt Into Sadness)
Sugar decorations are best the day you make them, but you can get some extra life out of them with careful storage:
- Store in an airtight container at room temperature.
- Add a small food-safe desiccant packet (best) or a little dish of dry rice (decent backup).
- Keep away from steam, heat, andyeshumidity.
- Avoid the fridge; it’s basically a humidity spa for sugar.
What to Serve with Sugar Corkscrews (Dessert Pairing Ideas)
Sugar corkscrews bring crunch and caramel flavor, so pair them with creamy or soft desserts for contrast:
- Chocolate mousse with sea salt and espresso
- Panna cotta with berries or citrus segments
- Cheesecake with brûléed fruit
- Ice cream (add the corkscrew right before serving)
- Cupcakes with vanilla buttercream for a bakery-style finish
FAQ
Is this the same as spun sugar?
Related, but not identical. Spun sugar is made by flicking thin strands of sugar syrup into wispy threads or nests.
Sugar corkscrews are thicker ribbons or curlsmore architectural, more “look at me.”
Do I need corn syrup?
No. The classic sugar corkscrew can be made with just sugar. Corn syrup simply helps reduce crystallization and makes
the process a little more forgiving.
Can I make them ahead for a party?
You can, but they’re happiest when made the same day. If you must make them ahead, store airtight with a desiccant,
and don’t decorate desserts until the last minute.
Kitchen Experiences: The Real-Life Side of Making Sugar Corkscrews (Extra )
Making sugar corkscrews is one of those kitchen projects that feels like a magic trickright up until the moment
sugar reminds you it’s basically edible glass lava. Most home bakers go through a short (and very normal) emotional arc:
confidence, confusion, minor panic, then a burst of joy when the first perfect spiral slides off the handle like it was
born to be photographed.
The first thing people usually notice is how quiet caramel work is. There’s no mixer roaring, no timer beeping every 30 seconds.
It’s you, a saucepan, and a color change so subtle you’ll swear it’s not happening… until it suddenly is.
That’s why “mise en place” stops being a fancy phrase and becomes a survival strategy. When the caramel hits that sweet amber zone,
you don’t have time to hunt for parchment paper like it’s a hidden Easter egg.
Another very common experience: the “too soon” spiral. If you drizzle and wrap the sugar while it’s still super hot and watery,
it slides around like it’s auditioning for a slip-and-slide commercial. People describe it as “the caramel wouldn’t listen,”
which is fair, because caramel does not take direction. The fix is surprisingly simple: wait 30–60 seconds.
That tiny pause lets the sugar thicken into that honey-like texture that actually holds a line. Suddenly, you’re not wrestling a liquid,
you’re shaping a ribbon.
Then there’s the “one corkscrew is gorgeous, the next is chaos” phase. That’s also normal. Sugar cools, thickens, and changes behavior
from minute to minute. Many bakers end up finding a rhythm: drizzle, wrap, slide off, repeatthen briefly rewarm the pot for a few seconds
when the sugar gets stubborn. It feels a bit like working with craft glue that has opinions and deadlines.
The funniest part is how quickly sugar corkscrews upgrade your dessert credibility. Put a caramel spiral on a basic scoop of vanilla ice cream
and people act like you studied pastry in Paris. (They don’t need to know you were five seconds away from eating cereal for dinner.)
Add a few curls to a chocolate tart or a mousse cup, and suddenly it looks like a restaurant plate.
That visual “wow” is why people come back to sugar workeven after a sticky batch or two.
And finally: the humidity lesson. Almost everyone who makes sugar decorations eventually learns to respect weather like a sailor.
On a dry day, corkscrews snap cleanly and stand tall. On a humid day, they soften, sag, and behave like they’re melting emotionally.
The good news is that once you know the rule, you can plan around it: choose a dry day, store airtight, decorate at the last second.
Do that, and sugar corkscrews go from “intimidating” to “my signature move.”
If you’re new to this, give yourself permission to treat the first batch as practice. Sugar is cheap, and the learning is fast.
Even the “ugly” corkscrews still taste like carameland that means they have a guaranteed backup job:
being crushed over ice cream as “intentional caramel shards.” That’s not a mistake. That’s dessert strategy.


