
Table of Contents >> Show >> Hide
- Why a Toilet Repair Kit Is the Most Satisfying Home Fix (After a Stuck Drawer)
- Fast Diagnosis: What’s Actually Wrong With Your Toilet?
- What “Toilet Repair Kit” Really Means (Because Labels Are Vague on Purpose)
- Bob Vila’s Vetted Picks: The Best Toilet Repair Kits
- Best Overall: Korky 4010 QuietFILL Complete Toilet Repair Kit
- Best Bang for the Buck: Fluidmaster 507AK Flush Valve Repair Kit
- Best Universal All-in-One: Fluidmaster 400AKR All-in-One Toilet Tank Repair Kit
- Best Fill Valve & Flapper Combo: Fluidmaster 400CR Fill Valve and 2-Inch Flapper Kit
- Best Fill Valve Only (Water-Saving Features): Danco HC660 HydroClean Water-Saving Toilet Fill Valve
- Quick Comparison Table
- How to Choose the Right Toilet Repair Kit (Without Guessing)
- DIY Installation Overview: What You’re Actually Signing Up For
- Leak Check Tip: The Dye Test (A Classic for a Reason)
- When to Call a Plumber (No Shame, Just Wisdom)
- Bottom Line
- 500+ Words of Real-World Experience (So You Don’t Learn the Hard Way)
- Conclusion
There are two kinds of people in this world: those who have heard a toilet “mysteriously” refilling at 2 a.m., and those who are about to. If your bathroom is producing a steady hiss, a random “ghost flush,” or the sound of a tiny waterfall in the tank, congratulationsyou’ve got a classic toilet problem. The good news? Most of these issues are fixed with a few inexpensive parts, a towel you don’t mind sacrificing, and a toilet repair kit that actually fits your setup.
This guide breaks down Bob Vila’s vetted picks for the best toilet repair kits (the ones that show up again and again in DIY roundups), plus the real-world “how do I know what I need?” advice that keeps you from buying the wrong parts and rage-returning them in the parking lot.
Why a Toilet Repair Kit Is the Most Satisfying Home Fix (After a Stuck Drawer)
A running toilet can waste a surprising amount of water. Even a slow leak adds up over weeks, and a faulty fill valve can turn your tank into a constant refill machine. A repair kit typically costs less than a plumber’s service call, and the payoff is immediate: the noise stops, the toilet flushes like it’s supposed to, and your water bill stops doing its best impression of a mortgage payment.
The trick is choosing the right kit. Some kits handle one job (like replacing a flapper). Others rebuild the whole tank (fill valve, flush valve, gasket, bolts, handlethe works). Your best option depends on what’s failing and what type of toilet you have.
Fast Diagnosis: What’s Actually Wrong With Your Toilet?
Pop the tank lid and watch one flush cycle. (Set the lid somewhere safeporcelain is not known for forgiving gravity.) Most common issues live in the tank, and they tend to announce themselves in very predictable ways.
Symptom: The toilet keeps running (or “ghost flushes”)
- Most likely culprit: a worn flapper that isn’t sealing.
- Also possible: the chain is too tight/short or too loose/long, so the flapper can’t close properly.
- Or: the flush valve seat is grimy or damaged, so even a new flapper can’t seal.
Symptom: The tank refills slowly or sounds extra loud
- Most likely culprit: fill valve issues (mineral buildup, worn diaphragm, or simply old age).
- Fix: clean it (sometimes), replace it (often), or upgrade to a quieter model (your household will thank you).
Symptom: Weak flush (but the bowl isn’t clogged)
- Often: the tank water level is set too low, so you’re flushing with a sad little cup of water.
- Or: the flapper closes too fast because the chain/flapper timing is off.
- Sometimes: the flush valve assembly is worn or leaking and needs replacement.
Symptom: Water on the floor near the base
That’s usually not a tank repair kit problemit can be a wax ring or a loose mounting issue. If the leak is at the base, stop here and diagnose carefully before you buy tank parts. (You’ll still be a hero… just a different kind.)
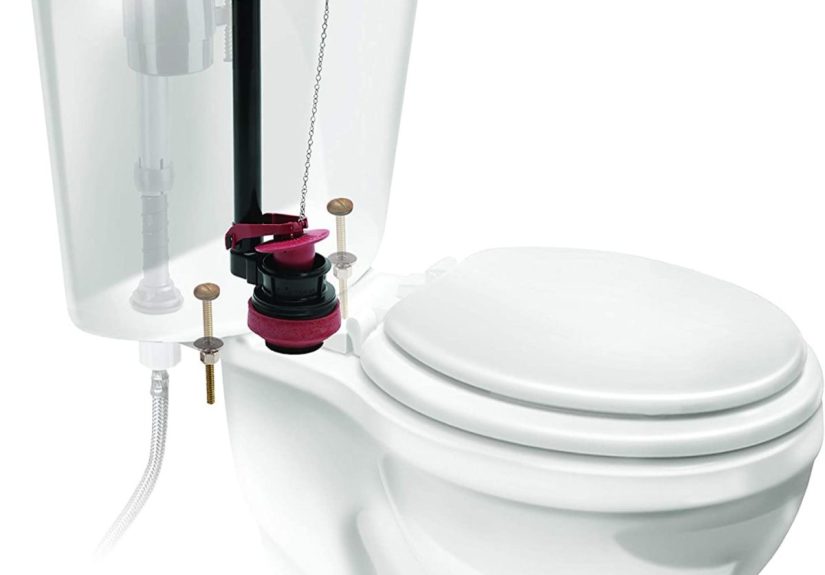
What “Toilet Repair Kit” Really Means (Because Labels Are Vague on Purpose)
Think of toilet repair kits like toolboxes: some are a single screwdriver, and some are the whole rolling chest. Here are the main types you’ll see:
- Flapper-only kits: cheapest, fastest fix for running toilets. Great for “it won’t stop refilling.”
- Fill valve kits: ideal for slow, noisy refills or inconsistent shutoff.
- Flush valve kits: for leaks at the drain opening (especially when the flapper seat is damaged).
- Fill valve + flapper combos: common “mid-size” option that solves many running/noisy problems.
- All-in-one complete rebuild kits: replaces most tank components in one shotbest when the toilet is old, multiple parts are worn, or you just want to stop thinking about it for several years.
Bob Vila’s Vetted Picks: The Best Toilet Repair Kits
The selections below align with Bob Vila’s “vetted” roundupsolid brands with broad compatibility, durable parts, and the kind of design tweaks that make DIY installation less of an emotional journey. I’ve kept the tone honest: these are strong options, but the “best” kit is always the one that fits your toilet and your specific problem.
Best Overall: Korky 4010 QuietFILL Complete Toilet Repair Kit
If you want a full tank refresh in one purchase, this is the kind of kit that makes you feel like you “rebuilt” a toiletbecause you basically did. It includes the main wear parts: fill valve, flush valve, flapper, and the hardware/seals that usually trigger the second trip to the store.
Why it stands out: Korky is known for chlorine-resistant rubber flappers and DIY-friendly adjustability. The QuietFILL valve is designed to reduce refill noise, which is a fancy way of saying it helps your toilet stop sounding like it’s practicing for a harmonica solo.
- Best for: older toilets, multiple problems at once, or “I just want it fixed for years.”
- Watch-outs: any “complete kit” can be a tighter fit in some tanks; measure and read the instructions before you start.
Best Bang for the Buck: Fluidmaster 507AK Flush Valve Repair Kit
This pick is aimed at the common scenario where the leak is happening at the flush valve opening. If your flapper looks rough and the seat area is worn or crusty, a flush valve repair kit can be a smarter move than replacing the flapper alone.
Why it stands out: you get a new flush valve assembly plus the sealing components and hardware needed for the job. It’s a practical, budget-minded fix when the toilet is losing water through the drain openingwithout rebuilding every part in the tank.
- Best for: persistent running/ghost flushing tied to the flush valve area.
- Watch-outs: replacing a flush valve often means removing the tank on a two-piece toilet (not hardjust methodical).
Best Universal All-in-One: Fluidmaster 400AKR All-in-One Toilet Tank Repair Kit
This is the “I want a reset button” option for most standard toilets with a common flush valve size. The kit is built around Fluidmaster’s widely used fill valve design, and it includes key extraslike a handleso you’re not stuck trying to reuse a lever that’s already halfway to retirement.
Why it stands out: it’s designed for broad compatibility and includes multiple parts that commonly fail together: fill valve, flapper, gasket, and hardware. Some versions add adjustability for flush performance/water usage, which can help dial in a strong flush without wasting water.
- Best for: DIYers who want an all-in-one kit from a long-established toilet-parts brand.
- Watch-outs: always confirm whether your toilet uses a 2-inch or 3-inch flush valve opening before buying.
Best Fill Valve & Flapper Combo: Fluidmaster 400CR Fill Valve and 2-Inch Flapper Kit
If your toilet is noisy, running, or slow to refill, but you don’t necessarily need to replace the flush valve assembly, this combo kit is a smart middle ground. Two of the most common failure points (fill valve + flapper) get swapped in one go.
Why it stands out: it’s a targeted fix that covers a lot of real-life problems without requiring you to remove the tank. It’s especially handy for high-use bathrooms where the flapper is wearing out faster than your patience.
- Best for: running toilets, noisy refills, and inconsistent shutoffwithout a full rebuild.
- Watch-outs: it’s designed for 2-inch flush valves; measure before you buy.
Best Fill Valve Only (Water-Saving Features): Danco HC660 HydroClean Water-Saving Toilet Fill Valve
Sometimes the flapper is fine, but the fill valve is the drama. If your toilet refills inconsistently, overfills, refills too low, or seems to need constant tweaking, a fill-valve-only upgrade can be the cleanest solution.
Why it stands out: the HC660 line is known for features aimed at reducing water loss through miscalibration and for alerting you to potential leaks. It’s also designed to help keep the tank cleaner by moving sediment along during flush cyclesuseful in areas with grittier water.
- Best for: fill-level problems, inconsistent refills, and anyone who wants an upgrade with extra monitoring features.
- Watch-outs: if the toilet is running because of a bad flapper/flush valve seat, a fill valve won’t solve that by itself.
Quick Comparison Table
| Pick | Best For | What It Replaces | DIY Difficulty |
|---|---|---|---|
| Korky 4010 QuietFILL Complete Kit | Full tank overhaul | Fill valve, flush valve, flapper, hardware | Moderate |
| Fluidmaster 507AK Flush Valve Kit | Leak at flush valve opening | Flush valve + sealing parts/hardware | Moderate (tank removal often) |
| Fluidmaster 400AKR All-in-One Kit | Broad “reset” repair | Fill valve, flapper, gasket, handle/hardware | Moderate |
| Fluidmaster 400CR Fill Valve + Flapper | Running/noisy toilets | Fill valve + flapper | Easy to moderate |
| Danco HC660 HydroClean Fill Valve | Refill level & fill-valve issues | Fill valve only | Easy to moderate |
How to Choose the Right Toilet Repair Kit (Without Guessing)
1) Confirm your flush valve size: 2-inch vs. 3-inch
Many kits are built around a 2-inch flush valve opening. Some newer toilets (and certain models/brands) use 3-inch. If you buy the wrong size, you’ll discover it at the worst momentmid-project, with the tank already drained.
Easy check: measure the flapper opening or look up your toilet model number (often inside the tank). If you’re unsure, bring the old flapper to the store for a match.
2) Decide between “targeted repair” and “complete refresh”
Use this simple rule: if your toilet has one obvious issue and the parts don’t look ancient, go targeted (flapper, fill valve, or combo kit). If the toilet is older, has mineral buildup everywhere, or multiple parts look worn, a full rebuild kit is often the most time-efficient.
3) Match your toilet type: two-piece vs. one-piece
Most universal kits are designed around common two-piece toilets. One-piece toilets can be more model-specific inside the tank. If you have a one-piece, double-check compatibility and be prepared for a more custom parts hunt.
4) Think about your water conditions
Chlorine, hard water, and sediment can shorten the life of rubber and plastic parts. Kits that emphasize chlorine-resistant flappers or easy cleaning features can be worth it if you’ve replaced parts more than once in a suspiciously short time.
DIY Installation Overview: What You’re Actually Signing Up For
Most toilet tank repairs are beginner-friendly if you go slow and follow the steps. The “secret” is preparation: clear space, grab a small bucket, keep a sponge/towel nearby, and don’t overtighten tank bolts (porcelain cracks are forever).
Replacing a flapper (often 10 minutes)
- Turn off the water at the shutoff valve behind the toilet.
- Flush to drain the tank; hold the handle down to let most water out.
- Unclip the old flapper from the overflow tube and disconnect the chain.
- Clean the seat area where the flapper seals.
- Install the new flapper and reconnect the chain with a little slack.
- Turn water back on and test flushes.
Replacing a fill valve (common DIY win)
- Shut off water and drain the tank.
- Disconnect the supply line under the tank.
- Remove the retaining nut and lift out the old fill valve.
- Install the new fill valve and adjust height per instructions.
- Reconnect the supply line and set the water level (typically about an inch below the top of the overflow tube).
Replacing a flush valve (bigger job, still doable)
This often requires removing the tank on a two-piece toilet. You’ll drain it, disconnect the supply line, remove tank bolts, lift the tank, swap the flush valve, and reassemble with new gaskets/bolts. It’s not difficultit’s just a “be patient and don’t drop porcelain” kind of project.
Leak Check Tip: The Dye Test (A Classic for a Reason)
Not sure if you’re dealing with a silent leak? Try the dye test: add a few drops of food coloring to the tank water and wait about 10 minutes. If color appears in the bowl without flushing, water is leaking past the flapper/flush valve area. Flush afterward to prevent staining.
When to Call a Plumber (No Shame, Just Wisdom)
- You see cracks in the tank or bowl.
- The shutoff valve won’t turn (forcing it can create a bigger leak).
- Bolts are heavily corroded and you’re worried about snapping them.
- Water is leaking at the base and the floor feels soft (that can become a flooring/subfloor problem).
- You’ve replaced parts twice and the toilet still runstime to look for model-specific issues or hidden damage.
Bottom Line
If you want the easiest “one-and-done” repair, a complete rebuild kit like Korky’s 4010 QuietFILL is hard to beat. If you’re targeting a specific failure, Bob Vila’s picks cover the most common repair paths: a flush valve kit for persistent drain leaks, a fill valve + flapper combo for running/noisy toilets, and a fill valve upgrade when refill calibration is the main issue.
500+ Words of Real-World Experience (So You Don’t Learn the Hard Way)
Let’s talk about the part nobody mentions in product roundups: the “experience” of actually doing the repairwhen you’re crouched next to the toilet, your phone flashlight is balanced on the sink, and you’re trying to remember whether the chain should have one link of slack or “a vibe.” I’ve seen more DIY toilet repairs go sideways from tiny, avoidable details than from any real technical difficulty.
The first classic mistake is skipping the two-minute diagnosis. A running toilet doesn’t automatically mean “replace everything.” Sometimes the flapper is fine, but the chain is tangled under it like it’s hiding from responsibility. Other times the water level is too high, so the tank is quietly spilling into the overflow tube and refilling forever. You can spot both problems in one flush cycleno wrench required. That’s why the best “repair kit experience” starts with observation: flush, watch, listen, and only then commit.
The second classic mistake is buying a kit that doesn’t match the flush valve size. If you’ve never measured the opening, you’re not alone. Many homeowners assume “universal” means “every toilet ever made.” In reality, “universal” usually means “fits most common setups,” which is a polite way of saying “please measure first.” The easiest real-life workaround is bringing the old flapper with you when you shop. Even if you buy online, having the part in hand lets you confirm size and shape before you start draining the tank.
Third: overtightening bolts. This happens when someone wants to be “extra secure,” and porcelain responds by… not being secure at all. Snug is good. Hulk-strength is not. If your kit includes new tank bolts and a gasket, treat that like a gift from the plumbing gods. Hand-tight plus a gentle wrench turn is typically enough; the gasket does most of the sealing work.
Fourth: water-level calibration is where a good repair turns into a great repair. A toilet can “work” with the tank filled too low, but you’ll get weak flushes and repeat flushing. After installing a new fill valve, take the extra minute to set the water line correctly. Your flush will improve, and you’ll stop holding the handle down like you’re sending a telegraph message.
Finally, the most underrated part of the whole experience is the post-repair test routine. Don’t just flush once and declare victory. Flush five times. Listen between flushes. Watch the flapper seal. Check the refill. Put a dry paper towel under the supply connection and around the bolts; it’ll reveal slow leaks fast. If everything stays dry and quiet, you’re doneand you’ve just joined the very exclusive club of people who can say, “Yeah, I fixed my toilet,” without calling anyone.
The best toilet repair kit, in the end, is the one that leaves you with three outcomes: no noise, no ghost flush, and no mysterious water bill. And maybe a tiny, well-deserved ego boost every time you hear… nothing.
Conclusion
Toilet repairs look intimidating until you realize most problems boil down to a few replaceable parts. Start with a quick diagnosis, match the kit to your toilet’s flush valve size, and choose the level of repair that fits the situation. Bob Vila’s vetted picks make it easier to buy with confidence: a complete kit for a full refresh, targeted kits for common failures, and a feature-rich fill valve when calibration is the real culprit. With the right kit and a little patience, you can stop the hiss, stop the leaks, and stop paying for water you never asked to flush.


