
Table of Contents >> Show >> Hide
- What “Homebrewing an Inductor” Actually Means
- Start With the Specs That Actually Matter
- Pick the Right Core (Because the Core Is the Whole Personality)
- The DIY Superpower: Using AL to Calculate Turns
- Wire Choices: Gauge, Insulation, and When Litz Actually Helps
- Winding Techniques That Keep Your Inductor from Becoming Performance Art
- Testing Your Homebrew Inductor Like You Mean It
- Design Tips for Common Homebrew Use Cases
- Common Mistakes (So You Can Skip the “Character Building” Phase)
- FAQ: Quick Answers for DIY Inductor Builders
- Experiences Related to “Tips For Homebrewing Inductors” (Real-World Lessons People Keep Sharing)
- 1) “I hit the inductance value… and the circuit still hated it.”
- 2) “My inductor value changes when I crank the load.”
- 3) “Winding a toroid is relaxing… if you enjoy pain.”
- 4) “My coil is buzzing/singing.”
- 5) “I finally got it right when I stopped trying to be perfect on the first try.”
- 6) “My ‘better’ wire made things worse.”
- 7) “Once I started measuring temperature, everything got easier.”
- 8) “My best builds happened when I wrote down what worked.”
- Conclusion
Homebrewing an inductor is one of those electronics skills that feels like wizardry the first time it works:
you wrap some wire around a core, your circuit behaves, and suddenly you’re looking at spools of magnet wire
like they’re the fresh-baked cookies of the parts world.
But inductors aren’t just “wire, but curly.” They’re also heat, magnetic fields, sneaky parasitics, and a
whole lot of “Wait… why did the value change when I measured it again?” If you’ve ever had a DIY coil
that buzzed, got spicy-hot, or mysteriously stopped acting inductive at higher frequencies, welcomeyou’ve
already started learning the real lesson: inductance is a system, not a number.
This guide breaks down how to choose a core, estimate turns, wind neatly, and test like a grown-upwithout
turning your bench into a tiny, angry space heater.
What “Homebrewing an Inductor” Actually Means
Homebrewing an inductor usually falls into one of these buckets:
- Prototyping: you need “about 10 µH” today, not a week from now.
- Custom fit: you need a weird shape, lead spacing, or mounting style.
- Performance tuning: you want lower resistance, higher current, or a specific Q.
- Learning: you’re building intuition (and maybe a small collection of “learning experiences”).
The key idea: your goal isn’t just hitting an inductance value at room temperature on an LCR meter. Your goal
is an inductor that behaves the way your circuit needs under real operating conditionswith DC current,
ripple, frequency, temperature, and nearby components all in play. Inductance depends on frequency, temperature,
and current, and every real inductor has parasitic resistance and capacitance that show up more as frequency rises.
Start With the Specs That Actually Matter
Before you touch a spool of wire, write down these five things. It’ll save you from winding the world’s
prettiest coil that’s also completely wrong.
1) Target inductance (L) and tolerance
Many power applications tolerate ±20% just fine. RF tuning circuits might need tighter control, but for lots
of “choke/filter/switcher” jobs, getting close and then measuring is a perfectly valid strategy.
2) DC current and the dreaded saturation
If you’re using a magnetic core (ferrite, powdered iron, etc.), high DC current can push the core toward
saturation. When that happens, inductance can drop sharply, and your circuit may suddenly behave like it
lost its inductor and gained a bad attitude.
Different manufacturers define “saturation current” differently (10–20% inductance drop is common, but not universal),
so always treat saturation current as a definition, not a law of nature.
3) RMS current and heating
Copper loss is basically I²R. That “R” is often quoted as DCR (DC resistance). Many datasheets use an
Irms rating tied to temperature rise, while Isat is tied to inductance drop from DC bias.
For DIY inductors, that translates to: if your coil is getting hot, your “current rating” is imaginary.
4) Frequency range (and self-resonant frequency)
Inductors have parasitic capacitance that forms a resonant tank with the inductance. Measured inductance can
appear to change with frequency, and at the self-resonant frequency the part stops looking inductive in the
way you hoped. That’s why “inductance at 100 kHz” isn’t the same as “inductance at 10 MHz.”
5) EMI sensitivity (do you care about stray fields?)
Unshielded inductors radiate more magnetic field. Shielded inductors reduce EMI but can trade off size or
saturation performance for the same inductance value.
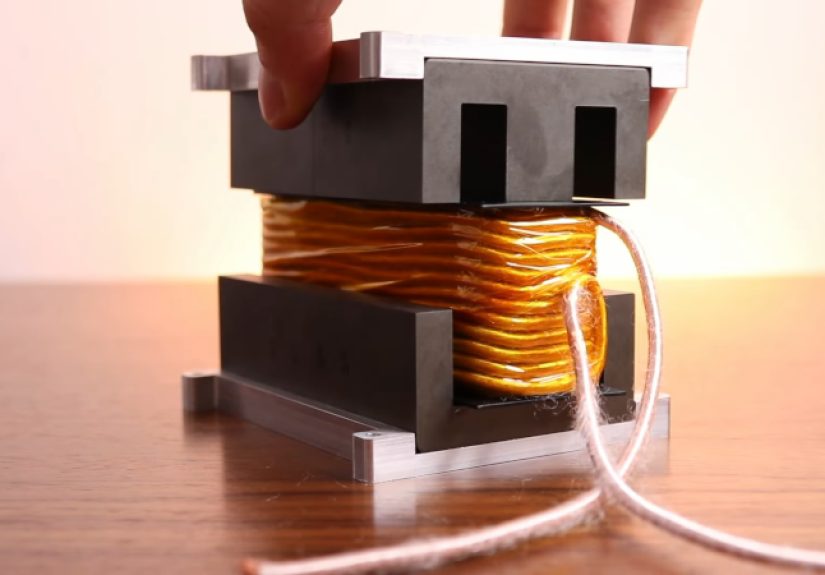
Pick the Right Core (Because the Core Is the Whole Personality)
The core choice is where DIY inductors go from “craft project” to “engineering.” Here’s a practical way to
think about common options.
| Core Type | Best For | Watch Outs |
|---|---|---|
| Air-core (no core) | RF coils, low distortion, no saturation worries | Needs more turns; higher stray fields; bigger size |
| Ferrite | High-frequency power conversion, EMI control | Sharper saturation; value varies with bias/temp |
| Powdered iron | Chokes, some RF and power inductors; “soft” saturation | Often higher core loss than ferrite at high frequency |
| Toroid form (shape) | Low stray field, tidy magnetic path, efficient use of core | Winding can be fiddly; lead dressing matters |
Ferrite vs. powdered iron in plain English
A helpful rule of thumb from power design literature: powdered iron tends to “saturate softly” but can have
higher core loss, while ferrite tends to saturate more sharply but often has lower core loss at high frequency.
Translation: ferrite is common in modern switchers, while powdered iron can be great when you want a gentler
inductance roll-off with current.
Don’t ignore core material data
Core material properties (like permeability and losses) change with frequency and temperature. Manufacturers
publish material data sheets for a reason (and not just to fill the internet with PDFs).
For example, Fair-Rite’s material sheets list initial permeability and other characteristics used in common-mode
and broadband inductor designs.
The DIY Superpower: Using AL to Calculate Turns
If you’re winding on a known core (especially toroids), the cleanest “homebrew” method is using the core’s
AL value. AL is basically “inductance per turn squared.” Micrometals, for instance, describes AL
in units of nH/N².
The two equations you’ll use constantly
- L = AL × N²
- N = √(L / AL)
Keep your units consistent. A common approach is:
L in nH and AL in nH/N².
Example: a quick 10 µH toroid
Let’s say your toroid’s datasheet shows AL = 100 nH/N².
You want 10 µH = 10,000 nH.
N = √(10,000 / 100) = √(100) = 10 turns.
Wind 10 turns, measure, and then adjust by a turn or two if your real-world value is off (tolerances and
winding style can shift results).
Pro tip: AL tolerances exist. Core manufacturers explicitly discuss tolerances and grading practices, so
treat your first wind as an estimate, not destiny.
Wire Choices: Gauge, Insulation, and When Litz Actually Helps
Pick wire gauge based on heat, not vibes
Thicker wire lowers DCR, which lowers I²R heating. That matters most for DC or low-frequency current. If your
inductor is part of a switching supply, you’ll also have AC ripple currentand that’s where things get tricky.
DC loss vs. AC loss
DC winding loss is straightforward: PDC = IDC² × DCR.
AC winding loss is messier because resistance increases with frequency due to skin effect and
proximity effect.
When to consider litz wire (and when not to bother)
Litz wire helps reduce AC losses by splitting current across many insulated strands, improving skin and
proximity effects. Some power design discussions explicitly call out litz and parallel winding methods as a
way to reduce these losses.
Practical DIY guidance:
- At low kHz: litz usually isn’t necessary unless currents are high and you’re chasing efficiency.
- At tens/hundreds of kHz: litz can help, especially with thick conductors and multiple layers.
- At “I’m doing RF now” frequencies: winding geometry and parasitics often matter as much as wire type.
Winding Techniques That Keep Your Inductor from Becoming Performance Art
Make the turns tight and consistent
Sloppy winding changes spacing, increases parasitic capacitance, and makes your measurements bounce around.
Neat, consistent turns make your inductor more predictable and easier to replicate.
Mind the layers
More layers can raise parasitic capacitance, which lowers the self-resonant frequencysometimes dramatically.
If your inductor needs to work at higher frequencies, fewer layers and cleaner geometry usually win.
Lead dressing matters more than you think
The leads are part of the inductor. Long leads add stray inductance and can create unexpected coupling into
nearby traces. Keep leads short, route them intentionally, and don’t run them right next to sensitive analog
inputs unless you enjoy mystery noise.
About gapping cores (a gentle warning)
Gapping a ferrite core is a legitimate way to store more energy and reduce saturation in power inductors.
It’s also an easy way to chip ferrite, create uneven gaps, and end up with an inductor that changes behavior
with the slightest mechanical pressure.
If you’re new: start with powdered iron toroids or known AL ferrite parts designed
for inductors, and only “DIY gap” once you’re comfortable measuring and validating the results.
Testing Your Homebrew Inductor Like You Mean It
Measuring inductance once and calling it done is like tasting soup before you add salt and declaring yourself
a chef. You want to measure in ways that match how the inductor will be used.
Use an LCR meter correctly (frequency matters)
LCR meters measure inductance at a specific test frequency and conditions. Some measurement platforms even
describe dedicated LCR measurement capability for inductance and impedance evaluation.
The point: measure at (or near) your operating frequency whenever possible.
Check DC resistance (DCR)
A quick DCR measurement tells you a lot about heat. If DCR is higher than you expected, don’t be surprised
when the inductor gets warm at currents you thought were “no big deal.”
Sanity-check self-resonant behavior
Inductance doesn’t stay “pure” forever. Inductors behave as an L with parasitic C, creating a resonance that
can make your inductor look weird in measurements and in-circuit.
If your circuit is sensitive, it’s worth checking that your inductor isn’t operating too close to its own
resonance.
Don’t ignore saturation and temperature
In commercial parts, you’ll see two different “current” ideas: one tied to inductance drop (saturation),
and one tied to temperature rise (Irms).
Your DIY inductor doesn’t come with a datasheet, so you become the datasheet:
test gradually, watch temperature rise, and avoid driving your setup into unsafe conditions.
Safety note: Do testing on low-voltage supplies when possible. If you’re working with any circuit
that connects to wall power, get experienced supervision and use proper isolation and protection. (Inductors
are fun. Emergency rooms are not.)
Design Tips for Common Homebrew Use Cases
Use Case 1: Buck converter inductor (prototype-friendly approach)
If you’re winding an inductor for a buck converter, you care about ripple current, heating, and saturation.
TI’s application guidance emphasizes that too-low saturation rating can cause failures because inductance
collapses under operating conditions, and it also highlights ripple current trade-offs.
A practical target many designers use is a ripple current ratio in a “sweet spot” (often around 0.3–0.5 of
output current) to balance size, loss, and stress on capacitors.
Homebrew strategy:
- Pick a core with a known AL value.
- Calculate turns to hit your L target.
- Wind, measure, then iterate by a turn if needed.
- Run the converter at increasing load while monitoring inductor temperature.
Use Case 2: A noise choke or “stop that whining” inductor
For filtering and noise cleanup, you may not need an ultra-precise inductance. You often want enough
inductive impedance at the noise frequencies without the part saturating under DC load. Shielded parts can
help keep EMI from spreading through your layout.
A toroid is often a friendly DIY shape here because it naturally contains the magnetic field better than an
open solenoid.
Use Case 3: RF coils (air-core is your best friend)
For RF work, air-core coils avoid magnetic-core nonlinearities and saturation concerns. The trade-off is you
need more turns (and more space), and the coil’s geometry becomes part of the “spec.” Small changes in turn
spacing can noticeably shift inductance and Q.
If you’re building filters or tuned circuits, you’ll also see lots of hobbyist designs using toroidal
inductors on powdered-iron cores for compactness and repeatability (common in amateur radio projects).
Common Mistakes (So You Can Skip the “Character Building” Phase)
- Measuring at the wrong frequency: your “10 µH” at 1 kHz may not behave the same at 200 kHz.
- Ignoring saturation: if inductance collapses under DC bias, your circuit can misbehave fast.
- Assuming one current rating: heating (Irms) and saturation (Isat) are different limits.
- Winding too messy: inconsistent spacing = inconsistent results.
- Forgetting AC loss: skin/proximity effects can raise effective resistance at frequency.
FAQ: Quick Answers for DIY Inductor Builders
Do I need a fancy LCR meter?
It helps a lot, especially if it can test at frequencies close to your real operating range. But if you’re
prototyping, even basic measurements can be usefulas long as you understand they’re not the whole story.
Why does my inductance reading change when I touch the coil?
Your hands add capacitance and change the electromagnetic environment. If that moves the reading a lot, your
coil may be operating close to resonance or be very sensitive to stray capacitance.
Is a toroid always better?
Not always. Toroids often reduce stray fields and can be compact, but winding them is more annoying, and
some designs need adjustable spacing (which is easier with air-core coils).
Can I salvage cores?
Sometimestoroids and ferrites show up in lots of electronics. If you do, be extra cautious around anything
that was connected to wall power. When in doubt, buy known cores so you have real material data and AL values.
Experiences Related to “Tips For Homebrewing Inductors” (Real-World Lessons People Keep Sharing)
The funniest part about homebrewing inductors is that everyone’s journey includes the same plot twists. Below
are common “bench experiences” makers reportbasically the greatest hits of coil winding lessons, minus the
smoke (hopefully).
1) “I hit the inductance value… and the circuit still hated it.”
This is the moment you learn that inductors have a social life: they interact with current, frequency,
temperature, and nearby parts. A coil that measures perfectly at a low test frequency can still run hot in a
switching converter because the ripple current and frequency-dependent losses are real. People often fix this
not by changing L, but by reducing DCR (thicker wire, fewer turns on a higher-AL core) or choosing a different
core material that behaves better at the switching frequency.
2) “My inductor value changes when I crank the load.”
That’s saturation peeking around the corner like a mischievous cat. Builders commonly discover that their
“works fine at light load” inductor becomes a chaos generator at higher load. The fix is usually: more core
cross-section (bigger core), more turns (higher inductance), a different material, or a design that stores
energy more gracefully (often a gapped ferrite designafter you’re ready).
3) “Winding a toroid is relaxing… if you enjoy pain.”
The first toroid wind is always slow because you’re threading wire through a donut like you’re sewing a tiny
sweater. Then you discover tricks people swear by:
pre-cut the wire length, keep the coil neat, and count turns in a way you can’t “almost remember.” A lot of
hobbyists mark every 5 turns with a tiny piece of tape or a notebook tallybecause recounting a finished
toroid is its own special mini-game.
4) “My coil is buzzing/singing.”
Mechanical vibration happens, especially in power inductors. People often report that tightening the windings,
securing them (varnish or appropriate adhesive), and avoiding loose turns reduces audible noise. Sometimes the
noise is also a clue that the inductor is being pushed too hardexcess ripple current or core stress can make
everything more dramatic.
5) “I finally got it right when I stopped trying to be perfect on the first try.”
The biggest mindset shift is treating your first wind as a prototype. Many builders find success by winding to
the calculated turns, measuring, then iterating. It’s normal to be off because AL tolerance, winding tightness,
and lead length all matter. The “prosumer” move is building a tiny personal cheat sheet: core used, AL, turns,
measured inductance at test frequency, DCR, and a note about how warm it gets at real current.
6) “My ‘better’ wire made things worse.”
People sometimes swap to much thicker wire, then discover they can’t fit the same number of turnsor they end
up with messy multilayers that increase parasitic capacitance. The lesson: thicker wire reduces DCR, but winding
geometry still matters. Sometimes two thinner parallel strands (neatly wound) outperform one thick, awkward
conductor because you keep the build tighter and more consistent.
7) “Once I started measuring temperature, everything got easier.”
A common “aha” is realizing that temperature is the simplest real-world truth-teller. If an inductor is
running hot, your design is paying a cost somewhereDCR, AC resistance, core loss, or saturation. Builders who
use an inexpensive thermometer or thermal camera (or even the conservative “careful fingertip near it” test)
tend to converge on reliable designs faster than those who only chase the inductance number.
8) “My best builds happened when I wrote down what worked.”
Inductor homebrewing rewards note-taking more than most electronics tasks. A short log turns your learning into
a repeatable processso your next build starts at “pretty good” instead of “mystery coil roulette.”


