
Table of Contents >> Show >> Hide
- Traditional Pumpkin Pie at a Glance
- Ingredients
- Canned Pumpkin vs. Fresh Pumpkin
- Step-by-Step: How to Make Traditional Pumpkin Pie
- Step 1: Preheat and Prep the Crust
- Optional but Recommended: Par-Bake (Blind Bake) for a Crisper Bottom
- Step 2: Mix the Filling (Don’t Over-Whip)
- Step 3: Fill and Bake with the Classic Two-Temperature Method
- Step 4: How to Tell When Pumpkin Pie Is Done
- Step 5: Cool Like You Mean It (This Prevents Cracks)
- Serving Suggestions
- Common Pumpkin Pie Problems (and How to Fix Them)
- Make-Ahead, Storage, and Freezing
- Traditional Pumpkin Pie Recipe (Printable-Style Instructions)
- Conclusion
- Real-Life Pumpkin Pie Chronicles (500-ish Words of Experience)
Pumpkin pie is basically America’s edible handshake with fall: warm spices, silky custard, and a flaky crust that
somehow disappears faster than your willpower at a holiday dessert table. This is a traditional pumpkin pie recipe
written for real lifemeaning it works whether you’re a seasoned baker or someone who Googles “what is a whisk” once a year.
You’ll get a classic, custardy slice (not rubbery, not runny) with balanced spice, a crisp-ish crust, and enough tips to
keep the top from cracking like a dry Thanksgiving joke. Let’s bake the pie that makes your kitchen smell like a sweater.
Traditional Pumpkin Pie at a Glance
- Makes: 1 (9-inch) pie, about 8 slices
- Prep time: 20–30 minutes (plus chilling if making crust)
- Bake time: about 55–65 minutes total
- Key idea: pumpkin pie is a custardpull it before it’s fully firm and let carryover heat finish the job
Ingredients
For the Pie Crust (choose one)
- Option A (fast + classic): 1 store-bought 9-inch unbaked pie crust (refrigerated or frozen, thawed)
- Option B (homemade): Use the simple all-butter crust below for a more “wow” flake
Simple All-Butter Homemade Crust (optional but excellent)
- 1 1/4 cups all-purpose flour
- 1/2 teaspoon fine salt
- 1 teaspoon sugar (optional, but helps browning)
- 10 tablespoons (1 1/4 sticks) cold unsalted butter, cut into chunks
- 3–5 tablespoons ice water
Quick method: Mix flour, salt, and sugar. Cut in cold butter until you have pea-to-almond-sized pieces
(bigger flakes = flakier crust). Drizzle in ice water a tablespoon at a time, tossing just until the dough holds together
when squeezed. Form into a disk, wrap, and chill at least 2 hours (or overnight). Roll into a 12-inch circle, fit into a
9-inch pie plate, and crimp.
For the Traditional Pumpkin Pie Filling
- 1 (15-ounce) can 100% pure pumpkin (not pumpkin pie filling)
- 3/4 cup granulated sugar
- 1 teaspoon ground cinnamon
- 1/2 teaspoon ground ginger
- 1/4 teaspoon ground nutmeg
- 1/8 teaspoon ground cloves (or allspice)
- 1/2 teaspoon fine salt
- 2 large eggs
- 1 (12-ounce) can evaporated milk
- 1 teaspoon vanilla extract (optional, but cozy)
Why these ingredients work: The eggs set the custard, the pumpkin provides body and flavor, evaporated milk adds
creamy richness without making the filling heavy, and the spice blend tastes “classic” instead of “my mouth is a candle.”
Canned Pumpkin vs. Fresh Pumpkin
Traditional American pumpkin pie is often made with canned pumpkin because it’s consistent: stable texture,
predictable moisture, and a dependable result when you’re juggling oven space and family members asking, “Is it done yet?”
Want to go fresh? You canjust know it’s more variable (some pumpkins are watery, some are bland, some are secretly planning
to sabotage your custard). If you roast and purée fresh pumpkin, drain it if it seems wet. A thicker purée helps prevent a
soupy filling.
How to Make Quick Fresh Pumpkin Purée (optional)
- Heat oven to 400°F. Halve a small sugar pumpkin, scoop seeds.
- Roast cut-side down on a sheet pan until very tender, about 45–60 minutes.
- Cool, scoop flesh, purée until smooth, then drain in a fine-mesh strainer if watery.
- Measure 1 3/4 cups purée to replace the 15-ounce can.
Step-by-Step: How to Make Traditional Pumpkin Pie
Step 1: Preheat and Prep the Crust
Preheat oven to 425°F. Place a baking sheet on the center rack while the oven heats (this helps the bottom
crust start cooking right away).
If using a store-bought crust, fit it into the pie plate and crimp the edge. If using homemade dough, roll, fit, and crimp.
Chill the shaped crust for 10–15 minutes while you mix the fillingcold dough is less likely to shrink.
Optional but Recommended: Par-Bake (Blind Bake) for a Crisper Bottom
A common pumpkin-pie heartbreak is a soft bottom crust. The fix: partially bake the crust before adding custard.
- Line the crust with parchment or foil and fill with pie weights (or dried beans/rice).
- Bake at 425°F for 10–15 minutes, until the edges look set.
- Remove weights/liner, poke a few holes with a fork, and bake 3–5 minutes more.
If you skip par-baking, don’t worrythis recipe still works. Par-baking just upgrades the crust from “soft handshake” to “crisp high-five.”
Step 2: Mix the Filling (Don’t Over-Whip)
- In a medium bowl, whisk together sugar, cinnamon, ginger, nutmeg, cloves, and salt.
- Add eggs and whisk just until blended.
- Whisk in pumpkin until smooth.
- Whisk in evaporated milk and vanilla until fully combined.
Tip: Whisking is good. Aggressively beating until it’s frothy is not. Too many air bubbles can contribute to
cracking and a less silky texture. Aim for smooth and calmlike a person who finished holiday shopping in October.
Step 3: Fill and Bake with the Classic Two-Temperature Method
- Pour filling into the prepared crust.
- Bake at 425°F for 15 minutes.
- Without opening the oven too much, reduce heat to 350°F.
- Bake 35–50 minutes, depending on your pie plate and whether you par-baked.
Crust-edge insurance: If the rim browns too quickly, cover the edge with a pie shield or strips of foil for the final 20–30 minutes.
Step 4: How to Tell When Pumpkin Pie Is Done
Pumpkin pie should look set around the edges with a small wobble in the center. Not liquid. Not stiff as drywall.
Think: “jiggle like gelatin,” not “slosh like soup.”
- Jiggle test: A 2–3 inch circle in the middle should quiver when you gently nudge the pie.
- Knife test (gentle version): Insert a thin knife about 1 inch from the edge; it should come out mostly clean.
- Thermometer test (most reliable): The center is typically done around 175–180°F.
Important custard truth: The pie continues to cook from residual heat after you remove it. If you bake until the center is fully firm in the oven,
you’re basically scheduling a crack.
Step 5: Cool Like You Mean It (This Prevents Cracks)
Rapid cooling can cause custard pies to contract and crack. For a smoother top:
- Turn off the oven.
- Crack the oven door (a wooden spoon works as a door prop).
- Let the pie sit inside for 20–30 minutes.
- Move to a rack and cool to room temperature.
Once cooled, refrigerate if you’re not serving soon (custard pies are perishable). For best slices, chill at least 4 hours.
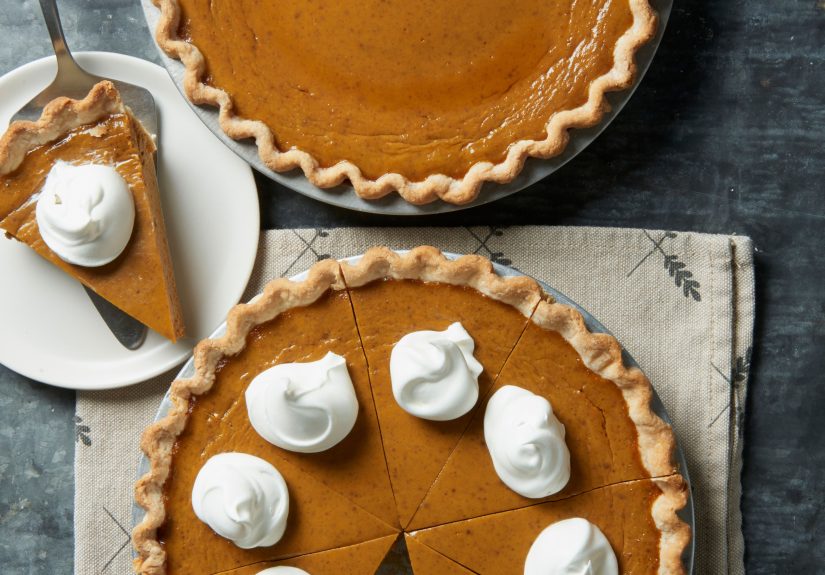
Serving Suggestions
- Classic: whipped cream and a dusting of cinnamon
- Crunchy: toasted pecans or candied pepitas
- Grown-up: a tiny pinch of flaky sea salt on each slice (it makes the pumpkin taste louderin a good way)
Common Pumpkin Pie Problems (and How to Fix Them)
1) “My pie cracked!”
Usually: overbaking or rapid cooling. Next time, pull it earlier (use the temperature/jiggle test) and cool gradually.
This time? Cover with whipped cream and call it “rustic.” Everyone will believe you.
2) “My crust is soggy.”
Par-bake the crust next time. Also bake the pie on a preheated sheet pan to help the bottom set sooner.
3) “My filling is watery.”
Make sure you used pure pumpkin (not pie mix). If using fresh purée, drain it. Also, measure ingredients accuratelyextra liquid throws off custard set.
4) “It tastes bland.”
Add a pinch more salt (seriously) and consider bumping cinnamon by 1/4 teaspoon. Pumpkin is subtle; salt and spice help it show up to the party.
Make-Ahead, Storage, and Freezing
Make-Ahead
- Dough: make up to 2–3 days ahead (or freeze longer), then thaw overnight in the fridge.
- Baked pie: pumpkin pie is often best the next day after chillingclean slices, set custard, and calmer holiday energy.
Storage
Cool at room temperature, then refrigerate within about 2 hours. Keep covered in the fridge and enjoy within 3–4 days for best flavor and texture.
Freezing
You can freeze pumpkin pie, but the texture may soften slightly. Freeze slices or the whole pie (well wrapped). Thaw overnight in the fridge.
For best results, add whipped cream after thawing.
Traditional Pumpkin Pie Recipe (Printable-Style Instructions)
Ingredients
- 1 (9-inch) unbaked pie crust (store-bought or homemade)
- 1 (15-ounce) can pure pumpkin
- 3/4 cup sugar
- 1 tsp cinnamon
- 1/2 tsp ginger
- 1/4 tsp nutmeg
- 1/8 tsp cloves (or allspice)
- 1/2 tsp salt
- 2 large eggs
- 1 (12-ounce) can evaporated milk
- 1 tsp vanilla (optional)
Directions
- Preheat oven to 425°F. Place a baking sheet on the center rack.
- Fit crust into pie plate and crimp. Optional: par-bake crust 10–15 minutes with weights, then 3–5 minutes without.
- Whisk sugar, spices, and salt. Whisk in eggs, then pumpkin, then evaporated milk (and vanilla).
- Pour filling into crust. Bake at 425°F for 15 minutes.
- Reduce to 350°F and bake 35–50 minutes, until edges are set and center slightly jiggles (or center reads 175–180°F).
- Turn off oven, crack door, cool pie inside 20–30 minutes. Cool fully on a rack, then chill 4+ hours before slicing.
Conclusion
A great traditional pumpkin pie recipe isn’t about complicated tricksit’s about a few smart moves:
balanced spices, gentle mixing, the classic high-then-lower bake, and pulling the pie while the center still has a confident little wobble.
Do that, and you’ll get a creamy custard slice that tastes like fall showed up on time and brought snacks.
Real-Life Pumpkin Pie Chronicles (500-ish Words of Experience)
The first time many people make pumpkin pie, it’s not because they woke up inspired by artisanal custard theory. It’s because
someone says, “Can you bring dessert?” and suddenly you’re in the baking aisle staring at evaporated milk like it’s a pop quiz.
Pumpkin pie has this funny way of turning regular humans into temporary food historians: you start thinking about who first decided
pumpkin + cinnamon + pastry was a good idea (spoiler: they were right), and why the smell alone can trigger a full-body memory of
family gatherings, football in the background, and at least one relative giving unsolicited life advice.
In real kitchens, pumpkin pie is rarely a calm, silent project. Ovens are crowded, counters are messy, and somebody is always opening
the oven door “just to check.” (If that somebody is you, no judgmentjust know the pie will set faster if it isn’t being interrogated
every six minutes.) The best pumpkin pies usually happen when you treat the filling like what it is: custard. Gentle mixing, steady heat,
and patience. It’s not a casserole. It doesn’t need emotional support via aggressive whisking.
Then there’s the “crack drama.” Nearly every household has lived through the moment the pie cools and the top splits. The first reaction
is heartbreak. The second reaction is bargaining (“Maybe it’ll close back up?”). The final reaction, ideally, is acceptancebecause whipped
cream exists. In fact, pumpkin pie might be the most forgiving dessert in America: it can look imperfect and still taste perfect. If anything,
the crack becomes a reminder that homemade desserts are allowed to look homemade. They’re not auditioning for a magazine cover; they’re here
to make people happy.
Pumpkin pie also teaches timing. Bake it too long and it gets grainy or cracks; bake it too short and it slices like pudding.
Eventually you learn to trust the center jigglea small, brave wobble that says, “I’ll finish setting, don’t worry.” That’s a surprisingly
useful life lesson, honestly. Not everything has to be locked and rigid before you take it out of the oven. Sometimes “almost done” is exactly right.
And when you finally nail itclean slices, creamy texture, crust that actually crunchesyou start noticing the little rituals that come with it.
The person who always takes the first slice “to test it.” The person who insists pumpkin pie is better for breakfast (they’re not wrong).
The way the spices linger in the kitchen long after the last plate is cleared. Pumpkin pie isn’t just dessert; it’s a seasonal signal flare.
It says: slow down, share food, and save room for something sweet.


