
Table of Contents >> Show >> Hide
- Why DIY Hanging Shelves Are Worth the Effort
- Plan Before You Build
- Materials and Tools You Will Need
- How to Create Beautiful DIY Hanging Shelves from Scratch
- How to Make DIY Hanging Shelves Look Beautiful
- Common Mistakes to Avoid
- Best Places to Use DIY Hanging Shelves
- Real DIY Experiences and Lessons Learned
- Final Thoughts
Blank walls are a little like awkward party guests. They stand there quietly, contribute nothing, and make the room feel unfinished. That is exactly why DIY hanging shelves are such a smart project. They add storage, style, texture, and personality without gobbling up floor space. Better yet, they look far more expensive than they really are, which is one of the greatest joys in home improvement. Right up there with finding a matching screw on the first try.
If you want a project that is practical, beginner-friendly, and attractive enough to earn compliments from people who usually only notice your snacks, hanging shelves are a fantastic choice. Whether you love a modern minimalist look, warm rustic wood, a soft coastal vibe, or a clean Scandinavian style, you can build shelves that fit your space instead of settling for whatever the store decided was “neutral.”
This guide walks you through how to create beautiful DIY hanging shelves from scratch, from planning and material selection to finishing, styling, and real-world lessons learned along the way. The focus here is on rope-hung wooden shelves because they are simple, eye-catching, and highly customizable. We will also cover safety, weight support, and the small details that separate “cute idea” from “wow, you made that?”
Why DIY Hanging Shelves Are Worth the Effort
There are plenty of reasons to build your own hanging shelves instead of buying them ready-made. The first is customization. You control the wood species, the shelf length, the color, the rope style, and the overall look. That means your shelves can actually match your room instead of looking like they were adopted from a random aisle under fluorescent lighting.
The second reason is cost. A simple set of hanging shelves often costs less to build than to buy, especially if you use basic lumber and standard hardware. The third reason is flexibility. Hanging shelves work in bathrooms, kitchens, bedrooms, entryways, home offices, and even small apartments where every inch matters.
And finally, they are just plain fun. You get to turn a few boards, some rope, and a little patience into something useful and beautiful. That is a solid weekend win.
Plan Before You Build
Decide What the Shelves Will Hold
Before you cut wood or buy rope, decide how the shelves will be used. Are they for lightweight décor like candles, plants, and framed photos? Are they for folded towels in the bathroom? Coffee mugs in the kitchen? Books in a reading nook? The answer changes everything, including your wood thickness, shelf depth, rope size, and mounting method.
For light decorative use, a two-tier or three-tier rope shelf works beautifully. For heavier items, you need sturdier boards, stronger rope, and secure mounting into wall studs or ceiling joists. If you plan to display a small plant, great. If you plan to store your cast-iron skillet collection, you need a much more structural approach. Be honest with yourself. Shelves have feelings too.
Pick the Right Location
Choose a wall or corner that benefits from vertical storage. Good spots include above a toilet, next to a desk, beside a bed, over a console table, or in a kitchen nook. Make sure the shelves will not block doors, switches, vents, or traffic flow. Also check for nearby outlets, plumbing, or anything else hiding behind the wall that would make drilling a very memorable event for all the wrong reasons.
Choose a Shelf Size
A beginner-friendly size is around 24 inches long and 8 to 10 inches deep. That is wide enough to be useful but small enough to keep the build simple. Boards around 3/4 inch thick usually feel sturdy and substantial without being bulky. If you want a more dramatic look, go longer, but remember that wider shelves need stronger support and more careful leveling.
Materials and Tools You Will Need
Here is a practical materials list for a classic two- or three-tier DIY hanging shelf project:
- 3/4-inch wood boards, cut to your desired shelf size
- Strong rope, such as cotton, jute, or synthetic utility rope
- Eye hooks, ceiling hooks, or wall-mounted hardware rated for the load
- Sandpaper in medium and fine grits
- Wood stain or paint
- Clear protective finish
- Wood filler if needed
- Painter’s tape
- Measuring tape
- Pencil
- Level
- Stud finder
- Drill and drill bits
- Saw, if the boards are not pre-cut
- Clamps
- Clean cloths or foam brushes
If you want a polished look, consider using poplar, oak, or a clean pine board. Pine is affordable and easy to work with. Oak has beautiful grain and a more upscale appearance. Plywood can also work well if you finish the edges neatly.
How to Create Beautiful DIY Hanging Shelves from Scratch
Step 1: Measure and Mark the Boards
Lay each board on a flat surface and mark where the rope holes will go. A common layout is one hole near each corner, placed evenly from the front and side edges. Keep the hole placement consistent across all shelves so the finished piece hangs straight.
This is not the moment for “close enough.” Uneven hole placement is one of the fastest ways to end up with shelves that look slightly drunk.
Step 2: Cut the Wood
If your lumber is not already cut, trim each board to size. Use a miter saw, circular saw, or table saw, depending on your setup. For a softer, more finished look, lightly round or ease the front edges with sandpaper. Sharp edges can make a new project look unfinished, even when the rest of the shelf looks great.
Step 3: Drill the Rope Holes
Select a drill bit slightly larger than the rope diameter so the rope can slide through without an all-day wrestling match. Drill slowly and keep the bit straight. If you are working with wood that chips easily, place painter’s tape over the drill spots or drill with a scrap board underneath to reduce tear-out.
After drilling, check each hole for splinters and clean up the edges with sandpaper.
Step 4: Sand Like You Mean It
This is where beautiful shelves are made. Sand every surface thoroughly, starting with a medium grit and working up to a finer grit. Always sand with the grain, not across it. Remove all dust before staining or painting. If glue residue or rough patches stay on the wood, your finish will highlight them like a spotlight on bad decisions.
Pay attention to the edges and corners. A shelf can be structurally perfect and still look homemade in the wrong way if the sanding is rushed.
Step 5: Stain or Paint the Shelves
Now for the fun part. Choose a finish that matches your style and room. A dark walnut stain looks rich and classic. White paint feels airy and clean. Natural clear-coated wood works well in modern, minimalist, and Scandinavian-inspired spaces.
Apply stain or paint evenly and let it dry completely. If you are staining, wipe away excess product and keep the timing consistent from board to board for a uniform color. Once dry, add a clear protective coat to help the shelves resist wear, moisture, and everyday life. In bathrooms and kitchens, this protective finish matters even more.
Step 6: Cut and Prep the Rope
Cut four equal lengths of rope, leaving extra for knots and adjustments. It is much better to have too much rope than too little. Too little rope turns a stylish DIY into a creative vocabulary exercise.
If you are using synthetic rope, wrap the cut ends with tape or carefully seal them to prevent fraying. If you are using natural rope, trim stray fibers for a neater appearance.
Step 7: Assemble the Shelves
Thread the rope through each hole and tie knots underneath the bottom of the first shelf. Repeat for the upper shelves, using a measuring tape to keep the spacing even. Ten to 14 inches between shelves is a good starting range for many spaces, but adjust based on what you plan to display.
As you tie each knot, check for level. This is the part that takes patience. Tiny differences in knot placement can make a noticeable difference once the shelf is hanging. Adjust as needed before moving on. A small spacer block or stack of books can help you keep shelf spacing consistent while you work.
Step 8: Mount the Hardware Securely
This step is the difference between “beautiful shelf” and “sudden floor décor.” Use a stud finder to locate solid support whenever possible. Mount wall hardware into studs or ceiling hardware into joists for the strongest hold. If you must use anchors, choose ones rated for both the shelf weight and everything you plan to place on it.
Use a level while marking hardware placement, and double-check your measurements before drilling. When hanging a pair of shelves, measure from the same reference point, not just from the ceiling, because older homes can be a little… artistically asymmetrical.
Step 9: Hang, Adjust, and Test
Once the shelves are mounted, hang the assembled unit and step back. Check for level, even spacing, and visual balance. Add weight gradually and test the shelf before styling it fully. Start with light objects first, then work up to the intended load.
If the shelf tilts, do not panic. Adjust the knots, recheck the top hardware, and test again. Most hanging shelf issues come down to tiny measurement differences, not total failure.
How to Make DIY Hanging Shelves Look Beautiful
Choose the Right Wood and Finish
Beauty starts with materials. Clean-grain boards, careful sanding, and a consistent finish instantly make a project feel elevated. If you want a refined look, use oak or poplar and a matte clear coat. If you prefer cozy farmhouse charm, go with pine and a warm stain. For a coastal or airy design, whitewashed wood and soft cotton rope look fantastic.
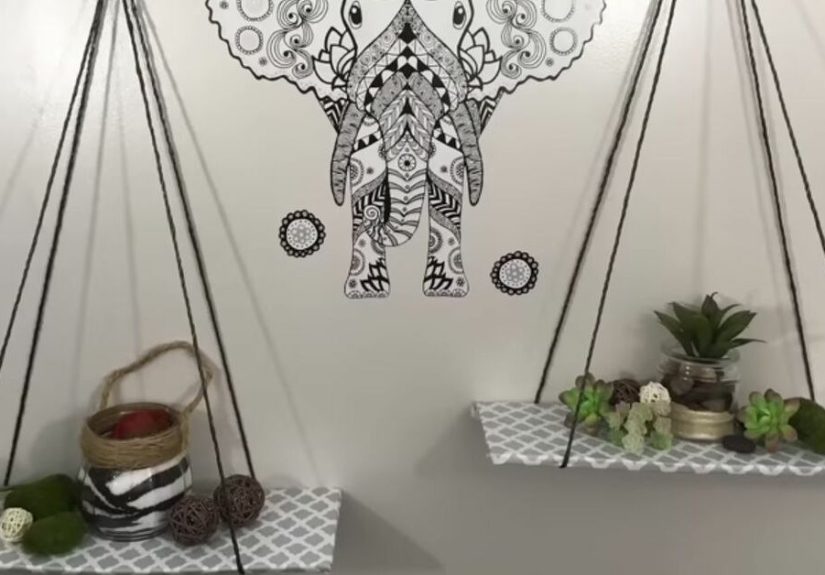
Use Rope as a Design Feature
Rope is not just structural. It is decorative. Thick cotton rope creates a softer, more modern look. Jute brings rustic texture. Black rope paired with stained wood can look surprisingly sleek and contemporary. Try to match the rope style to the room instead of treating it like an afterthought.
Style the Shelves with Restraint
The fastest way to ruin pretty shelves is to overstuff them. Leave breathing room. Mix practical items with decorative accents. Stack a couple of books, add a small plant, include a candle or ceramic piece, and vary the heights so the arrangement feels natural. Repeating one or two colors or materials also helps the shelf styling feel intentional.
Think “curated,” not “yard sale during a windstorm.”
Common Mistakes to Avoid
- Skipping wall support planning: Always know what is behind the wall before drilling.
- Using weak or overly thin rope: Decorative cord is not the same thing as structural rope.
- Forgetting the finish: Raw wood can look dusty, rough, and unfinished fast.
- Rushing the knot adjustments: Crooked shelves often come from uneven knot placement.
- Ignoring weight limits: Light display shelves and heavy storage shelves are not the same project.
- Overdecorating: A few beautiful objects look better than twenty tiny ones fighting for attention.
Best Places to Use DIY Hanging Shelves
One of the best things about hanging shelves is how adaptable they are. In the bathroom, they are perfect for towels, jars, and small plants. In the kitchen, they can hold mugs, cookbooks, tea canisters, or decorative bowls. In a bedroom, they work beautifully as a soft alternative to a bedside table, especially in a small space. In a home office, they give you vertical storage without making the room feel heavy.
You can also use them in an entryway for keys, baskets, and everyday grab-and-go items. Just remember that the prettier the shelf looks, the more likely people are to ask where you bought it. That is your cue.
Real DIY Experiences and Lessons Learned
One of the most common experiences people have when building DIY hanging shelves from scratch is realizing that the project looks deceptively simple. At first glance, it is just wood, rope, and a few hooks. How hard could it be? Then you start measuring, and suddenly you are deeply invested in whether one hole is 1-1/4 inches from the edge or 1-3/8. That is the secret life of DIY. The project is never just the project. It is also a small emotional journey.
A lot of first-time builders say the sanding stage taught them patience. The wood may look smooth after a quick pass, but once stain goes on, every rough patch, scratch, and fuzzy edge becomes obvious. Many DIYers learn right there that beautiful shelves are usually the result of slow prep, not magic stain. The people who are happiest with the final result are often the ones who spent extra time sanding, dusting, and finishing before assembly.
Another familiar experience is the knot-adjustment phase. This is usually where confidence gets tested. You tie everything carefully, hang the shelf, step back proudly, and then notice one side is lower by just enough to bother you forever. So you take it down, retie one knot, hang it again, and now a different shelf looks crooked. This is normal. Hanging shelves often require small rounds of fine-tuning, and the final polished look usually comes after a little trial and error.
There is also a practical lesson many people learn about styling. When the shelves first go up, the temptation is to fill every inch because you are excited and because empty space can feel unfinished. But once the dust settles, most builders realize the shelves look far better with fewer, better-chosen items. A small stack of books, one trailing plant, a framed print, and a ceramic vase often look more expensive and intentional than a shelf crowded with lots of little accessories.
Many DIYers also discover that the room changes more than expected. The shelves do not just add storage. They can make a blank wall feel warmer, taller, and more finished. In small rooms, this can be especially satisfying because the shelves add function without the visual bulk of a large cabinet or bookcase. That combination of usefulness and beauty is what makes the project memorable.
Perhaps the best part of the experience is the confidence that comes afterward. Once you build one set of hanging shelves, other projects start to feel less intimidating. You begin to understand measurements better, trust your eye more, and see wood, hardware, and wall space as creative tools instead of mystery objects from the hardware store. You also gain a healthy respect for levels, anchors, and the phrase “measure twice.”
In the end, creating beautiful DIY hanging shelves from scratch is rarely about perfection. It is about making something functional with your own hands, improving your space, and learning as you go. A tiny uneven spot or a knot you redid three times usually disappears into the bigger picture. What remains is a piece that feels personal, useful, and proudly handmade. And honestly, that kind of character often looks better than factory perfect.
Final Thoughts
If you have been waiting for a sign to upgrade that sad empty wall, this is it. DIY hanging shelves are one of the best beginner woodworking and home décor projects because they combine form and function in a way that feels genuinely rewarding. With the right wood, careful sanding, sturdy mounting, and thoughtful styling, you can create shelves that look custom, polished, and completely at home in your space.
Take your time with the prep, respect the support requirements, and do not rush the details. A shelf may be small, but it has a surprising amount of personality. Build it well, style it simply, and enjoy the very specific satisfaction of saying, “Thanks, I made it.”


