
Table of Contents >> Show >> Hide
- Before You Start: Get the Best Version of Your Photos (So They Print Nicely)
- Fun Way #1: Turn Your Instagram Into a Photo Book You’ll Actually Want to Keep
- Fun Way #2: Make “Real-Life Instagram” Gifts and Games
- Troubleshooting: Why Prints Sometimes Look “Off” (And How to Fix It)
- Conclusion: Make Your Photos Real (Because Swiping Isn’t the Same as Keeping)
- Experience-Based Notes (): What People Learn After Doing This Once
Instagram is basically a museum where the exhibits change every 0.7 seconds and the gift shop is… more Instagram.
Meanwhile, your best photos are living a risky life: trapped in a camera roll jungle, compressed by apps, and
occasionally sacrificed to “Storage Almost Full” pop-ups.
The good news: you can pull your photos out of the scroll and into real life in ways that feel joyful (not like a
chore you’ll “totally do this weekend” for six months straight). Below are two genuinely fun, surprisingly doable
ways to use Instagram photosplus quality tips so your prints don’t come out looking like they were faxed from 2009.
Before You Start: Get the Best Version of Your Photos (So They Print Nicely)
Instagram is designed for screens, not for 8x10s on your wall. That doesn’t mean you can’t print your IG photos
it just means you’ll get better results if you start with the highest-quality files you have.
Quick quality checklist (no photography degree required)
- Use original photos when possible. If the image started on your phone camera, grab it from your camera roll or cloud backup.
- Avoid screenshots. Screenshots usually reduce quality and add UI clutter (unless the UI clutter is the point, like a retro meme wall).
- Know your pixels. Many Instagram photos are optimized around a width of about 1080 pixels. That’s great for small prints, less great for huge posters.
- Print size math (the friendly version): for crisp small prints, aim near “photo lab standards” (often around 300 dpi). That roughly means:
- 4×6 inches ≈ 1200×1800 pixels
- 5×7 inches ≈ 1500×2100 pixels
- 8×10 inches ≈ 2400×3000 pixels
- 12×12 inches ≈ 3600×3600 pixels
- Watch the crop. Instagram commonly uses square and portrait formats; some newer posting formats reduce cropping, but your printing template may still crop.
- Respect privacy. If your photo features friends, kids, or a recognizable private moment, get a quick “cool if I print this?” before gifting or displaying.
How to pull photos off Instagram if you need to
If you don’t have the originals anymore, Instagram provides a way to request a downloadable archive of your account
information (which can include photos and videos you’ve shared). It’s not always instant, but it’s a reliable
backup option when your camera roll has… moved on without you.
Fun Way #1: Turn Your Instagram Into a Photo Book You’ll Actually Want to Keep
A photo book is the rare kind of “content” that doesn’t need Wi-Fi, doesn’t get demoted by an algorithm, and won’t
vanish because a platform changed its layout. Also: it’s incredibly satisfying to hand someone a real book and watch
them flip through it like it’s a magazine starring your life.
Step 1: Pick a theme (your book needs a plot)
The easiest way to finish a photo book is to narrow the story. “My Entire Year” sounds noble… until you realize your
year includes 43 pictures of coffee, 19 sunsets, and that one oddly emotional sandwich.
Try a theme like:
- One trip, start to finish: 1–2 pages per day, captions like a travel diary
- A “Best Of” season: Summer weekends, fall hikes, holiday chaos
- A project timeline: home remodel, garden glow-up, fitness journey, new puppy’s “before manners” era
- Family milestones: baby’s first year, grandparents’ anniversary, “we survived moving”
Step 2: Curate like an editor, not a hoarder
Photo books are better when you don’t include everything. Think: highlight reel with enough context to feel like a
story. A simple starting target:
- Mini book: 30–60 photos
- Standard book: 60–120 photos
- Big coffee-table book: 120–200 photos (only if you enjoy decision-making marathons)
Pro tip: duplicates are sneaky. Keep the one where everyone’s eyes are open, the lighting is kind, and nobody looks
like they just heard a ghost story in the bread aisle.
Step 3: Design with “breathing room”
The temptation is to cram 9 photos per page because you love your memories. Resist. White space makes photos look
intentional, and intentional is a fancy word for “I totally meant to do this.”
- Use full-page spreads for your top 10 moments
- Mix close-ups and wide shots for variety
- Keep a consistent look: same borders, similar color vibe, repeatable layout patterns
Step 4: Choose a printing service based on what you care about
In the U.S., you’ll find plenty of reputable options. Your best choice depends on whether you want premium materials,
fast-and-easy creation, or deep customization.
- Fast and friendly: Great for first-timers who want templates and a smooth process.
- Premium keepsake: Better paper, elevated covers, and “this belongs on a coffee table” vibes.
- Pro-quality labs: Strong image reproduction and sturdier buildsoften a bit more expensive.
- Budget/value: Solid quality for the price, especially with seasonal discounts.
One important heads-up: some services used to import Instagram photos automatically through third-party connections.
Due to platform API changes, that “auto-pull from Instagram” workflow may no longer work the way it used toso plan
to upload photos from your phone, computer, or cloud library instead.
Step 5: Add captions that make the book feel alive
Your captions don’t need to be poetic. They just need to anchor the memory. A few styles that work:
- Micro-story: “We got lost. Found tacos. Would get lost again.”
- Timestamp: “October 2025 first cold night, last warm dessert.”
- People-forward: “Dad pretending he’s not proud of his grill setup.”
- Place-forward: “Outer Banks: wind, sand, and the best fries of the trip.”
Step 6: Do a quick “print reality” check before ordering
Screens are bright. Prints are honest. If your book builder offers previews, use them and check:
- Faces aren’t accidentally cropped (goodbye, foreheadhello, regret)
- Dark photos aren’t too moody to see
- Text is readable and spelled correctly (future-you will notice)
- Key photos aren’t stretched or blurry
When it arrives, you’ll have something Instagram can’t offer: permanence. Also, your phone will stop guilt-tripping
you about storage. That alone is worth a slow clap.
Fun Way #2: Make “Real-Life Instagram” Gifts and Games
Instagram photos are already curated momentsso they’re perfect raw material for personalized gifts and playful
at-home experiences. This second idea is less “make a book” and more “turn your photos into something people can
touch, use, and laugh over.”
Option A: A custom photo calendar that doesn’t feel like a dentist promo
Photo calendars are underrated because most people only see the generic ones. Your version can be genuinely fun:
seasonal photos, tiny captions, and little “memory markers” (like the date of your best road trip meal).
- Pick 12 photos that match the months (snowy January, beach July, cozy November).
- Add one “inside joke” line per month. Keep it short.
- Highlight real dates: birthdays, anniversaries, big tripsstuff you actually want to remember.
- Gift upgrade: add a matching set of prints or postcards from the same photo set.
If you store your images in a photo library (like a cloud photo service), many offer built-in printing workflows.
That can be faster than hunting through your phone, especially if your “Favorites” album is already curated.
Option B: “Instagram Bingo” or a photo memory game for parties
This is the sleeper hit for birthdays, reunions, and holiday gatheringsespecially if you’re tired of the same
small talk loop where everyone says, “We should do this more often,” and then vanishes until next year.
Instagram Bingo (easy, hilarious)
- Print 25 small photos (2×2 or 3×3 squares work great).
- Make bingo cards by mixing photos into different 5×5 grids.
- Call prompts instead of numbers: “Someone’s first concert,” “That meal we still talk about,” “The worst haircut era.”
- Players mark the matching photo on their card. Winner gets a prize (or bragging rights, the true currency).
Photo Memory Match (kid-friendly, surprisingly competitive)
- Choose 12–24 photos and print two copies of each.
- Mount them on cardstock (or use thicker prints).
- Shuffle and place face down; match pairs to win.
- Pro move: group by themepets, travel, family faces, “food that deserved better lighting.”
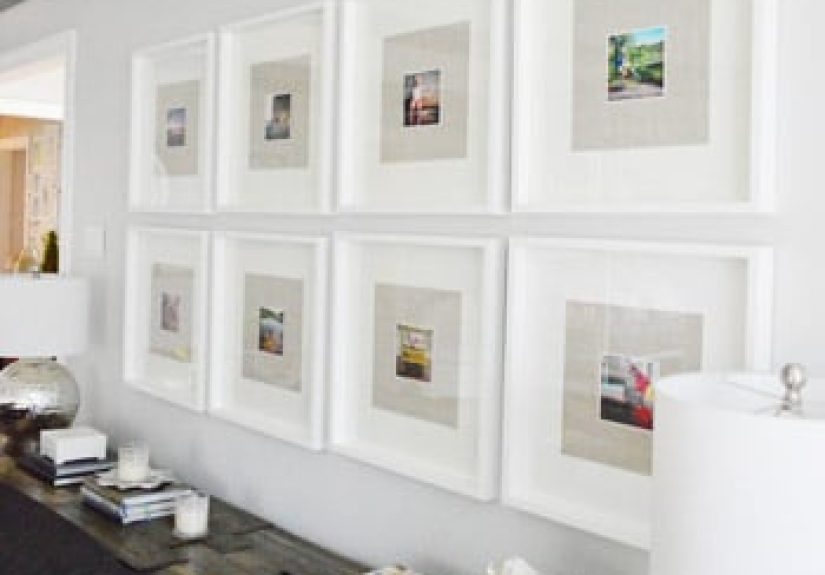
Option C: A mini gallery wall (or desk display) using your “best squares”
Instagram’s square format practically begs to become a wall grid. You don’t need a massive renovationjust a small
corner that turns into your “highlight reel” without needing a phone.
- Pick a color story: warm tones, beach blues, black-and-white, or “accidentally all green.”
- Use consistent sizes: 4×4, 4×6, or square tiles for a clean look.
- Mix in text cards: a date, a quote, a location, or a one-line memory.
- Frame optional: frames look polished; clip grids look playful; mini easels look charming on shelves.
Permission, privacy, and “don’t be weird” rules (worth reading)
- Ask before gifting photos with someone else’s face. Most people will say yesand appreciate being asked.
- Be careful with kids’ photos. Keep them for close family, and avoid public display if parents prefer privacy.
- Don’t print what you don’t own. If it’s someone else’s art, a meme with copyrighted imagery, or a screenshot of paid content, skip it.
- Watch location clues. If a photo reveals an address, school, or routine, consider cropping or choosing a different image.
Troubleshooting: Why Prints Sometimes Look “Off” (And How to Fix It)
Problem: The print looks blurry
- Use a higher-resolution original file if available.
- Print smaller sizes when working with screen-optimized images.
- Avoid heavy filters that crush detail (some look great on a phone, less great on paper).
Problem: The print is darker than your screen
- Brighten the image slightly before printing.
- Choose a paper finish that fits the photo (some finishes mute contrast).
- Preview with “print” settings if your builder offers them.
Problem: Important stuff gets cropped
- Reposition images inside the template (especially portraits).
- Leave extra space around faces when selecting photos.
- Stick with consistent aspect ratios inside one project to reduce surprises.
Conclusion: Make Your Photos Real (Because Swiping Isn’t the Same as Keeping)
Instagram is great for sharing, but it’s not built for savoring. If you want your photos to feel like part of your
lifenot just part of your feedtry one of these two moves:
- Make a photo book that tells a story you’ll love revisiting.
- Create real-life gifts and games that turn memories into something your people can hold, use, and enjoy.
Start small. Pick a theme. Print the highlights. And enjoy the rare flex of having “content” that doesn’t need an
update, a password reset, or an algorithm’s permission to exist.
Experience-Based Notes (): What People Learn After Doing This Once
After someone makes their first Instagram photo book or printed project, a few patterns tend to show upregardless of
whether they’re a meticulous planner or a “wing it and hope” creative type. Here are the most common learnings people
share after the fact, so you can skip a few headaches and get to the fun part faster.
1) The hardest part isn’t printingit’s choosing
People usually assume the “work” is the design tool. In reality, the biggest time sink is picking photos. The moment
you start selecting, you realize you have five versions of the same sunset and exactly one decent photo of the person
who actually came on the trip. A practical fix: create a short list of “must include” shots first (top 10–20), then
fill gaps with supporting photos. This keeps the project moving and prevents perfectionism from eating your weekend.
2) Captions matter more than you expect
Many people skip captions because they feel like homework. Then the book arrives, and suddenly you can’t remember
whether “that amazing noodle place” was in Seattle or San Diego (both start with “S,” and your memory is not a search
engine). Even one linedate, place, or a tiny storyturns a pretty book into a meaningful one. The best captions
aren’t formal; they’re human. Think: “We missed the exit and found the best bakery by accident.”
3) Print projects reveal which photos are truly strong
On a phone screen, almost any photo can look good. In print, the winners become obvious: sharp focus, good light, and
simple composition shine. People often discover that their favorite “viral” posts aren’t necessarily their best
imagesbecause the post did well for timing or humor, not image quality. This isn’t a problem; it’s a helpful filter.
If a photo doesn’t hold up in print, it can still live happily online while your printed pieces feature the strongest
visuals.
4) The most-loved gifts are specific, not expensive
When people gift printed photos, the biggest reactions usually come from thoughtful specificity: a calendar filled
with family moments for a grandparent, a mini book of a child’s year for a co-parent, or a tiny set of prints from a
best-friends trip. Cost matters less than relevance. A simple “theme” (pets, grandkids, travel, celebrations) makes
the gift feel intentional. And yesadding one funny outtake photo often gets more laughs than the perfectly posed one.
5) Games and small displays create conversation without forcing it
People who try photo bingo or a memory-match game are often surprised by how it changes a gathering. Instead of
everyone defaulting to the same questions, the photos naturally prompt stories: “Oh my gosh, I forgot about that day,”
or “Waitwho took this picture?” Even a small desk display or a mini gallery wall can do the same thing in daily
life. It’s like your own highlight reel, but calmerno comments section required.


