
Table of Contents >> Show >> Hide
- First, a reality check: Arduino isn’t “encrypted” by default
- What “undoing encryption” with a scope usually means
- Why Arduino-class devices leak more than you expect
- How an oscilloscope “sees” crypto happening
- The classic crypto mistake: secret-dependent work
- What you can safely do with this knowledge (and what you shouldn’t)
- A practical, maker-friendly “leak hunt” workflow
- How to harden Arduino crypto against oscilloscope snooping
- 1) Prefer vetted libraries with constant-time goals
- 2) Eliminate secret-dependent branching and secret-indexed lookups
- 3) Use blinding / masking where the algorithm supports it
- 4) Consider a secure element for key storage and crypto operations
- 5) Design your power delivery like you’re trying to avoid being “heard”
- 6) Build a realistic threat model (and avoid security theater)
- A quick “scope-resistant crypto” checklist for Arduino projects
- Legal and ethical note (because adulthood is basically paperwork)
- Experiences: what it feels like to “listen” to an Arduino with a scope
Encryption is supposed to be the “nobody can read this” part of your project. The cozy security blanket. The thing you add after your Arduino
is already blinking, beeping, and making you feel like a wizard.
And then someone shows up with an oscilloscope and ruins the magicbecause the secret isn’t always in the ciphertext. Sometimes it’s in the
electric personality of your microcontroller: how much current it draws, how long it takes, and what patterns it “accidentally” performs while
doing “secure” math.
This article explains how “undoing Arduino encryption with an oscilloscope” works in the real world (spoiler: it’s a side-channel problem), what you
can realistically learn from power traces, andmost importantlyhow to build Arduino crypto that’s harder to eavesdrop on. You’ll get practical,
maker-friendly guidance, with just enough paranoia to keep things fun.
First, a reality check: Arduino isn’t “encrypted” by default
Let’s clear up the headline-sized confusion: an Arduino board doesn’t ship with some universal “Arduino encryption” that you can simply “undo.”
What people usually mean is one of these:
- Your sketch implements crypto (RSA/ECC signatures, AES encryption, HMACs, etc.).
- Your device stores secrets (API keys, tokens, Wi-Fi credentials, licensing keys, pairing keys).
- Your device performs authentication (signing challenges, verifying signatures, secure boot-ish workflows).
- Your code uses a naive or leaky implementation where “secret-dependent behavior” shows up in timing or power use.
An oscilloscope doesn’t break math the way a movie hacker breaks math. It doesn’t “solve RSA.” It simply watches physical side effects and asks:
“When the chip did that operation… did it behave differently depending on the secret?”
What “undoing encryption” with a scope usually means
This idea lives in the world of side-channel attacks. Side-channels are unintended information leaks that come from how a device runs,
not from the algorithm on paper. The classic categories include:
Timing leaks
If an operation runs faster for some secret values than others, an attacker may infer bits of the secret just by measuring time. This can happen with
conditional branches, early exits, variable-time multiplication, or lookup tables that behave differently based on key-dependent memory access.
Power leaks (what the oscilloscope cares about)
Microcontrollers draw different current depending on what they’re doing: toggling many transistors, accessing memory, doing multiplication, looping
longer, branching differently, and so on. If the secret changes the work performed, the power trace can change too.
EM leaks (scope-adjacent)
Similar idea, but instead of power draw you observe electromagnetic emissions with probes. Same problem, different “ears.”
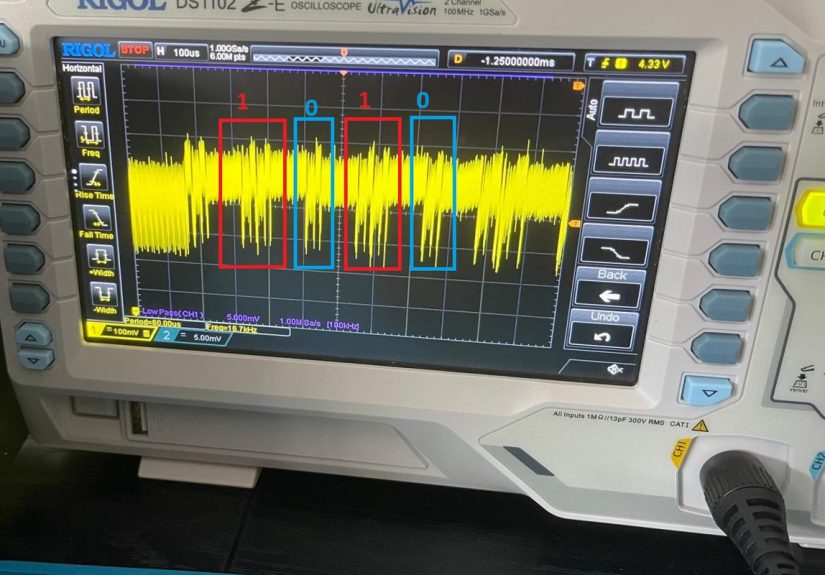
So “undo Arduino encryption with an oscilloscope” typically means: measure power consumption while crypto runs, then infer secret-dependent
behavior. In the simplest demonstrations, you can visually spot patterns (Simple Power Analysis). In more advanced setups, you do statistical
analysis across many captures.
Why Arduino-class devices leak more than you expect
Arduino boards are perfect side-channel teaching tools because they’re approachable, widely used, and often built for conveniencenot for resisting
physical attackers with lab gear.
Common reasons leakage happens:
- Naive “fast” math where the number of operations depends on secret bits.
- Branching on secrets (“if bit is 1, do extra work”).
- Variable-time big integer libraries used for RSA/ECC without constant-time protections.
- Debug-friendly design choices (serial prints during sensitive code, predictable control flow, interrupts firing mid-crypto).
- Power delivery you can “listen to” (clean rails, accessible points, minimal noise, exposed traces).
None of that means your Arduino project is doomed. It means: if your threat model includes physical access (stolen device, competitor teardown,
lab analysis), you must treat side-channels as a first-class security requirement.
How an oscilloscope “sees” crypto happening
An oscilloscope measures voltage over time. To learn about current, you convert current into a voltage you can measure. Two common approaches are:
1) Measuring current with a shunt resistor
You place a small resistor in series with the device’s power supply and measure the voltage drop across it. Because current through the resistor creates
a proportional voltage drop, changes in device current show up as changes in measured voltage.
This method is popular in demonstrations because it’s inexpensive and surprisingly effective. But it also introduces practical challenges:
you can create ground issues, add noise, or change the device behavior if the resistor causes too much voltage drop. In other words, the measurement
tool can become part of the system.
2) Measuring current with a current probe
A current probe can measure current without inserting a resistor into the circuit path in the same way. This can reduce intrusion, but probes can be
expensive and have their own bandwidth and sensitivity constraints.
Either way, you’re trying to capture the “shape” of computation. When the chip works harder or loops longer, you often see a different trace than when
it takes a shorter path. If the difference lines up with secret-dependent choices, that’s the leak.
The classic crypto mistake: secret-dependent work
A lot of “undoing encryption” demos revolve around public-key cryptography (like RSA) because the math is heavy and often implemented with
algorithms that can leak through obvious patterns if coded naively.
Here’s the general idea behind a common pitfall, explained without turning this into a “how to steal keys” manual:
Square-and-multiply style exponentiation
Many exponentiation methods process an exponent bit-by-bit. A naive approach does one operation every bit (“square”), and sometimes does a second
operation (“multiply”) when the bit is 1. That means the sequence of operationsand the time and power profilecan differ depending on the exponent’s
bits. If you can consistently observe those differences, you can learn about the secret exponent.
This isn’t a theoretical gotcha; it’s a practical engineering requirement: if secrets influence control flow, the device is basically doing interpretive
dance with the private key.
What you can safely do with this knowledge (and what you shouldn’t)
If you own the hardware and you’re testing your own design (or you have explicit permission), oscilloscopes are fantastic for answering defensive
questions like:
- Does my “secure” operation run in constant time, or does it vary with secret values?
- Can I visually distinguish code paths that should be indistinguishable?
- Do interrupts, logging, or peripheral activity accidentally create repeatable fingerprints during crypto?
- Do my mitigations (constant-time code, blinding, masking, secure elements) reduce visible leakage?
What I won’t do here is provide step-by-step instructions for extracting private keys from devices you don’t own or don’t have permission to test.
That crosses the line from education into enablement. The good news: you don’t need a key-stealing recipe to build better, more resistant Arduino
projectsyou need to understand the failure modes.
A practical, maker-friendly “leak hunt” workflow
You can think of side-channel testing as a three-part loop: make it repeatable, measure cleanly, compare runs.
Here’s a defensive workflow that stays on the right side of ethics and usefulness.
Step 1: Make the operation repeatable
Side-channel measurement loves repetition. If your crypto operation runs once every 30 seconds while also updating LEDs, reading sensors, and chatting
over serial, the trace becomes a messy mixtape. For testing, isolate the operation so you can capture it repeatedly under controlled conditions.
Step 2: Reduce “accidental noise” you control
Serial printing during sensitive code is basically yelling the timing out loud. Timer interrupts can add jitter. Peripheral activity can add signatures
unrelated to crypto. During measurement, temporarily minimize those sources so you can see what the crypto itself is doing.
Step 3: Compare two implementations
A great sanity test is to compare:
- Version A: an implementation that branches or loops based on secret-dependent values (even a toy example).
- Version B: a constant-work version that does the same amount of work regardless of secret values.
If Version A shows visibly different timing or power profiles across different secrets, and Version B doesn’t (or shows much less), you’ve learned
something extremely valuable: your system can leak even when the crypto is “correct.”
How to harden Arduino crypto against oscilloscope snooping
Mitigations fall into three buckets: software discipline, hardware assistance, and system design choices.
The best outcomes come from combining them.
1) Prefer vetted libraries with constant-time goals
“I found a fast RSA function on a forum” is not a security plan. Use libraries that explicitly address side-channel resistance (constant-time behavior,
blinding, or masking where applicable). If the library documentation never mentions timing or side-channels, treat it as “probably leaky until proven otherwise.”
2) Eliminate secret-dependent branching and secret-indexed lookups
The simplest rule that prevents a shocking number of leaks:
your secrets should not decide your code path.
That means avoiding “if (secretBit) doMoreWork()” patterns and avoiding table lookups indexed by key material when the memory system makes access
patterns observable.
3) Use blinding / masking where the algorithm supports it
For certain public-key operations, “blinding” techniques randomize intermediate computations so the same secret doesn’t produce the same physical
signature each time. For symmetric crypto, “masking” can decorrelate power use from the raw key by mixing in randomness at intermediate steps.
These techniques are nuanced and easy to get wronganother reason to rely on well-reviewed implementations.
4) Consider a secure element for key storage and crypto operations
If your Arduino project protects valuable secrets (device identity keys, signing keys, provisioning keys), moving those secrets into a dedicated secure
element can dramatically improve your situation. The microcontroller can request cryptographic operations without exposing the private key in general
RAM where it’s easier to leak, dump, or accidentally log.
Secure elements aren’t magic either, but they’re purpose-built for safer key storage and cryptographic workflows than a general-purpose MCU running
hobby-friendly code.
5) Design your power delivery like you’re trying to avoid being “heard”
Good power integrity is usually taught as a signal-quality topic, but it intersects with side-channels. Decoupling capacitors placed close to IC power
pins, short return paths, and low-impedance grounding help stabilize rails and reduce some measurement clarity (while also improving reliability).
Don’t rely on “add noise” as your only defense. Noise can be averaged out when an attacker has many measurements. But robust power design is still
part of a mature embedded security postureand it makes your device behave better in general.
6) Build a realistic threat model (and avoid security theater)
Ask practical questions:
- Can an attacker physically access the device for minutes, hours, or days?
- Is the secret a long-term private key, or a short-lived session key?
- What’s the value of the secret if extracted?
- Can we rotate keys, revoke devices, or limit impact?
If you’re protecting a garage door opener token, your measures differ from a device identity key for a paid product or a high-value IoT deployment.
Side-channel resistance is a budget decision as much as a technical one.
A quick “scope-resistant crypto” checklist for Arduino projects
- Keep private keys out of sketch code (and out of serial logsseriously).
- Use constant-time implementations for key operations whenever feasible.
- Avoid secret-dependent branching and secret-indexed table lookups.
- Minimize observable “markers” (debug prints, LED toggles, predictable delays) during sensitive operations.
- Harden the system: disable unnecessary debug interfaces, lock fuses where appropriate, and reduce attack surface.
- Consider secure elements for real secrets and real products.
- Test: don’t guess. Measure for timing and power variability under controlled conditions.
Legal and ethical note (because adulthood is basically paperwork)
Side-channel research is a legitimate security discipline when used responsibly: testing your own devices, participating in authorized audits, or doing
research with consent. Using these ideas to extract secrets from devices you don’t own or aren’t authorized to test is not okay, and can be illegal.
If you’re building security content, emphasize permission, responsible disclosure, and defensive outcomes.
Experiences: what it feels like to “listen” to an Arduino with a scope
People imagine this kind of work looking like a spy movie: you clip on a probe, squint heroically, and the private key scrolls across the screen like
it’s confessing. In practice, the first experience is usually closer to: “Why does my trace look like a nervous squirrel?”
A common early surprise is how much of your signal is not crypto. Serial output, timer interrupts, USB interface noise, even an LED
blinking on the same rail can leave fingerprints that dominate the capture. Many beginners think they’ve found a “secret pattern,” but it turns out they
discovered their own debug statements. The takeaway isn’t discouragingit’s empowering: the moment you reduce avoidable activity, you learn how
strongly “non-crypto” design choices influence what an attacker can observe.
Another recurring experience is realizing that “simple” measurement setups teach real engineering lessons. When you measure current via a small resistor,
you’ve now created a system where wiring, grounding, probe choice, and layout matter. Move one ground clip, and the waveform changes. Route a long wire,
and the trace sprouts ringing. It’s a hands-on crash course in why instrument manufacturers talk so much about common-mode noise, ground loops, and
bandwidth. Embedded security, it turns out, is partly cryptography and partly learning not to accidentally build an antenna.
People also frequently notice that the “best” looking trace isn’t always the most useful. A clean, pretty trace can be great for seeing big timing
differences, but the subtle leaks that matter in real implementations often hide inside small variations. That’s why repetition and consistency become
the workhorse skills. You start thinking less like “one perfect screenshot” and more like “many comparable captures under controlled conditions.”
This mindset shift is huge: it turns side-channel work from a magic trick into a measurement discipline.
There’s also the humbling moment where you realize that “fast” and “secure” can pull in different directions if you’re not careful. The temptation
in hobby projects is to optimize for speed with shortcuts that introduce data-dependent behaviorbranches, early exits, variable-length loops.
But when you look at it through a side-channel lens, those shortcuts become “free hints” to anyone watching. Many builders end up appreciating
constant-time design as a kind of craftsmanship: you’re writing code that behaves the same way even when the data is different, and that’s a skill
that improves your engineering beyond security.
Finally, a very common experience is discovering that the strongest practical defense is often architectural, not just “add more code.”
When people move long-term secrets into a dedicated secure element, they often feel immediate relief: the microcontroller can still do the project’s
fun parts, while the secure element handles key storage and sensitive crypto workflows. Even if you never become a side-channel expert, that design choice
reduces the chance you’ll accidentally create a leaky implementation in your sketch.
The big lesson people tend to walk away with is refreshingly simple: encryption is not only about algorithmsit’s about implementations. An Arduino can be
“correct” and still leak. But with disciplined coding, smart component choices, and a habit of measuring instead of guessing, you can build projects that
keep their secrets a lot more convincinglywithout needing a spy soundtrack or a trench coat.


