
Table of Contents >> Show >> Hide
- Why a Yarn Feather Wreath Works So Well
- Materials You Will Need
- How to Make a Yarn Feather
- How to Make the Wreath Base
- Assembling the Yarn Feather Wreath
- Best Color Ideas for a Yarn Feather Wreath
- Common Mistakes and How to Fix Them
- How to Style and Display Your Wreath
- Conclusion
- Real-Life Experiences With a Yarn Feather Tutorial + Wreath
- SEO Tags
If your craft supplies have been whispering, “Please turn us into something cute,” this is their moment. A yarn feather wreath is one of those projects that looks fancy enough to earn compliments from neighbors, friends, and that one relative who mysteriously becomes an art critic at family gatherings. But the truth is, it is surprisingly approachable. With a few skeins of yarn, a wreath base, scissors, and a little patience, you can create a soft, textured wreath that feels handmade in the best possible way.
This project blends two trends that never really go out of style: cozy yarn crafts and eye-catching wreath decor. The yarn-wrapped base gives the wreath a polished, finished look, while the feather pieces add movement, dimension, and a little boho flair. The result can lean rustic, modern, farmhouse, seasonal, or playfully colorful depending on your yarn choices and embellishments. In other words, it is the kind of craft that lets your personality show up without demanding a graduate degree in hot glue.
In this guide, you will learn how to make yarn feathers, how to build a wreath around them, what materials work best, and how to avoid the most common “why does mine look like a fuzzy carrot?” mistakes. You will also find styling ideas, troubleshooting tips, and a longer section on the real-life crafting experience at the end, so your finished article is rich, useful, and ready for the web.
Why a Yarn Feather Wreath Works So Well
A wreath made with yarn feathers checks a lot of boxes at once. It is lightweight, affordable, customizable, and easy to update for different seasons. Want a spring version? Try cream, blush, sage, and soft yellow. Want fall? Reach for rust, mustard, olive, and warm brown. Want something year-round? Neutral ivory, taupe, gray, and dusty blue will do the trick beautifully.
Yarn also brings texture that flowers alone cannot. A traditional floral wreath is lovely, but a yarn feather wreath adds softness and depth even from a distance. The feather shapes break up the circle of the wreath in a way that feels airy and layered rather than heavy. If you build your base with wrapped yarn first, the entire project looks intentional from every angle. That little detail matters more than people think.
Materials You Will Need
For the yarn feathers
- Cotton yarn, single-twist cord, or soft yarn that can be brushed out
- Sharp scissors or fabric shears
- A fine comb or pet slicker brush
- Fabric stiffener or craft stiffening medium
- Floral wire, cotton cord, or a central strand for the feather spine
- Optional felt backing for extra support
For the wreath
- Foam wreath form, wire wreath form, or embroidery hoop
- Yarn for wrapping the base
- Hot glue gun and glue sticks
- Ribbon, twine, or cord for hanging
- Optional faux greenery, wooden beads, bells, pom-poms, or felt flowers
If you want the cleanest feather fringe, cotton cord usually behaves better than slippery acrylic yarn. Acrylic still works, but it can get fuzzier and less crisp once brushed. That is not always a problem. Sometimes “slightly wild and fluffy” is exactly the mood.
How to Make a Yarn Feather
There are several ways to make a yarn feather, but the easiest web-friendly method is a brushed feather built around a center spine. It creates that soft, airy feather shape people love in wall hangings and wreath accents.
Step 1: Cut the center spine
Start with one longer piece of cord or yarn for the center spine. A piece around 10 to 14 inches is a great starting size for wreath feathers. If you want a hanging loop at the top, leave a little extra length and fold it later.
Step 2: Cut the side strands
Cut multiple shorter strands for the feather body. For medium feathers, you can make the top strands longer, the middle strands medium, and the bottom strands shorter. This natural taper helps the final trimming look more feather-like. A simple pattern is:
- Top section: 8 to 10 inch strands
- Middle section: 6 to 8 inch strands
- Bottom section: 4 to 6 inch strands
Step 3: Attach the strands to the spine
Fold one side strand in half and place it under the spine. Fold another in half and place it over the opposite side. Pull the ends through the loops to knot them together around the spine. Repeat this process down the full length of the center strand, alternating sides as you go. Push the knots upward now and then so the feather stays full instead of sparse.
This part looks a little strange halfway through, which is normal. Many good crafts go through an awkward teenage phase.
Step 4: Rough-trim the shape
Once the feather is fully assembled, trim it into a leaf or feather outline. Do not aim for perfection yet. Just create the overall silhouette. A gentle oval taper with a pointed end usually looks best.
Step 5: Brush the strands
Place the feather on a sturdy work surface and use a fine comb or slicker brush to separate the fibers. Brush outward from the center spine. This transforms the knots and strands into a soft fringe. Be patient here. The feather really comes alive during this stage.
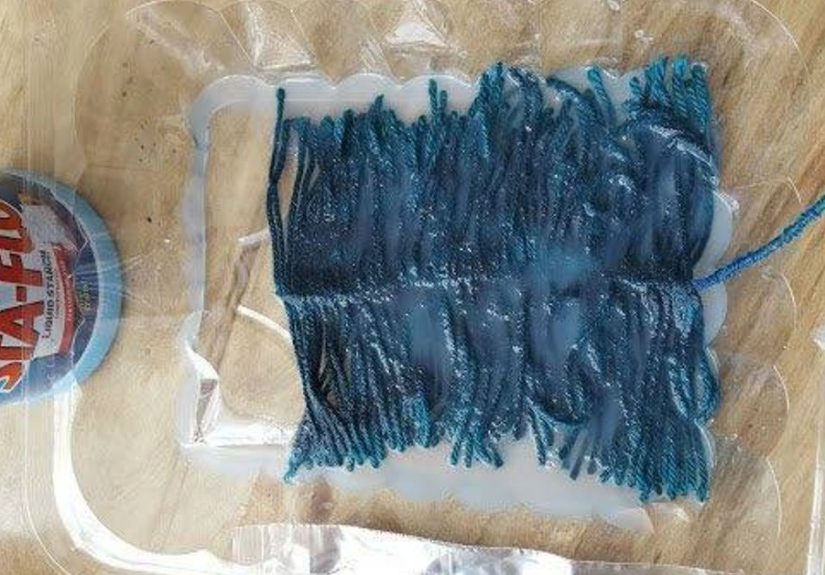
Step 6: Apply stiffener
Lightly coat the feather with fabric stiffener or another suitable craft stiffening product. Let it dry flat. If the feather still droops after drying, add another light coat. The goal is shape, not cardboard. You want “graceful feather,” not “tiny decorative roof shingle.”
Step 7: Final trim
After the stiffener dries, trim again for a cleaner outline. This final trim makes a huge difference. It sharpens the edges and gives the feather its finished, professional look. Make several feathers in different sizes for a more natural wreath design.
How to Make the Wreath Base
A good wreath base is the secret to making the project look polished instead of improvised. The easiest method is to wrap the form in yarn until the surface is fully covered.
Foam wreath form method
Tie or hot-glue the yarn to the back of the form. Wrap it tightly and closely, pushing the yarn together as you go so the base does not show through. If you switch colors, glue the end at the back, then begin the next yarn strand neatly. This method works especially well if you want a full, soft, cozy look.
Embroidery hoop method
If you prefer a lighter, more modern wreath, use a wooden or metal embroidery hoop. Wrap only a portion of the hoop in yarn, or leave some of it exposed for an airy look. Hoop wreaths are great if you want your yarn feathers to be the main event rather than background singers.
Wire wreath form method
A wire form works best if you want to attach clusters of feathers, yarn balls, or greenery with floral wire and hot glue. It has a little more structure for layered designs, especially if you like a fuller wreath with dimension.
Assembling the Yarn Feather Wreath
Step 1: Plan the layout first
Before gluing anything, arrange your feathers on the wrapped wreath base. Try placing them in one sweeping cluster on the lower left or lower right side for a modern asymmetrical design. For a fuller look, space smaller feathers around the entire wreath.
Step 2: Layer by size
Start with the largest feathers first. Then tuck medium and smaller feathers underneath and between them. This gives the arrangement depth and helps the cluster look intentional rather than randomly stuck on during a caffeine emergency.
Step 3: Glue or wire in place
Use hot glue for quick assembly, especially on foam or wrapped bases. If your feathers have a sturdy spine or felt backing, you can also secure them with floral wire for extra hold. Press and hold each piece long enough to set properly. Crafting rewards patience, even when your glue gun thinks otherwise.
Step 4: Add supporting elements
Now add embellishments if you want them. Good options include:
- Faux eucalyptus or lamb’s ear for softness
- Wooden beads for a natural look
- Felt flowers for color
- Pom-poms for a playful style
- Ribbon tails for movement
- A bow if your wreath needs a little extra drama
Step 5: Create a hanger
Attach a ribbon or loop of twine to the top back of the wreath. Make sure it feels secure before hanging. If the wreath is going on a front door, consider a wreath hanger or removable hook rather than a nail. Your door has done nothing wrong and deserves kindness.
Best Color Ideas for a Yarn Feather Wreath
Neutral boho
Use ivory, sand, taupe, and warm gray. Add wood beads and dried-look greenery for a soft, elevated wreath that works all year.
Spring fresh
Mix blush, cream, pale sage, and dusty blue. Add faux florals or light greenery for a breezy seasonal feel.
Summer bright
Go with coral, turquoise, lemon yellow, and white. This version looks especially good on a hoop base with fewer, larger feathers.
Fall cozy
Choose rust, mustard, terracotta, olive, and cream. Add small faux leaves or berry stems for extra texture.
Winter soft
Try white, silver gray, evergreen, and muted blue. A few metallic accents can make it feel festive without turning it into a glitter blizzard.
Common Mistakes and How to Fix Them
The feather looks limp
Use more stiffener and let it dry completely. A second coat can help. You can also add a felt backing to support the shape.
The fringe looks messy
Brush more thoroughly, then do a careful final trim once the stiffener dries. Sharp scissors matter here more than people expect.
The wreath base shows through
Wrap the yarn more tightly and push the strands together as you go. If needed, tuck a matching yarn strand into sparse spots and glue discreetly.
The design feels flat
Layer pieces at different angles and vary the feather sizes. Add one contrasting texture, such as greenery, felt flowers, or beads.
The whole thing feels too busy
Remove one-third of the decorations and step back again. Wreaths often improve when you edit rather than add.
How to Style and Display Your Wreath
A yarn feather wreath can live in more places than just the front door. Hang it above a mantel, in a craft room, over a bed, in an entryway, or on an interior door that needs a little personality. A smaller version also works beautifully as a nursery accent or seasonal wall hanging.
If you are displaying it outdoors, keep it in a protected area like a covered porch. Yarn and fabric stiffener are decorative materials, not fans of rainstorms, humidity tantrums, or surprise weather drama. For long-term use, store the wreath flat or hang it in a closet with a loose protective cover so the feathers do not get crushed.
Conclusion
A yarn feather wreath is the kind of project that feels satisfying from start to finish. It is creative without being chaotic, stylish without being expensive, and customizable without being complicated. You get the cozy texture of yarn, the elegance of feather shapes, and the charm of a handmade wreath all in one project. Better yet, once you make one, you will probably start mentally redesigning it in five more color palettes before the glue cools.
If you want a craft that looks thoughtful, photographs beautifully, and makes your space feel a little warmer, this is a smart choice. Start with a simple wrapped wreath base, make a handful of brushed yarn feathers, layer them with intention, and do not be afraid to trim and tweak until the shape feels right. That final round of refinement is often where the magic shows up.
Real-Life Experiences With a Yarn Feather Tutorial + Wreath
One of the most relatable things about making a yarn feather wreath is that it rarely looks impressive in the first ten minutes. At first, it is just a pile of cut strands, a wreath form, and the creeping suspicion that maybe you should have chosen a simpler hobby, like napping. Then the process begins to click. The base gets wrapped. The first feather gets brushed out. The second one looks better. By the third, you suddenly understand why people get hooked on this craft. It is tactile, calming, and oddly satisfying.
Many crafters notice that the best part of this project is the transformation stage. A yarn feather starts out looking a little plain, even clunky. But once the fibers are brushed, trimmed, and shaped, it becomes delicate and sculptural. That moment feels rewarding because it is visual proof that patience matters. The same goes for the wreath itself. A bare ring wrapped in yarn may seem underwhelming at first, but once you start layering feathers and adding supportive textures, it develops that finished, styled look people love.
Another common experience is discovering that color matters more than expected. Two people can use the exact same wreath pattern and end up with completely different moods. Neutral yarns feel soft and modern. Rich earth tones make the wreath look cozy and seasonal. Bright shades create a playful statement piece. That flexibility is part of the appeal. You are not just following a yarn feather tutorial; you are building something that can match your room, your porch, or your holiday decor without feeling generic.
This project also tends to teach useful lessons about restraint. The first instinct is often to add more: more feathers, more ribbon, more flowers, more beads, maybe one heroic pom-pom too far. Then comes the moment of stepping back and realizing the wreath looked better two embellishments ago. That is not failure. That is design. Editing is part of the craft, and a yarn feather wreath is an excellent teacher. It shows that texture can do a lot of the heavy lifting, and not every wreath needs to look like it lost a fight with the clearance aisle.
There is also something deeply practical about a project like this. Leftover yarn becomes decor. A plain wreath form turns into a custom piece. Even small scraps can become mini feathers for tags, garlands, ornaments, or gift toppers. So the experience does not end with one wreath. It usually expands. People finish the project and immediately start thinking, “I could make a smaller one for the hallway,” or “This would be cute in fall colors,” or “Why am I suddenly judging every empty wall in my house?” That is the charming side effect of a successful DIY.
In the end, making a yarn feather wreath is not just about producing something pretty. It is about enjoying a hands-on process that combines texture, color, and experimentation in a way that feels approachable. It is a craft with enough flexibility for beginners and enough room for creativity to keep experienced makers interested. And when the final wreath goes up on the wall or door, it does not just look handmade. It looks considered, personal, and a little bit magical.


