Table of Contents >> Show >> Hide
- Before You Organize: The 20-Minute Reset That Makes Everything Easier
- Quick Map
- 1) Build a “Vertical First” Wall
- 2) Install a Pegboard (or Upgrade to a Tougher Panel System)
- 3) Use Sturdy Hooks for Long-Handled Tools
- 4) Create a Rake-and-Shovel “Parking Rail”
- 5) Put Storage on the Back of the Door
- 6) Add Shelves That Match What You Store
- 7) Use Labeled, Lidded Bins (and Label the Top Too)
- 8) Make a Small “Hardware Bar” for Nails, Screws, and Bits
- 9) Add a Potting/Work Bench (Even a Fold-Down One)
- 10) Store Hoses and Cords So They Don’t Become a Knotty Soap Opera
- 11) Add a Rolling Cart for Frequently Used Items
- 12) Use Ceiling/Rafter Space for Light, Bulky Stuff
- 13) Build a “Charging Station” for Power Tools
- 14) Give Each Category a Zone (and Don’t Mix Zones)
- 15) Improve Lighting So You Can Actually Find Things
- 16) Control Moisture, Pests, and Smells
- 17) Create a 5-Minute Maintenance Routine
- Extra: Real-World “Shed Stories” and What They Teach You (About )
- Conclusion
A shed is supposed to be your backup closet for the outdoorsnot a horror movie set where rakes jump-scare your ankles.
The good news: with a few smart upgrades (most of them inexpensive), you can turn even the tiniest shed into a calm, grab-and-go
storage zone for tools, lawn gear, planters, seed packets, sports stuff, and the mysterious coil of rope you swear you’ll need “one day.”
This guide synthesizes practical advice commonly shared by U.S. home-and-garden resources and organizing pros (think outlets like
Better Homes & Gardens, This Old House, The Spruce, Family Handyman, HGTV, BobVila.com, Lowe’s, The Home Depot, Martha Stewart,
Popular Mechanics, plus university extension guidance). No fluff, no “buy a bigger shed” nonsensejust workable ideas you can mix and match.
Before You Organize: The 20-Minute Reset That Makes Everything Easier
If you skip this, your “organization project” becomes “moving clutter from left to right.” Do this quick reset first:
- Empty one wall at a time (not the whole shed unless you enjoy chaos).
- Sort into simple zones: Lawn care, hand tools, power tools, gardening, hardware, paint/chemicals, sports/outdoor gear, seasonal.
- Measure your wall space (even rough measurements help you choose hooks, shelves, and bins that actually fit).
- Decide what must stay dry and keep it off the floor (moisture happens; pretending it won’t is how rust wins).
Quick Map
Use these 17 ideas like a menu. If your shed is small, prioritize vertical storage, door storage, and
clear labeling. If your shed is larger, add a work surface and a rolling zone.
1) Build a “Vertical First” Wall
The floor is not storage. The floor is a walkway. Decide that today, and your shed gets 40% bigger (emotionally and functionally).
Pick one wall and dedicate it to hanging storage. This is your “grab zone” for the stuff you use weekly: pruners, trowels, hand saw,
gloves, edging tool, small shovel, and that one screwdriver that always disappears.
Make it work
- Hang items at eye level for speed.
- Put heavier items lower so you’re not wrestling them down like a cranky piñata.
- Group by task: “mow,” “trim,” “water,” “plant,” “repair.”
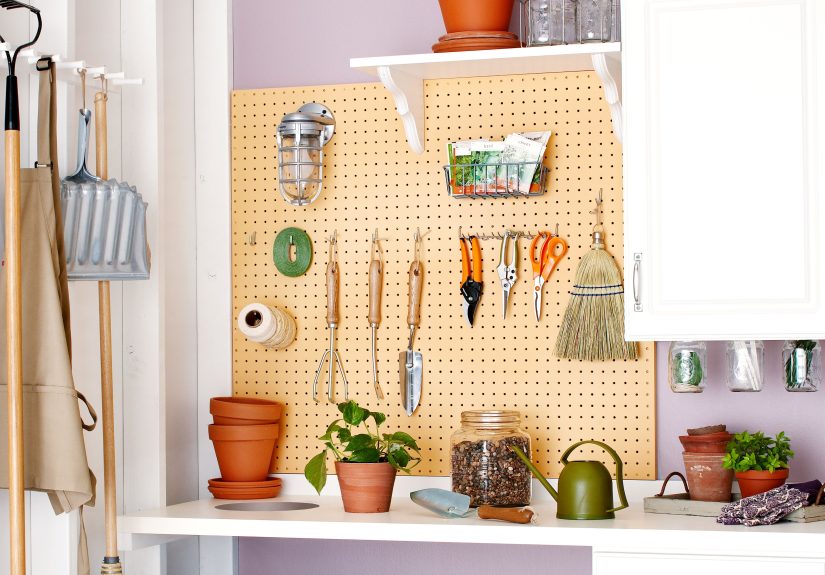
2) Install a Pegboard (or Upgrade to a Tougher Panel System)
Pegboard is classic because it’s flexible: move hooks around as your tool collection grows (because it will).
If you store heavier tools, consider sturdier wall panels or slat-style systems designed to hold more weightstill modular,
just less likely to bow when you hang the “small” sledgehammer you pretend isn’t heavy.
Pro move
Trace tool outlines or use simple labels under hooks. It feels a little “kindergarten classroom,” but you’ll never again ask,
“Where did I put the hand pruners?” while holding the hand pruners.
3) Use Sturdy Hooks for Long-Handled Tools
Rakes, shovels, brooms, weed whackerslong-handled tools eat floor space for breakfast. Heavy-duty hooks or tool hangers keep them upright,
visible, and out of the trip zone. If you can see it, you can use it. If it’s buried, it’s basically gone.
What to hang
- Rakes, shovels, brooms, cultivators
- Loppers and hedge shears
- Foldable saw horses
- Leaf blowers (check the handle balance)
4) Create a Rake-and-Shovel “Parking Rail”
A simple rail with evenly spaced slots (or a board with pegs) turns long tools into a neat lineup instead of a chaotic pile.
The key is spacing: give each tool a “parking spot” so handles don’t tangle.
Why it works
When each tool has a dedicated home, the shed stays organized without constant effort. You’re not “re-organizing”you’re just returning items.
5) Put Storage on the Back of the Door
Shed doors are underused real estate. Add a wire rack, shallow shelves, or over-the-door organizers for small, light items:
seed packets, twine, plant labels, gloves, sunscreen, bug spray, and that tiny wrench that’s somehow essential once a year.
Keep it light
Doors swing. Heavy items can stress hinges and make the door sag. Use this space for small stuff, not your entire dumbbell collection.
6) Add Shelves That Match What You Store
Shelving is your shed’s “closet system.” But shelves only help if they fit your stuff.
If you store bulky bins, use deeper shelves. If you store small containers, use narrower shelves so items don’t disappear into the back.
Shelf planning tips
- Top shelves: seasonal, rarely used supplies.
- Middle shelves: weekly and monthly items.
- Bottom shelves: heavier bins and bags (and keep them off the ground when possible).
7) Use Labeled, Lidded Bins (and Label the Top Too)
Clear bins are great for visibility, but even opaque bins work if the labeling is strong.
Label the front and the top so you can identify what’s inside when bins are stacked.
Use large lettering you can read without pulling down a whole tower like you’re playing Storage Jenga.
Label categories that actually help
- “Irrigation” (emitters, connectors, spare hose parts)
- “Garden hand tools”
- “Fasteners” (separate from “Hardware”future you will thank you)
- “Paint supplies” (brushes, rollers, traysstore paint itself appropriately for your climate)
- “Seasonal decor” (outdoor lights, stakes, inflatables, etc.)
8) Make a Small “Hardware Bar” for Nails, Screws, and Bits
Tiny items cause big messes. Create a compact hardware station using small, lidded containers or jars (mounted securely or stored in a box).
The goal: contain, separate, and label. If you mix everything into one mystery container, you’ll spend more time sorting than fixing.
Example setup
- One container for nails
- One for wood screws
- One for anchors
- One for drill bits and driver bits
- One “odds & ends” jar (because reality)
9) Add a Potting/Work Bench (Even a Fold-Down One)
A work surface changes everything. A potting bench gives you a spot for repotting plants, mixing soil, or doing quick repairs.
If your shed is small, consider a fold-down surface that tucks away when not in use.
Make it functional
- Add hooks or hanging storage nearby for hand tools.
- Keep frequently used soil tools in a small bin under the bench.
- If you pot often, keep a small brush and dustpan close by for fast cleanup.
10) Store Hoses and Cords So They Don’t Become a Knotty Soap Opera
Hoses, extension cords, and rope love turning into chaos the moment you look away.
Use dedicated hangers or reels so each item stores in a controlled loop. The goal is a smooth pull-and-return.
Simple rule
Give every cord and hose a specific hanger. If they share, they tangle. It’s science. (Okay, it’s physics and spite.)
11) Add a Rolling Cart for Frequently Used Items
Rolling storage is perfect for items you use in multiple spots: pruning kit, weeding kit, grill tools, car-wash supplies,
or planting supplies. You roll it out, do the work, roll it back. No scavenger hunt required.
Great cart categories
- “Planting day” (gloves, trowel, labels, twine, snips)
- “Lawn care” (spare string, funnel, small tools)
- “Outdoor cleanup” (trash bags, grabber, brush, rags)
12) Use Ceiling/Rafter Space for Light, Bulky Stuff
Look up. That’s storage spaceif you use it safely and keep loads light. Overhead hooks or simple racks can hold folding chairs,
pool noodles, seasonal cushions (in sealed bags), or sports gear. Keep frequently used items lower so you’re not constantly climbing.
Keep overhead storage smart
- Store light items only.
- Avoid anything you’d hate to have fall on your head.
- Leave clearance for doors and for you to move safely inside.
13) Build a “Charging Station” for Power Tools
Cordless tools are amazinguntil the chargers and batteries become a spaghetti pile.
Dedicate a small shelf area to chargers, with a power strip mounted or placed neatly so cords stay controlled.
Keep batteries in a consistent spot so you aren’t “charging one somewhere” and “storing another somewhere else.”
Bonus perk
You’ll know at a glance what’s charged and what’s not. That’s the kind of calm that deserves a trophy (or at least a cold lemonade).
14) Give Each Category a Zone (and Don’t Mix Zones)
A shed stays tidy when it’s organized by categorynot by mood. Create clear zones:
gardening on one side, lawn tools on another, hardware and repair supplies in a contained station, seasonal gear up high.
When categories mix, clutter multiplies.
Zone examples
- Garden zone: pots, soil tools, seed storage, plant ties, watering cans
- Lawn zone: mower accessories, trimmer parts, fuel container storage (safely), maintenance tools
- Repair zone: fasteners, adhesives, tape, spare parts, small hand tools
- Seasonal zone: holiday outdoor decor, tarps, storm prep supplies
15) Improve Lighting So You Can Actually Find Things
Organization isn’t just shelvesit’s visibility. If your shed is dim, you’ll create piles because you can’t see where anything goes.
Add bright, simple lighting (battery-powered options can work in a pinch), and keep a clear path so you’re not navigating by memory.
Lighting trick
Put your most-used storage where the light is best. If you can’t see it, you won’t use it (and you’ll buy a duplicate).
16) Control Moisture, Pests, and Smells
Sheds live outdoors, which means humidity, temperature swings, dust, and pests are all invited to the partywhether you RSVP’d or not.
To protect supplies, keep items off the floor, use sealed bins for soft goods, and make sure the shed stays dry, secure, and ventilated.
Safe-storage reminders (worth the 30 seconds)
- Ventilation matters if you store gasoline-powered equipment or strong-smelling fertilizers; consider dedicated, appropriate storage methods for fuels and chemicals.
- Don’t store what can’t handle heat/cold/moisture unless your shed is designed for it.
- Keep lids tight and containers labeled so kids (and adults) don’t “guess” what’s inside.
17) Create a 5-Minute Maintenance Routine
The secret to a tidy shed is not organizing harderit’s maintaining easier. Once a week (or after a big yard day), do this:
- Hang long tools back on their hooks.
- Return small tools to the pegboard or tool bin.
- Put loose parts into the hardware station.
- Do a quick floor sweep (dirt piles breed clutter piles).
- Reset one “problem spot” (the corner where stuff migrates).
Extra: Real-World “Shed Stories” and What They Teach You (About )
If you’ve ever felt like shed organization is impossible, you’re not alonereal life is messy, and sheds collect the most random mix of items:
half-used mulch bags, sports gear, pruning tools, paint rollers, outdoor string lights, spare stakes, and that one shovel that’s older than the shed itself.
The patterns below show up again and again for homeowners, and they explain why some “perfect Pinterest” systems fail while simpler setups stick.
Story #1: The Tiny Plastic Shed That Could
In small sheds, the floor becomes the enemy fast. The fix isn’t cramming in more binsit’s going vertical immediately.
Homeowners who succeed in tiny sheds usually do three things: (1) they hang long tools on a dedicated wall, (2) they use the back of the door for small items,
and (3) they store everything else in a few consistent bins on one shelf unit. The win here is reducing decision fatigue:
if there are only four bins“Garden,” “Lawn,” “Hardware,” “Seasonal”you can actually maintain it. Tiny sheds don’t need elaborate systems.
They need clear categories and no floor clutter.
Story #2: The Older Wooden Shed With “Character” (and Gaps)
Older sheds are charming until you realize “charming” includes dust, moisture, and tiny openings that pests treat like a front door.
The people who keep these sheds tidy tend to focus on protection first: lidded bins, items raised off the ground, and a simple routine to keep things dry.
Once soft goods (like gloves, kneeling pads, and seed packets) are sealed and labeled, the shed suddenly feels manageable.
The big lesson: organization isn’t only about where things goit’s about whether they stay clean enough to use.
If every garden glove is dusty or damp, you’ll stop putting them away because you’ll stop using them.
Story #3: The “Everything Shed” That Tries to Be a Workshop, Pantry, and Toy Closet
Multi-purpose sheds are common, especially for families. The biggest mistake is mixing categoriessports equipment drifts into the garden zone,
hardware ends up under camping gear, and suddenly you’re moving five things to reach one thing. The solution is zoning with visible boundaries:
one side is “workbench and tools,” one area is “garden and yard,” and a high shelf is “seasonal and rarely used.”
Rolling carts shine here because they let you create task-specific kits (like a planting cart or a cleanup cart) that return to the same parking spot.
The lesson: when a shed serves multiple people, systems have to be obvious. Labels, consistent bin types, and dedicated hooks keep everyone honest.
The takeaway
The best shed organization isn’t the fanciestit’s the one you can maintain when you’re tired, sweaty, and ready to go inside.
If your system requires 12 steps, it won’t survive summer. If it takes 30 seconds to reset, it will.
Start with one wall, one shelf, and one set of labelsand let the shed earn upgrades over time.
Conclusion
A neat shed isn’t about perfectionit’s about speed (finding things fast), safety (keeping walkways clear and storing items appropriately),
and sanity (no more avalanches of rakes). Pick 3–5 ideas from this list, set up clear zones, label your bins, and commit to the quick weekly reset.
Your future selfholding a plant in one hand and a trowel in the otherwill be ridiculously grateful.