Table of Contents >> Show >> Hide
- Why Clay Faces + Plush Bodies Work So Well
- Materials That Made My Life Easier (and a Few That Didn’t)
- My Step-by-Step Workflow for Clay Face Plushies
- 32 Clay Face Plushies: The Full Lineup
- Common Problems (and How I Fixed Them Without Crying… Much)
- Care Tips for Clay Face Plushies
- What I Learned Making 32 of These (500-ish Words of Real Talk)
- Conclusion
Somewhere between “I’ll just make one cute plush” and “why do I own three different tiny paintbrushes for eyeballs,” I ended up with
32 clay-face plushies in a row. If you’ve never tried the combo of a squishy plush body with a sculpted clay face, it’s basically
the best of both worlds: the hug of a stuffed toy and the expression control of a mini sculpture. You can go from “sweet and sleepy”
to “unbothered gremlin” with a single eyebrow.
In this post, I’m sharing the exact workflow I used, the materials that actually behaved, and a full gallery-style rundown of the
32 characters I made in the last few monthsplus the messy, funny lessons learned so you can avoid the same “why is this face peeling?”
moment I had at 11:47 PM.
Why Clay Faces + Plush Bodies Work So Well
A plush alone is adorable, but it can be hard to make the face look crisp and consistent. Clay alone is expressive, but it’s not exactly “nap friendly.”
Putting a polymer clay face (or air-dry clay face) on a plush body gives you:
- Sharper expressions: sculpted cheeks, dimples, smirks, and dramatic little noses.
- Durability where it matters: the face holds details better than embroidery alone.
- Comfort everywhere else: the body stays soft, squeezable, and forgiving.
- Design freedom: you can swap body shapes and outfits without resculpting a new head every time.
Materials That Made My Life Easier (and a Few That Didn’t)
Clay options
I used two main clay routes depending on how I wanted the plush to feel and how soon I needed it finished:
-
Polymer clay (oven-bake): Great for crisp details, smoother sanding, and faces that feel like durable plastic once cured.
Ideal when you want clean lines, sharp eyelids, and tiny mouth corners that don’t melt into a blob. -
Air-dry clay: Convenient for quick experiments and larger, simpler faces. It’s lightweight, but it can be more fragile and
may need extra sealingespecially if the plush will be handled a lot.
Fabric and stuffing
- Minky / fleece: forgiving, plush, beginner-friendly, hides minor stitching crimes.
- Felt: perfect for tiny accessories, collars, patches, and flat add-ons.
- Stuffing: standard polyfill works; firmer stuffing helps the plush hold shape behind the face.
Paint, finish, and “please don’t chip” protection
For color, I used acrylic paints (thin layers, patience, and occasional dramatic sighing). For protection, a clear finish helps reduce scuffs and
keeps paint from rubbing off on fabric. The key is choosing a finish that plays nicely with your clay and paint.
Attachment methods (aka the part that decides whether your plush survives hugs)
You have three common routes. I used all three depending on the design:
- Stitch-on face plate: drill small holes in the cured clay and stitch it to the plush like a button. Very secure and repairable.
- Adhesive bond: flexible, strong craft adhesives can work if surfaces are prepped correctly (clean, dry, sometimes lightly roughened).
- Hybrid: a small amount of adhesive to position + a few hidden stitches for long-term security.
My Step-by-Step Workflow for Clay Face Plushies
1) Design the expression before you touch the clay
I sketch faces like I’m casting a tiny sitcom. What’s their vibe? Sleepy barista? Medieval goblin accountant? If you can name the emotion,
you can sculpt it. I keep a mini “expression menu”:
- Round eyes + tiny mouth = innocent
- Half-lids + smirk = chaotic confidence
- Eyebrows angled inward = determined (or mildly offended)
- One brow up = “I have questions.”
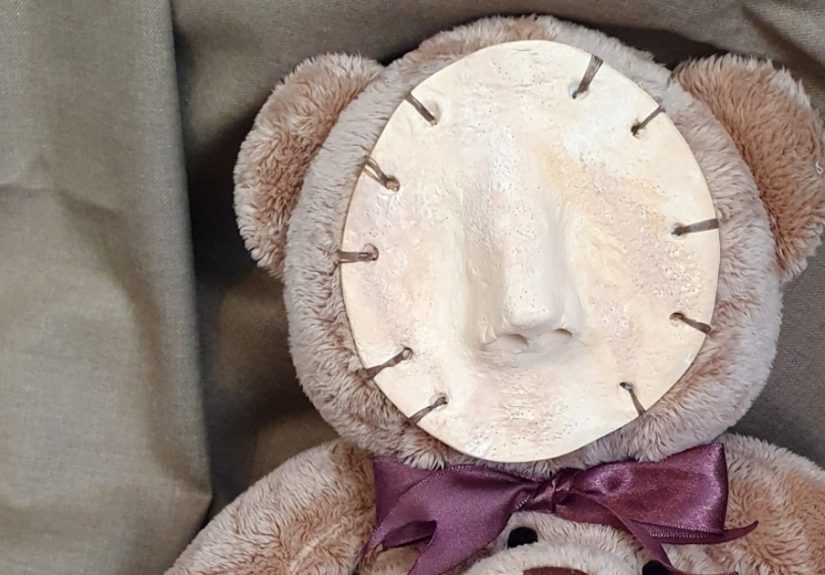
2) Sculpt the face as a “plate,” not a full head
For plushies, I prefer a slightly curved face plate rather than a full clay head. It’s lighter, sits better on fabric, and doesn’t
turn your plush into a tiny bowling ball. I build it up in layers:
- Base oval/round plate (slightly domed)
- Nose and cheeks (small additions, blended edges)
- Eye shapes and eyelids (tiny slabs, smoothed gently)
- Mouth (thin coil or carved line, depending on style)
3) Cure or dry properly (don’t speed-run this part)
If you use polymer clay, follow the package directions for temperature/time. In general, polymer clay is cured in a home oven at a low temperature,
and thickness matters. Rushing the cure is how you get brittle edges, weak seams, or a face that looks fine until it meets gravity.
4) Sand, refine, then paint in thin layers
After curing/drying, I refine the surface with light sanding (especially around cheeks and eyelids). Then I paint:
- Base coat: thin, even, no gloopy brush strokes
- Shading: dry-brush blush on cheeks, under lids, around noses
- Details: pupils, highlights, freckles, tiny lip corners
- Let it dry: seriouslywalk away and hydrate like an adult
5) Seal strategically
I seal faces after the paint fully dries. If the plush is decorative (shelf friend), a light seal is enough. If it’s a “carried everywhere like a
mascot” plush, I use a more protective finish and make sure it’s fully cured before it touches fabric.
6) Attach the face with the “belt and suspenders” mindset
My most reliable approach is: position the face, secure it, then reinforce the edges so it can handle gentle handling. If the plush is intended for kids
(especially under 3), avoid small detachable parts entirely and use embroidered features instead of anything that can pop off.
32 Clay Face Plushies: The Full Lineup
I grouped them by vibe so you can steal… I mean, borrow inspiration without scrolling into the next century.
Group 1: Mood Monsters (4)
- The Sleepy Blob: half-lidded eyes, tiny “o” mouth, and cheeks shaded like it just took the world’s smallest nap.
- Overcaffeinated Gremlin: wide eyes, uneven brows, and a grin that says “I’ve had three espressos and one bad idea.”
- Soft-Spoken Worrier: raised inner brows, tiny frown, and a body shaped like a hugging pillow for emotional support.
- Unbothered Potato: minimal features, one eyebrow slightly higher, expression set to “politely judging your life choices.”
Group 2: Snack Squad (4)
- Toast Buddy: face plate framed by a “crust” fabric edge; rosy cheeks like it’s proud of being breakfast.
- Boba Pal: big glossy eyes, tiny mouth, and felt tapioca “pearls” that look suspiciously like it’s plotting.
- Strawberry Shortcake Sprite: freckles, a whipped-cream hat, and the sweetest grin I’ve ever sculpted on 1.5 inches of clay.
- Spicy Ramen Imp: mischievous eyebrows, swirl cheeks, and a noodle scarf that took longer than the face (rude).
Group 3: Forest Friends (4)
- Mossy Frog: sleepy smile, round cheeks, and a green body with a “moss” texture I made from trimmed fleece.
- Acorn Gnome: tiny nose, blushing cheeks, and a cap that makes it look like it lives rent-free in a fairy tale.
- Shy Deer Bean: gentle eyes, soft snout shading, and little felt ears that flop like polite applause.
- Owl Librarian: serious brows, round spectacles, and a body shaped like a tiny book you can hug.
Group 4: Cosmic Critters (4)
- Galaxy Cat: star freckles, calm eyes, and a swirl-painted face that looks like it knows your search history.
- Moon Moth: sleepy lashes, silver accents, and plush wings that make it feel like a pillow from outer space.
- UFO Nugget: the tiniest grin under a clear dome detail; objectively the weirdest-cute thing I’ve ever made.
- Comet Puppy: tongue-out joy face, with a tail that looks like a little flame (but soft, because: puppy).
Group 5: Tiny Legends (4)
- Mini Knight: brave eyebrows, rosy cheeks, and a felt “helmet” that hides my seam allowances like a champion.
- Wizard Bean: wise eyes, tiny mustache, and a hat that droops dramatically like it’s always mid-monologue.
- Pirate Dumpling: one brow up, smirk engaged, and an eye patch that makes it 300% more confident.
- Dragon Pocket Friend: sleepy eyes, little snout, and tiny horns that are stitched on (because safety and sanity).
Group 6: Spooky-Cute (4)
- Ghost Marshmallow: tiny “boo” mouth and blush cheeksmore “polite greeting” than haunting.
- Bat Burrito: wrapped-wing body and a face that says “I’m nocturnal but also emotionally available.”
- Pumpkin Imp: toothy grin, arched brows, and a pumpkin body that looks like it’s ready for fall selfies.
- Skeleton Buddy: minimalist skull face with painted details; oddly comforting, like a spooky stress ball.
Group 7: Office Oddballs (4)
- Burnout Bear: tired eyes, flat mouth, and a tie that’s basically a cry for help in felt form.
- Spreadsheet Slime: cheerful grin with dead eyesan accurate depiction of quarterly reporting.
- Meeting Gremlin: raised brow, tiny coffee cup accessory, and an aura of “can this have been an email?”
- CEO Hamster: confident smile, tidy blush, and a tiny “badge” that says “Vision” (it does not have vision).
Group 8: Seasonal Specials (4)
- Snow Day Bunny: soft smile, winter blush, and little scarfcozy enough to lower your blood pressure.
- Spring Chick: bright eyes, tiny beak, and a body shaped like a peep with better intentions.
- Summer Sun Bean: squinty happy eyes, warm cheeks, and a sun-ray “mane” that took three attempts to behave.
- Cozy Cocoa Pal: sleepy smile and marshmallow headband; it looks like comfort in plush form.
Common Problems (and How I Fixed Them Without Crying… Much)
Problem: Paint scratches or looks tacky
Thin paint layers help, but the real fix is letting paint fully dry and using a compatible sealant. Also, avoid pressing the face against fabric too soon.
“Dry to the touch” is not the same thing as “ready to be aggressively hugged.”
Problem: Face plate doesn’t sit flush on the plush
If your plush body is too rounded or too soft behind the face, the edges may lift over time. I fixed this by adding firmer stuffing right behind the face
area and using a slightly more curved face plate that matches the plush’s contour.
Problem: Glue bond fails over time
Prep matters. Clean the clay surface, make sure fabric is lint-free, and consider lightly roughening the clay where the adhesive will sit (without wrecking
the painted front). When in doubt, a few hidden stitches are the best backup plan you’ll ever install.
Problem: The plush looks “cute” but not “alive”
Add one tiny asymmetry. Slightly different eye sizes, one brow raised, a micro-smirksomething that implies thought. A perfectly symmetrical face can read
as “sticker,” while a slightly imperfect face reads as “character.”
Care Tips for Clay Face Plushies
- Spot clean only: avoid soaking the face area; use a damp cloth for the plush body if needed.
- Keep away from high heat: leaving polymer clay plushies in a hot car is not a personality test you want to perform.
- Store without pressure on the face: don’t stack heavy items on them; faces can scuff over time.
- If gifting: include a small care card so your creation doesn’t get thrown in a washing machine like a brave little astronaut.
What I Learned Making 32 of These (500-ish Words of Real Talk)
The first thing I learned is that “I’ll just make a quick plush” is the craft equivalent of saying “I’ll just watch one episode.” It’s never one.
Plushies multiply. Clay faces multiply faster. And suddenly you’re hosting a tiny soft army on your desk, all staring at you like they know you still
haven’t finished folding laundry.
My earliest faces were… optimistic. I was heavy-handed with paint, impatient with drying time, and convinced that if I simply wanted the glue to
cure faster, it would. (Spoiler: adhesives do not care about your dreams.) I had a few face plates lift at the edges after a week because I didn’t prep
the surfaces well. Once I started treating attachment like engineering instead of vibescleaning, roughening where appropriate, giving full cure time,
and reinforcing with stitcheseverything got more reliable.
The second big lesson: expression is a game of millimeters. Moving a mouth line down by the width of a pencil lead can turn “sweet” into “concerned,” and
raising one eyebrow can turn “neutral” into “sarcastic coworker.” I began sculpting faces in batchesfour to eight at a timeso I could compare them side
by side while they were still workable. If one face looked slightly off, I could fix it before curing instead of trying to sand a regret into a smile.
I also learned that fabric choice affects your clay choices. Super fluffy fabrics can swallow the edges of a face plate, making the character look like it’s
peeking out of a snowbank. That can be adorableunless you wanted a crisp outline. For those cases, I added a felt “frame” or used a tighter pile fabric
around the face area. Stuffing matters too: if the face sits on a squishy marshmallow body, it can wobble and flex in a way that stresses the attachment.
Adding firmer stuffing behind the face area turned a wobbly plush into a stable, professional-feeling one.
My favorite surprise was how storytelling made everything easier. Once I started naming themBurnout Bear, Spreadsheet Slime, Bat Burritothe designs got
more confident. The face is the punchline, and the plush body is the setup. A tiny smirk becomes funnier when the plush is wearing a felt tie. A sleepy
expression becomes cuter when the body is shaped like a little pillow. Even color choices got simpler: if the character is “moon moth,” the palette basically
chooses itself.
The last lesson is the most important: consistency beats perfection. Some faces have tiny brush marks if you look closely. Some noses are
slightly asymmetrical. But as a series, they look intentionallike a style. If you’re making clay face plushies, aim for a repeatable process: the same
thickness, similar face size, consistent paint steps, and a reliable attachment method. That’s how you go from “I made a cute thing” to “I made a whole
collection,” which is how you accidentally become the kind of person who owns a dedicated “eye highlight” brush.
Conclusion
If you’re thinking about making your own clay face plushies, start with one simple character and a solid attachment method.
Keep the face plate lightweight, take your time with curing and paint layers, and treat durability like part of the design.
After that, you can let the personalities run wildbecause they absolutely will.