Table of Contents >> Show >> Hide
- Why a DIY Christmas Tree Collar Is Worth It
- 1. Flip a Large Basket into a Woven Tree Collar
- 2. Use a Galvanized Bucket for a Rustic Farmhouse Look
- 3. Make a Faux Wood Collar from a Cardboard Box
- 4. Build a Simple Scrap-Wood Box
- 5. Repurpose a Vintage Crate, Drum, or Tin
- 6. Turn a Planter or Urn into a Chic Collar
- 7. Group Picnic Baskets or Small Baskets Around the Base
- 8. Create a Whimsical Cardboard Christmas Village Collar
- How to Choose the Right DIY Christmas Tree Collar
- Styling Tips to Make Your Tree Collar Look Expensive
- Budget Mistakes to Avoid
- Final Thoughts
- Holiday Decorating Experiences: What Real-Life DIY Tree Collar Projects Usually Teach You
There is something mildly unfair about a Christmas tree stand. You spend hours fluffing branches, untangling lights like a holiday detective, and arranging ornaments with the focus of a museum curatorthen the base sits there looking like it just wandered in from the garage. That is where a DIY Christmas tree collar comes in. It hides the clunky stand, makes the whole setup look polished, and gives your tree that “Yes, I totally have my life together” energy, even if there is glitter on the dog and ribbon in your coffee.
The good news is you do not need a fancy store-bought collar with a price tag that makes your wallet sing sad carols. A budget-friendly Christmas tree collar can be made from baskets, buckets, cardboard, scrap wood, and other everyday materials that are probably already hanging out in your home, garage, or thrift-store wish list. Better yet, many of these projects are beginner-friendly and easy to customize for farmhouse, modern, rustic, vintage, Scandinavian, or classic red-and-green holiday decor.
In this guide, you will find eight smart and affordable ideas for a DIY Christmas tree collar, plus practical tips for sizing, styling, safety, and making the finished look feel intentional instead of “I panicked in the craft aisle.” Whether you have a towering artificial tree, a fresh-cut fir, or a small apartment-size evergreen, there is a project here that can dress up the base without dressing down your bank account.
Why a DIY Christmas Tree Collar Is Worth It
A Christmas tree collar does more than hide a stand. It creates a clean foundation, helps anchor your decorating style, and makes presents look better piled underneath. It can also be easier to clean and store than a fabric skirt, especially if you have pets, kids, or a tree that sheds needles like it is trying to redecorate the floor. A well-made collar adds texture, shape, and personality to the tree while keeping the focus where it belongs: on the sparkle above.
And because DIY versions use repurposed or inexpensive materials, they are perfect for anyone decorating on a budget. Think of them as the holiday version of a good blazer: one finishing touch, suddenly everything looks more expensive.
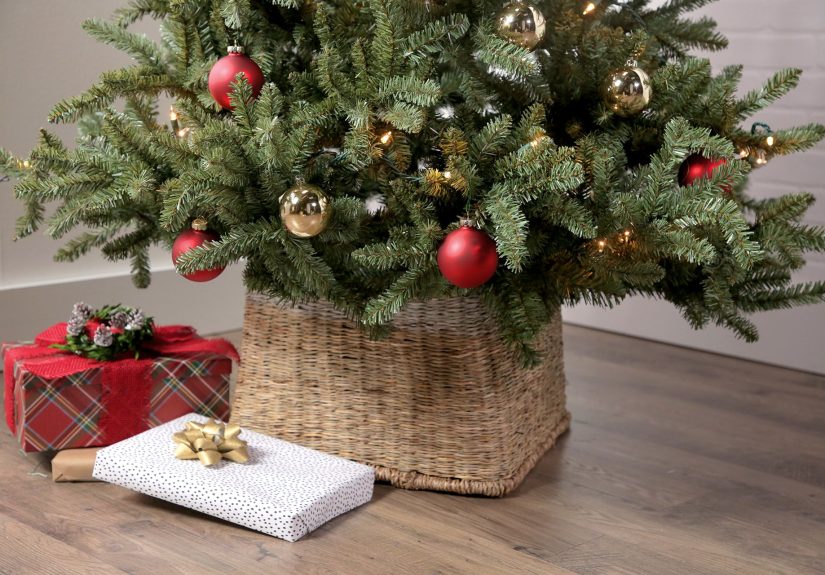
1. Flip a Large Basket into a Woven Tree Collar
If you want the easiest crowd-pleaser, start with a large woven basket. This is one of the most popular DIY Christmas tree collar ideas because it brings instant warmth and texture. Wicker, rattan, seagrass, and similar woven materials pair beautifully with cozy holiday themes, especially if your decor leans farmhouse, cottage, neutral, or Scandinavian.
How to do it
Take a large basket, turn it upside down, and cut out the bottom so it can slide over your existing tree stand. If the basket has handles, you can remove them for a cleaner look or leave them on if you like a more rustic style. Choose a basket wide enough to clear the stand comfortably and tall enough to disguise the legs and hardware.
Why it works
A woven basket feels soft and natural, which helps balance shiny ornaments and twinkle lights. It also photographs beautifully, which matters because no holiday setup is truly finished until someone says, “Wait, do not touch anything, I need a picture.”
Budget tip
Check thrift stores, yard sales, discount home stores, and your own attic before buying new. An older basket with a little wear often looks even better at Christmas, because holiday decorating is one of the few times “slightly imperfect” reads as “full of charm.”
2. Use a Galvanized Bucket for a Rustic Farmhouse Look
A galvanized bucket tree collar is practical, affordable, and packed with farmhouse character. If your holiday style includes plaid ribbons, wooden ornaments, bells, pinecones, or stockings that look like they belong in a cozy cabin catalog, this idea is calling your name.
How to do it
Find an oversized metal bucket, tub, or planter. Cut out the bottom so it fits around the tree stand, then smooth any rough edges carefully. If the silver finish feels too industrial, spray-paint it matte black, bronze, antique gold, or classic red for a more custom look.
Why it works
Metal collars create a sturdy, tailored base and pair especially well with natural greenery. They also resist spills and dirt better than fabric, which is handy if you are working with a real tree or energetic little humans with sticky December fingers.
Budget tip
Look for utility tubs or feed buckets at farm stores, hardware stores, flea markets, or secondhand shops. Sometimes the least glamorous aisle holds the most festive potential.
3. Make a Faux Wood Collar from a Cardboard Box
This is the overachiever of budget Christmas decor. A cardboard box costs next to nothing, but with the right finish, it can look like a custom wood crate. If your decorating budget is busy doing other thingslike buying gifts, hosting relatives, or replacing that one string of lights that mysteriously gave up againthis idea is a winner.
How to do it
Measure your tree stand at its widest point first. Then grab a sturdy box that will fit around it. Cut off the top and bottom flaps, adjust the height if needed, and wrap the outside in faux wood contact paper, shelf liner, peel-and-stick wallpaper, kraft paper, or even painted poster board. Add rope handles, ribbon, or stenciled holiday wording for extra style.
Why it works
It gives you the warm, boxy look of a wooden tree collar without requiring power tools or a lumber run. It is lightweight, inexpensive, and easy to customize to match your living room.
Budget tip
Use leftover wallpaper or contact paper from past home projects. That random roll in the closet may finally have its starring role.
4. Build a Simple Scrap-Wood Box
If you like a more solid, furniture-style look, a basic wood box collar is a classic DIY project. It can be rustic, modern, or traditional depending on the stain, paint color, and hardware. This is the kind of tree collar that makes people assume you casually build things on weekends while sipping cider and listening to jazz.
How to do it
Use four boards to create an open box around the stand. The boards can be nailed, screwed, or glued together, depending on how permanent you want the project to be. Sand rough edges, then paint, stain, whitewash, or leave the wood natural. Add corner brackets for an industrial look or ribbon and greenery for something more festive.
Why it works
A wood collar feels substantial and polished. It also pairs well with both classic Christmas ornaments and minimalist decor. If your home style is clean and neutral, this might be your perfect match.
Budget tip
Use scrap wood, reclaimed wood, leftover fence boards, or cut-down shelving. Holiday style does not care whether the lumber had a previous career.
5. Repurpose a Vintage Crate, Drum, or Tin
For decorators who love a little personality, repurposing a vintage item can create the most memorable Christmas tree collar of all. Think old wooden crates, candy tins, hat boxes, bass drums, washtubs, or similar pieces with interesting shape and patina. This approach feels collected, not cookie-cutter.
How to do it
Choose a piece large enough to fit the tree base or modify it so it wraps around the stand. Clean it thoroughly, remove any dangerous edges or sharp hardware, and test stability before placing it around the tree. If the item is especially precious or fragile, use it more like a decorative shell than a load-bearing structure.
Why it works
Vintage pieces bring storytelling into your holiday decor. A drum feels playful and nostalgic. A crate feels rustic and homey. A metal tin feels cheerful and old-fashioned. Suddenly your tree base is not just covered; it has a backstory.
Budget tip
Shop estate sales, flea markets, thrift stores, and online resale listings. December is a fine time to turn “What on earth would I do with that?” into “Actually, that looks amazing under my tree.”
6. Turn a Planter or Urn into a Chic Collar
A large planter or urn is one of the easiest ways to create a high-end look on a modest budget. It works especially well for smaller trees, pencil trees, tabletop trees, or faux trees with compact stands. This idea leans elegant, but it can also be playful with the right paint color.
How to do it
Use a planter wide enough for the stand and trunk opening. If needed, elevate the tree slightly inside the planter with blocks or a secure insert, then fill visible gaps with crumpled kraft paper, pinecones, faux snow, fabric, or greenery. You can paint the planter to match your decor, whether that means snowy white, festive red, glossy black, or a metallic finish.
Why it works
Planters and urns instantly make a tree feel styled and intentional. They are especially helpful if you want a designer look without a designer invoice.
Budget tip
Check garden centers in the off-season or look for lightweight plastic planters that can be painted. The transformation can be dramatic, and your wallet may remain calm enough to keep singing carols.
7. Group Picnic Baskets or Small Baskets Around the Base
Maybe you do not have one giant basket. No problem. A cluster of smaller baskets around the tree base can create the same cozy, textured effect. This is a clever option if your stand is awkwardly shaped or you want a looser, layered look.
How to do it
Arrange two to four baskets around the stand so they form a faux collar. Fill empty spaces with folded blankets, greenery, wrapped empty boxes, pinecones, or extra ribbon. The goal is not perfection. The goal is to make the base look deliberate and warm.
Why it works
Layered baskets add depth and charm, especially in casual family rooms. They also give you extra hiding places for cords, tree stand hardware, and the occasional ornament box you forgot to put away before guests arrived.
Budget tip
Use baskets you already own from storage, laundry, or picnic sets. Holiday magic loves a practical queen.
8. Create a Whimsical Cardboard Christmas Village Collar
If your goal is a tree base that makes people grin, build a cardboard Christmas village around it. This idea is especially fun for families, crafty decorators, or anyone who enjoys a little storybook charm. It is budget-friendly, customizable, and wonderfully dramatic without being expensive.
How to do it
Cut simple village house fronts from cardboard, then paint them in holiday colors or cover them with scrapbook paper. Add windows, doors, faux snow, glitter, bottlebrush trees, or tiny wreaths. Arrange the pieces in a circle around the stand or connect them into a freestanding ring. For a softer glow, tuck battery-operated fairy lights behind the buildings.
Why it works
It turns the tree base into part of the display instead of just camouflage. Kids love it. Guests notice it. And you get to say, “Oh, that little Christmas village? I made it,” which is objectively delightful.
Budget tip
Use shipping boxes, cereal boxes, leftover craft paint, and scrap paper. This project proves that cardboard is not just for deliveries and cats.
How to Choose the Right DIY Christmas Tree Collar
Measure first
Before you build anything, measure your tree stand at the widest point. That single step can save you from the deeply humbling experience of finishing a beautiful collar that fits absolutely nothing. Leave a little extra clearance so the collar slides on easily.
Think about tree type
If you have a real Christmas tree, make sure your collar still allows easy access to the water reservoir. You do not want a gorgeous setup that turns watering into an Olympic event. If you have an artificial tree, you can focus more on structure and style since daily watering is not part of the plot.
Match your decor style
Woven baskets feel natural and cozy. Metal looks clean and rustic. Faux wood boxes feel farmhouse. Painted planters lean chic. Vintage pieces add charm. Choose a material that makes sense with your ornaments, ribbon, room palette, and the overall mood you want.
Keep safety in mind
Do not block airflow around electrical connections, and do not place your tree near fireplaces, radiators, heating vents, or other heat sources. A collar should hide the base, not create a headache. For real trees, easy access to water is not optional. It is part of keeping the tree fresh and your setup safer.
Styling Tips to Make Your Tree Collar Look Expensive
Even a simple DIY project can look elevated with a few thoughtful finishing touches. Try weaving ribbon through a basket collar, adding bells or wooden beads, or tucking faux greenery around the top edge. Use a color palette that ties into the ornaments above, so the base feels connected to the rest of the tree. If you want texture, mix soft and hard materialslike a woven collar with velvet ribbon, or a metal collar with pinecones and knit stockings nearby.
Another trick is to style the area under the tree with intention. Do not toss every package down there like a holiday avalanche. Mix wrapped gifts with baskets, books, lanterns, or a folded throw. Your tree collar will look better because the whole scene looks better.
Budget Mistakes to Avoid
The biggest mistake is choosing something too small. The second biggest mistake is choosing something so complicated that it becomes your entire December personality. A good budget DIY Christmas tree collar should save money, not steal your sanity. Stick to materials you can cut, paint, or assemble with confidence. Also avoid anything unstable, overly flammable, or impossible to remove if you need to water the tree or adjust the stand.
And finally, do not underestimate the power of a test run. Set the collar in place before decorating the entire tree. It is much easier to fix a base issue before the ornaments arrive and start acting like tiny, fragile judges.
Final Thoughts
A DIY Christmas tree collar is one of the smartest ways to make holiday decor look more polished without spending a fortune. From woven baskets and galvanized buckets to faux wood boxes and whimsical cardboard villages, there are plenty of budget-friendly options that deliver style, personality, and practical charm. The best one is not necessarily the fanciest. It is the one that fits your tree, your home, your skill level, and your holiday mood.
So go ahead and give your tree the base it deserves. After all, if the top gets a star, the bottom should at least get a little dignity.
Holiday Decorating Experiences: What Real-Life DIY Tree Collar Projects Usually Teach You
Anyone who has ever attempted a DIY Christmas tree collar knows the experience is about more than just covering a stand. It usually starts with confidence. You spot a basket, bucket, or old crate and think, “This will take 20 minutes.” That estimate is adorable. What actually happens is a series of tiny discoveries: the basket is not perfectly level, the stand is wider than expected, the spray paint needs another coat, and somebody in the house suddenly has a strong opinion about whether the collar should be bronze, black, or “more Christmassy.” In other words, it becomes a full holiday memory.
One common experience is realizing that simple materials often look best. Many people begin with grand plans for an elaborate build, then end up loving the easiest solutionlike a woven basket or a cardboard box wrapped in faux wood paper. That is part of the charm. A DIY Christmas tree collar does not have to be complicated to feel special. In fact, the projects that look effortless are often the ones people enjoy the most year after year.
Another familiar lesson is that measuring matters more than optimism. Plenty of holiday decorators have learned this the funny way: by building a beautiful collar that fits the tree in theory but not in reality. The stand is too wide, the water reservoir becomes impossible to reach, or the collar bumps the lowest branches like it is trying to steal their parking space. After that first mishap, most people become passionate evangelists for measuring the stand before doing anything else. It is not glamorous advice, but it saves the day.
There is also the experience of discovering how much the base changes the whole room. Once the stand disappears and the collar goes on, the tree suddenly feels complete. Even a modest tree can look more intentional, warmer, and more “finished.” It is one of those small upgrades that delivers an oddly large amount of joy. You may not expect the base to make such a difference, and then there it is, quietly stealing the scene.
For families, DIY tree collar projects often become part craft session, part comedy show. Kids want to help paint. Pets inspect every basket as if conducting quality control. Someone inevitably gets glitter on something that absolutely should not contain glitter. Yet those messy details are usually what make the project memorable. Years later, no one talks about the exact cost of the materials. They talk about the year the cardboard village leaned slightly to the left, the year the dog tried to nap in the giant basket, or the year everyone agreed the old galvanized tub looked shockingly fancy.
That is really the beauty of a budget-friendly DIY Christmas tree collar. It does not just save money. It adds character, personality, and a little handmade story to the center of your holiday home. And honestly, that is a pretty great return on investment for a basket, a box cutter, and a bit of festive determination.
Note: This article is publication-ready, written in original American English, and cleaned of unnecessary citation placeholder artifacts.