
Table of Contents >> Show >> Hide
- Why Recycled Potion Bottles Make Such Great Halloween Decor
- What You Need to Make DIY Halloween Potion Bottles
- How to Choose the Best Bottles
- Step-by-Step: How to Make Recycled Potion Bottles
- Creative Display Ideas for Halloween Potion Bottles
- Common Mistakes to Avoid
- Why This DIY Works for So Many Decorating Styles
- My Experience Making Recycled Potion Bottles for Halloween
- Conclusion
Some people decorate for Halloween with animatronic skeletons, fog machines, and enough fake cobwebs to alarm the neighbors. Others look around the house, spot an empty syrup bottle and an old olive jar, and think, “Ah yes, this is clearly witch-lab material.” If that second group sounds like you, welcome home.
Recycled potion bottles are one of the easiest DIY Halloween decorations because they hit the sweet spot between spooky, cheap, and strangely elegant. They can sit on a mantel, haunt a bookshelf, dress up a party table, or transform an ordinary corner into a tiny apothecary of suspicious liquids and very poor decisions. Best of all, you do not need fancy tools, expensive supplies, or elite crafting credentials. If you can wash a bottle and commit to a vibe, you are already halfway there.
This guide will walk you through how to make recycled potion bottles for Halloween, which bottles work best, how to age them without making them look accidentally ugly, and how to style them so they look charmingly cursed instead of like a recycling bin with stage fright. Along the way, you will also get practical tips, creative label ideas, display inspiration, and a few lessons learned the messy way.
Why Recycled Potion Bottles Make Such Great Halloween Decor
There is a reason potion bottles show up again and again in Halloween decorating ideas. They instantly suggest mystery. Even before you add labels, paint, or embellishments, a bottle has a storybook quality. Make it dark, dusty, and slightly odd-looking, and suddenly it becomes “Nightshade Tonic” or “Moon Moth Essence” instead of “that pasta sauce jar from Tuesday.”
They are also budget-friendly. Instead of buying an entire themed décor collection, you can use glass bottles and jars you already have. Wine bottles, vinegar bottles, spice jars, medicine-style containers, hot sauce bottles, kombucha bottles, and even small jam jars can all be transformed into display-worthy Halloween decorations. That means less waste, more creativity, and a craft project that does not require selling your soul to afford it.
Another big advantage is flexibility. Recycled potion bottles can lean creepy, whimsical, gothic, vintage, elegant, or kid-friendly depending on your colors and labels. Want a dark witch’s shelf? Use matte black paint and old parchment labels. Want a playful family setup? Go with bright greens, glittery stoppers, and silly ingredients like “Dragon Sneezes” or “Goblin Bubble Syrup.” Same basic project, totally different mood.
What You Need to Make DIY Halloween Potion Bottles
The beauty of this project is that it is forgiving. You do not need every supply on Earth. Start with the basics, then add extras if you want more drama.
Basic Supplies
- Clean recycled glass bottles or jars in different shapes and sizes
- Dish soap and warm water
- Rubbing alcohol for leftover residue
- Acrylic paint, chalk paint, or spray paint
- Paintbrushes or foam brushes
- Sandpaper for distressing
- Printed or handwritten labels
- Glue stick, craft glue, or decoupage medium
- Twine, ribbon, raffia, lace, or string
Optional Extras for Maximum Witchiness
- Corks or decorative bottle toppers
- Black or metallic craft paint for accents
- Tea or coffee for aging paper labels
- Spanish moss, faux insects, or tiny bones
- Battery-operated fairy lights or flameless candles nearby
- Food coloring and water for temporary “potions” in sealed display bottles
- Mod Podge or another sealer to protect labels and paint
If you are decorating with kids, skip anything too breakable or sharp and focus on simple bottles, washable paint, funny labels, and non-glass embellishments. No one wants a trip to urgent care because “Zombie Cough Syrup” got too immersive.
How to Choose the Best Bottles
Not all bottles create the same effect, and that is good news. Variety makes your Halloween display look collected over time, like a witch who shops thrift stores with serious purpose.
Look for bottles with interesting shapes. Tall necks, rounded shoulders, square medicine-bottle silhouettes, and tiny jars all add visual interest. A group of identical bottles can still look nice, but mixing shapes makes the display feel more authentic and layered.
Clear glass is the easiest to customize because you can paint it, tint it, or leave parts exposed. Brown and green glass also work beautifully if you want a vintage apothecary feel. Small bottles are perfect for shelves and trays, while larger bottles can anchor a mantel or entryway table.
Before you get attached to a bottle, check that labels can be removed. Soaking bottles in warm, soapy water helps loosen paper labels, while rubbing alcohol can tackle sticky residue. Clean surfaces matter because paint and glue stick better when they are not fighting old syrup glue from 2024.
Step-by-Step: How to Make Recycled Potion Bottles
1. Wash and Prep the Bottles
Start by washing every bottle thoroughly with warm water and dish soap. Remove labels and residue, then dry completely. Wipe the outside with rubbing alcohol if needed so the paint has a clean surface to grip. This step is not glamorous, but it is the difference between “haunted heirloom” and “craft fail peeling by Tuesday.”
2. Decide on Your Look
Before painting, choose a style direction. Do you want your bottles to look old and dusty, sleek and gothic, or weirdly colorful like a mad scientist ran out of restraint? Picking a look first helps you avoid ending up with one bottle that says Victorian apothecary and another that says disco goblin.
For a vintage apothecary effect, use muted shades like black, gray, off-white, moss green, or deep plum. For brighter Halloween décor, try purple, orange, slime green, or metallic gold. Matte finishes usually look more aged and realistic than glossy ones.
3. Paint the Bottles
You can use acrylic paint, chalk paint, or spray paint depending on the finish you want. Chalk paint is great for a soft, aged look. Acrylic works well for layered details. Spray paint is quick and smooth, especially on taller bottles. If using spray paint, work in a ventilated area and allow proper drying time.
One coat may look patchy, which is normal. Two or three thin coats usually give better coverage than one heavy coat. Do not panic if the bottle looks unimpressive halfway through. Many excellent Halloween crafts go through a brief “this was a terrible idea” phase before suddenly looking fantastic.
4. Distress for an Antique Finish
Once the paint is dry, lightly sand edges, raised areas, or random spots to reveal glass underneath. This creates the worn, timeworn look that makes bottles feel old instead of freshly made. You can also dry-brush a second color over the first, especially gray or metallic gold, to add depth.
For an extra-aged effect, dab on a little dark brown or black paint, then wipe some away before it dries completely. The goal is not perfection. In fact, slightly uneven results often look more convincing than anything too polished.
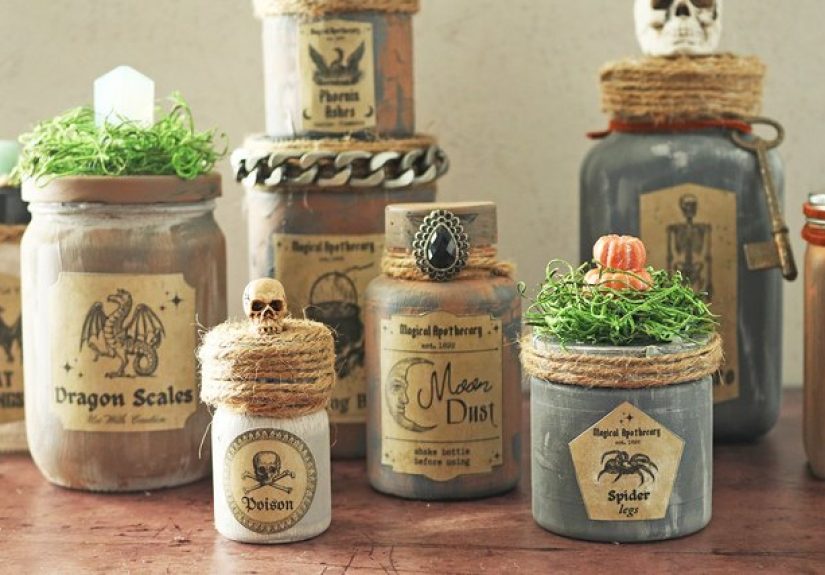
5. Make or Attach Labels
Labels are where the personality lives. You can print vintage-style labels in old-fashioned fonts, handwrite them for a more handmade feel, or mix both. If you want them to look aged, soak white paper briefly in cooled tea or coffee, let it dry flat, then print or write on it.
Great potion label names include:
- Bat Wing Brew
- Moon Dust Elixir
- Wolfsbane Tonic
- Spider Silk Syrup
- Frog Breath No. 9
- Ghost Vapor Extract
- Midnight Garden Poison
- Toe of Newt Tea Concentrate
Attach the labels with glue or decoupage medium. If you want them to last longer through the season, seal over the top once dry. That little extra step helps prevent peeling corners, which is useful if your display sits in a high-traffic area or near excited children who touch everything with the confidence of tiny raccoons.
6. Add Finishing Details
Tie twine, lace, or raffia around the necks of the bottles. Add charms, faux keys, dried herbs, black feathers, or tiny tags. A cork stopper instantly makes a bottle feel more potion-like, even if the bottle originally held sparkling water and had absolutely no magical ambition.
If you want the bottles to look filled, use only safe display materials and keep them sealed. Colored water works for short-term use, while beads, glitter, faux moss, or dried beans can also create texture. Avoid anything perishable or messy that could spoil, leak, or stain your furniture. Your haunted house should smell spooky, not fermented.
Creative Display Ideas for Halloween Potion Bottles
Create a Mantel Apothecary
Group bottles in odd numbers for a more natural display. Vary the heights and cluster them with candlesticks, faux ravens, stacked books, and mini pumpkins. Add flameless candles nearby for a soft glow that feels moody without creating a fire hazard.
Style a Party Drink Station
Use your potion bottles as part of a Halloween snack or drink table. Place them around punch bowls, dessert stands, or trays of spooky treats. Labels like “Hex Tonic” and “Witch’s Cordial” make the whole setup feel themed without requiring a full haunted banquet hall.
Decorate a Bookshelf or Entryway
If you want subtle Halloween décor, line a few bottles along a shelf with dark books and small decorative objects. In an entryway, place them on a console table with a mirror, dried branches, and a black table runner. It gives guests a stylish little warning that yes, something witchy this way comes.
Build a Tiered Tray Display
Mini potion bottles are perfect for tiered trays. Mix them with tiny skulls, faux spiders, handwritten tags, and moss. This works especially well in kitchens, breakfast nooks, or any corner that needs a little October personality without turning into a full haunted mansion.
Common Mistakes to Avoid
One of the biggest mistakes is skipping prep. Residue, dust, and moisture make paint and labels misbehave. Another is overdecorating every single bottle. A little restraint helps the display look curated. If all the bottles scream for attention at once, the result can feel cluttered instead of magical.
It is also smart to think about safety. Keep fragile glass bottles away from places where kids or pets can knock them over. If you are creating an eerie glow, use battery-operated candles or fairy lights rather than open flames near paper labels, twine, or dried decorative materials. Spooky is fun. Accidentally setting “Potion Shelf of Doom” on fire is not.
Why This DIY Works for So Many Decorating Styles
One reason recycled potion bottles are such a strong Halloween craft is that they do not belong to just one aesthetic. In a farmhouse setting, they look charming with distressed paint and raffia. In a gothic room, they fit beautifully with black candlesticks and antique frames. In a family home, they can be playful and silly. In a party setup, they become easy conversation starters.
That versatility makes them ideal if you want decorations that feel personal instead of mass-produced. Even if two people follow the same basic steps, their final bottles will not look exactly alike. One crafter might lean moody and elegant. Another might create a shelf full of ridiculous labels like “Werewolf Shampoo” and “Instant Eyeball Soup.” Frankly, both approaches are excellent.
My Experience Making Recycled Potion Bottles for Halloween
The first time I made recycled potion bottles, I was wildly overconfident. I had three empty bottles, one brush that had seen better days, and the kind of optimism usually reserved for people who believe one trip to the craft store will be quick. I assumed the project would take maybe 20 minutes. Reader, it did not.
First, I learned that label residue is immortal. I soaked one bottle forever, scraped another with my fingernail like I was uncovering an archaeological artifact, and finally discovered that a little rubbing alcohol made me feel less personally attacked. Then I slapped on too much paint, creating a bottle that looked less “ancient apothecary” and more “badly frosted cake.” After a brief dramatic pause and some sanding, though, it started to come together.
The real turning point was the labels. Once I printed a few names in an old-fashioned font and glued them on, the bottles suddenly made sense. They went from random containers to actual props with personality. I added twine around the necks, brushed a little dark paint into the edges, and arranged them beside a stack of thrifted books. It looked weirdly good. Not professional-set-designer good, but definitely “person who has their Halloween priorities in order” good.
Since then, I have made these bottles in a few different styles. One year I went full vintage and used muted colors, tea-stained labels, and dried herbs. Another year I made a sillier set for a family party with bright green accents and labels that sounded like they came from a witch with a good sense of humor. Both versions worked because the basic formula stayed the same: interesting bottle shapes, layered finishes, and labels that sell the story.
What surprised me most was how often people noticed them. Guests would walk past pumpkins, garlands, and bigger decorations, then stop to read the bottle labels one by one. That is the secret power of this project. It is inexpensive, but it feels thoughtful. It invites people closer. They want to inspect it, laugh at it, and ask how you made it. In decorating terms, that is a win.
I also learned that less can be more. My best displays were not the ones where every bottle had ten embellishments and enough glitter to be seen from space. They were the ones with a consistent color palette, a mix of sizes, and just enough texture to feel old and mysterious. A little black paint, worn paper, and rough twine can do a lot of heavy lifting.
If you are trying this project for the first time, my advice is simple: do not wait for perfect supplies. Start with the bottles you have. Test one finish. Make three labels. Build from there. Halloween décor is supposed to be fun, and potion bottles are one of those rare crafts that reward experimentation. If a bottle turns out too dark, sand it. If it looks too plain, add a label. If the whole thing feels too serious, name one bottle “Emergency Frog Juice” and keep moving.
That playful spirit is probably why I keep coming back to this project. It is affordable, creative, customizable, and just ridiculous enough to be memorable. In a season filled with store-bought plastic everything, a handmade potion bottle display feels personal. It tells a tiny story. It gives old materials a second life. And it lets you pretend, at least for one month, that your home has a suspiciously well-stocked witch pantry.
Conclusion
Easy DIY Halloween decorations do not have to be expensive, complicated, or painfully Pinterest-perfect. Recycled potion bottles prove that some of the best Halloween décor starts with items you already have at home and a little imagination. With the right prep, a few layers of paint, creative labels, and thoughtful styling, ordinary bottles can become spooky statement pieces that look custom-made for the season.
Whether you want elegant apothecary charm, playful party décor, or a full shelf of suspicious-looking elixirs, this project gives you plenty of room to experiment. So raid the recycling bin, embrace the weird, and give those empty bottles a glamorous second act. After all, Halloween is the one time of year when labeling something “Venom Extract” actually improves the décor.


