
Table of Contents >> Show >> Hide
- What “Netflix quality” on Android really means
- How to change quality on Netflix on Android in 10 steps
- Open the Netflix app on your Android phone or tablet
- Tap My Netflix in the bottom-right corner
- Tap the menu icon in the upper-right corner
- Go to App Settings
- Select Cellular Data Usage
- Turn off Automatic if you want manual control
- Choose the streaming option that fits your goal
- Tap OK and test a title
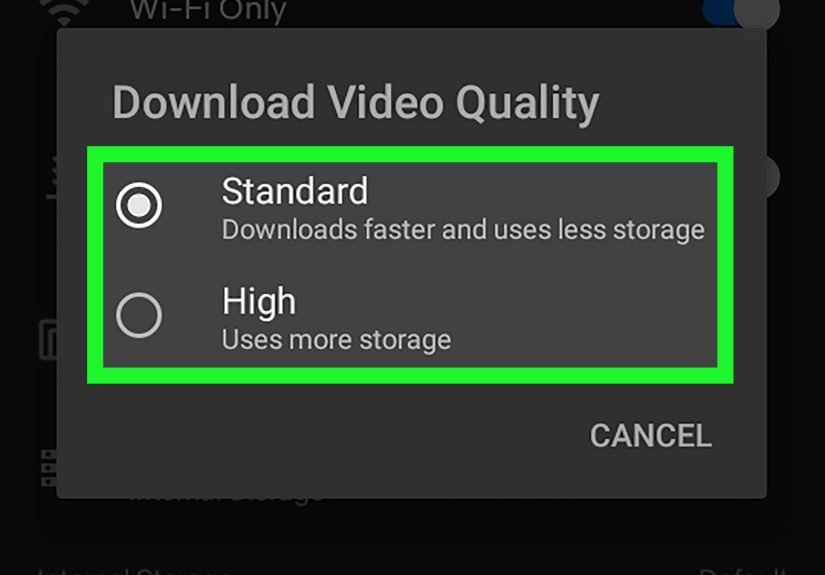
- Adjust Download Video Quality for offline viewing
- Use a browser to change Playback Settings for your profile
- What each Netflix quality setting means on Android
- Why your Netflix quality may still look bad on Android
- Quick fixes if Netflix quality will not change
- Best Netflix quality settings for common situations
- Final thoughts
- Bonus: Real-world experiences with changing Netflix quality on Android
- SEO Tags
If Netflix on your Android phone looks a little mushy, keeps chewing through your mobile data, or suddenly turns your “quick episode” into a buffering marathon, the good news is this: you do have control. The slightly less dramatic news is that Netflix does not hand Android users a giant button labeled Make This 1080p Right Now. Instead, quality on Netflix is shaped by a few different controls, including mobile data settings, download quality, profile playback settings, your plan, your device, and your internet speed.
That sounds like a lot, but it is actually pretty manageable once you know where to tap. In this guide, you will learn the easiest ways to change Netflix quality on Android, what each setting really does, and how to fix that annoying “why does this still look blurry?” problem without throwing your phone across the room like it insulted your family.
What “Netflix quality” on Android really means
Before jumping into the steps, it helps to know what you are changing. On Android, Netflix quality is not just one setting. It is more like a group project, and several settings are showing up late.
- Cellular Data Usage controls how aggressively Netflix uses mobile data while streaming.
- Download Video Quality controls the quality of videos you save for offline watching.
- Playback Settings in your Netflix account can affect the data usage and quality limit for a profile.
- Your Netflix plan can cap how high your quality can go.
- Your Android device support also matters, especially for HD and higher-quality playback.
- Your connection speed can still be the final boss.
In plain English: if you want better quality on Android, you may need to adjust both the Netflix app and your account settings in a browser.
How to change quality on Netflix on Android in 10 steps
-
Open the Netflix app on your Android phone or tablet
Start in the Netflix app, not your browser. Make sure the app is updated first. An outdated app can make troubleshooting harder, and nobody needs extra drama before lunch.
-
Tap My Netflix in the bottom-right corner
This is your command center for account shortcuts, downloads, app settings, and profile-related options on newer versions of the Netflix Android app.
-
Tap the menu icon in the upper-right corner
Look for the menu button near the top-right area of the screen. From here, you can reach the app settings that control mobile playback behavior.
-
Go to App Settings
This is where Netflix hides the settings that most people only discover after burning through half their data plan in one weekend.
-
Select Cellular Data Usage
Under the Video Playback section, tap Cellular Data Usage. This is the main Android setting for changing how much data Netflix uses when you stream over mobile data.
-
Turn off Automatic if you want manual control
If Netflix is set to Automatic, the app balances data usage and video quality for you. That is convenient, but it also means Netflix is the boss and you are just riding shotgun. Turn off Automatic if you want to choose a different option yourself.
-
Choose the streaming option that fits your goal
Netflix typically gives Android users several choices:
- Automatic: balances quality and data use.
- Wi-Fi Only: no mobile streaming, which is great if your data plan is allergic to fun.
- Save Data: lowers data use and usually lowers visual quality.
- Maximum Data: allows the highest quality your device, title, plan, and connection can support.
If your goal is better picture quality while using cellular, choose Maximum Data. If your goal is to stop Netflix from eating your monthly data allotment like popcorn, choose Save Data or Wi-Fi Only.
-
Tap OK and test a title
Once you save the setting, play a show or movie and watch how it behaves. If the stream still looks soft, wait a little. Some streams ramp up quality after the first few moments, especially on slower networks.
-
Adjust Download Video Quality for offline viewing
If you watch downloaded content on Android, go back to App Settings and tap Download Video Quality or Video Quality. Then choose Standard or High/Higher. This does not change live streaming quality, but it absolutely changes how good downloaded episodes look on a flight, train ride, or suspiciously long dentist waiting room visit.
-
Use a browser to change Playback Settings for your profile
This is the step many Android users miss. Open Netflix in a web browser, go to your Account, choose the profile you use on Android, and open Playback Settings. There, you can select a data usage setting such as Low, Medium, High, or Auto. This can affect quality across devices for that profile, including what happens on Android. If you want the best available quality, High or Auto is usually the move.
What each Netflix quality setting means on Android
If you are choosing between the options and wondering what they actually do in real life, here is the practical version.
Automatic
This is the “Netflix, you decide” option. It aims to balance quality and data usage. It is useful if your connection changes a lot throughout the day and you do not want to babysit settings.
Save Data
This is best for commuters, travelers, and anyone on a tight data plan. It helps stretch your cellular data further, but the tradeoff is softer video. Faces may look fine, but fast motion and dark scenes can lose detail.
Maximum Data
This is the setting to choose when you care more about image quality than data savings. It gives Netflix permission to use as much data as needed for the highest possible quality your setup supports. Translation: pretty picture, scary data bill if you are not careful.
Standard vs High downloads
For offline viewing, Standard uses less storage and downloads faster. High gives you a cleaner image, but it takes more space and more patience. Choose based on whether your phone storage is spacious or hanging on by a thread.
Why your Netflix quality may still look bad on Android
Sometimes you do everything right and Netflix still serves you a stream that looks like it was filmed through a sandwich bag. Here are the most common reasons.
Your Netflix plan may be limiting quality
Plan level still matters. If your subscription tier does not support the highest resolutions, changing app settings will not magically unlock them. In general, Netflix ties 1080p Full HD to its Standard tiers, while 4K Ultra HD and HDR are tied to Premium on supported devices.
Your internet may be the real issue
Netflix recommends a stable connection speed that is fast enough for the quality you want. HD typically needs less than 4K, and 4K needs a much stronger connection. If your Wi-Fi is weak or your cellular signal is jumping between bars like it is doing cardio, Netflix may lower quality automatically to keep the video playing.
Your Android device may not support HD properly
Not every Android phone or tablet can play Netflix in HD. Device certification matters. Netflix also checks the device’s DRM support, especially Widevine L1. If your device shows Widevine L3, Netflix may limit you to standard definition even if your plan and internet are great. That can feel rude, but it is how the platform handles protected video playback.
The title itself may not be available in higher quality
Some shows and movies are not offered in the highest formats on every device. So yes, sometimes the problem is not your phone. Sometimes the content itself is the diva.
Android Data Saver can interfere
If your phone’s built-in Android Data Saver is turned on, background data behavior changes across apps. It may not always directly cap the stream you are actively watching, but it can still affect how apps behave and how aggressively your phone conserves mobile data.
Quick fixes if Netflix quality will not change
- Restart the Netflix app.
- Update the app from Google Play.
- Switch from cellular to strong Wi-Fi and test again.
- Check your profile’s Playback Settings in a browser.
- Make sure you are not stuck on Automatic.
- Wait for pending downloads to finish if settings are grayed out.
- Check App Settings > Diagnostics > Playback Specification to see whether your device shows Widevine L1 or L3.
- Clear app cache if playback has gone weird for no obvious reason.
Best Netflix quality settings for common situations
If you are on unlimited data
Use Maximum Data in the app and High or Auto in profile Playback Settings. This gives you the best shot at the highest available quality.
If you are on a limited monthly data plan
Use Save Data or Wi-Fi Only. Download shows over Wi-Fi in High only when you really care about quality.
If you travel a lot
Use High for downloads before you leave home, then watch offline. It is the classic “be smart now so airport Wi-Fi cannot hurt you later” strategy.
If Netflix keeps buffering
Lower the quality instead of fighting physics. A slightly softer stream that actually plays is better than a crystal-clear loading wheel.
Final thoughts
Changing Netflix quality on Android is easy once you know where the controls live. The most important thing to remember is that Netflix quality is shaped by more than one setting. The app’s Cellular Data Usage setting changes how streaming behaves on mobile data, Download Video Quality changes your offline experience, and Playback Settings in a browser can still influence how high your profile is allowed to go. Add in your subscription plan, device support, and internet speed, and you have the full picture.
So if your Netflix stream looks fuzzy, do not panic. Tap through the settings, make a few smart changes, and give your Android phone a better shot at streaming something that looks like 2026 instead of 2006.
Bonus: Real-world experiences with changing Netflix quality on Android
In everyday life, these settings matter more than people think. On paper, “change video quality” sounds like a tiny adjustment buried in an app menu. In reality, it can completely change how pleasant Netflix feels on Android. One of the most common experiences is the commuter problem. You leave home on Wi-Fi, start a show that looks sharp and smooth, then head outside and your phone switches to mobile data. Suddenly the picture softens, darker scenes get muddy, and fast action looks like it is trying to escape through a foggy window. That is usually the moment people discover Netflix quality is not random after all.
There is also the traveler experience, which deserves its own support group. You download a few episodes for a flight, only to realize later that they were saved in a lower quality setting and now look merely okay on your tablet. Not terrible, not amazing, just aggressively average. The fix is simple once you know it: change the download quality before you save your shows. But most people do not think about it until they are already in airplane mode, staring into the consequences of their past choices.
Then there is the unlimited-data optimist. This person proudly selects Maximum Data, assumes they have defeated compromise itself, and starts binge-watching outdoors. For a while, life is beautiful. The image is crisp, the colors pop, and every close-up looks expensive. But if the cellular network is congested, even the best setting cannot force quality out of thin air. The experience becomes a reminder that app settings are powerful, but they are not wizards.
Another very common situation happens with family plans or shared accounts. One person sets the profile Playback Settings to a lower data option in a browser, maybe to save bandwidth at home, and forgets to mention it. Later, someone else opens Netflix on Android and wonders why everything looks softer than expected, even on good Wi-Fi. It feels like the app is ignoring them, when really the profile is just following instructions from another setting in another place. Sneaky? Yes. Fixable? Also yes.
Budget-conscious users often have the most satisfying results once they learn the system. Instead of letting Netflix burn through mobile data, they switch to Wi-Fi Only or Save Data, then download a few favorite titles in higher quality while still at home. That combination feels surprisingly efficient. You get decent visual quality when it matters, lower data stress on the go, and fewer unpleasant surprises from your carrier. It is not glamorous, but it is smart, and smart ages well.
And finally, there is the “why is my expensive phone still showing mediocre quality?” experience. This usually leads people down the rabbit hole of device support, HD certification, and Widevine levels. It is frustrating, but it also explains a lot. Sometimes the issue is not your eyes, your imagination, or the show itself. Sometimes the phone simply is not playing in HD the way you assumed it would. Once people check playback specs and understand that part, the confusion usually disappears, even if the irritation hangs around a little longer.
The overall experience of changing Netflix quality on Android is less about one magic toggle and more about matching the app to your real life. Commute differently, travel smarter, protect your data, and improve picture quality where your phone and plan allow it. That is the sweet spot.


