Table of Contents >> Show >> Hide
- What Is Ricotta, Exactly?
- Why Buttermilk Makes This Recipe So Good
- Why You Should Make Ricotta at Home
- Ingredients for Homemade Ricotta Cheese With Buttermilk
- Equipment You Will Need
- Homemade Ricotta Cheese Recipe With Buttermilk
- What the Texture Should Be Like
- Why This Method Works
- Common Mistakes to Avoid
- How to Use Homemade Ricotta
- What to Do With the Whey
- How to Store Homemade Ricotta
- Frequently Asked Questions
- Experience: What Making Homemade Ricotta With Buttermilk Feels Like in a Real Kitchen
- Final Thoughts
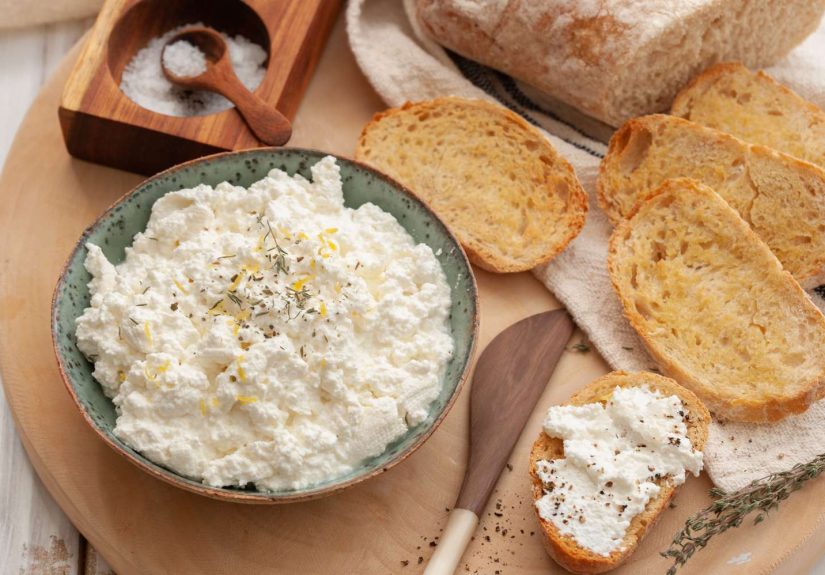
If you have ever stood in the dairy aisle holding a tub of ricotta and wondering why it tastes a little like damp optimism, this article is for you. Homemade ricotta cheese with buttermilk is one of those kitchen projects that sounds wildly impressive but is actually delightfully low-drama. No cave. No aging room. No tiny cheese goblin guarding your curds. Just milk, buttermilk, heat, a strainer, and about half an hour of your life.
The beauty of this homemade ricotta cheese recipe with buttermilk is that it delivers a fresh, creamy, fluffy ricotta with a clean dairy flavor and a gentle tang. It is rich enough for toast, soft enough for lasagna, and luxurious enough to make a humble bowl of roasted vegetables feel like it suddenly has a trust fund. Better yet, the method is straightforward, beginner-friendly, and far more forgiving than many fancy-sounding cooking projects.
In this guide, you will learn what ricotta is, why buttermilk works so well, how to make it step by step, what mistakes to avoid, how to store it, and how to use every dreamy spoonful. If you want a fresh ricotta recipe that feels approachable but still gives “I casually make cheese at home” energy, you are in exactly the right kitchen.
What Is Ricotta, Exactly?
Technically, traditional ricotta comes from whey, which is the liquid left behind after making other cheeses. The word ricotta means “recooked,” which is a nice way of saying somebody looked at leftover whey and said, “Hang on, we can still get more cheese out of this.” In many home kitchens, though, ricotta is made from whole milk or a combination of milk and cream, because that method is easier and gives a better yield for everyday cooks.
That is why most homemade ricotta recipes today are really fresh whole-milk ricotta-style cheese. Purists may raise an eyebrow. Everyone else will be too busy spreading it on warm bread to care.
Why Buttermilk Makes This Recipe So Good
Buttermilk is the secret handshake in this recipe. It brings acidity, which helps the milk proteins separate into curds and whey, but it also adds a gentle cultured tang that gives the finished cheese more personality than a plain acid-only version. Lemon juice and vinegar can absolutely make ricotta, but buttermilk often creates a softer flavor and a delicate texture that feels especially lovely in savory dishes.
It also makes the recipe feel a little more old-school and a little more comforting. There is something charming about turning two humble dairy products into a bowl of fresh cheese. It is kitchen alchemy without the suspicious smoke.
Why You Should Make Ricotta at Home
Store-bought ricotta has its place. It is convenient, easy to find, and perfectly useful in baked pasta. But homemade ricotta is fresher, softer, and usually more flavorful. It tastes milky instead of flat, creamy instead of chalky, and light instead of dense. You also get to control the salt, the texture, and the draining time.
Want it loose and spreadable for crostini? Drain it less. Want it thicker for stuffed shells or cheesecake? Drain it longer. Want to stand over the bowl feeling deeply accomplished? That part happens automatically.
Ingredients for Homemade Ricotta Cheese With Buttermilk
What You Need
- 8 cups whole milk
- 2 cups cultured buttermilk
- 3/4 teaspoon kosher salt
That is the core recipe. Some versions add a little cream for extra richness, but it is optional. If you want a more luxurious ricotta, you can add 1/2 cup heavy cream. The recipe will still work beautifully without it.
Ingredient Notes
Use whole milk: This is not the moment for skim milk heroics. Whole milk gives you a better yield and a richer texture.
Use cultured buttermilk: Buy the thick, tangy buttermilk from the refrigerated dairy section. This is the kind that gives the most reliable curd formation.
Avoid ultra-pasteurized milk if possible: It can be fussy for cheesemaking and may not form curds as well as regular pasteurized milk.
Equipment You Will Need
- Large heavy-bottomed pot
- Instant-read thermometer
- Wooden spoon or heatproof spatula
- Fine-mesh strainer or colander
- Cheesecloth, clean muslin, or a thin clean kitchen towel
- Large bowl for catching whey
You do not need fancy cheesemaking equipment. This is a very low-barrier recipe, which is one reason home cooks fall in love with it so quickly.
Homemade Ricotta Cheese Recipe With Buttermilk
Step 1: Prepare Your Strainer
Line a fine-mesh strainer or colander with cheesecloth and set it over a large bowl. Do this before you heat the milk so you are not scrambling around while curds are forming like an overcaffeinated dairy intern.
Step 2: Heat the Milk Mixture
In a large pot, combine the whole milk, cultured buttermilk, and kosher salt. Set the pot over medium to medium-low heat. Stir gently at the beginning to distribute the ingredients, then keep a close eye on the temperature.
You are aiming for roughly 175°F to 185°F. The mixture should get steamy and foamy around the edges, and you should begin to see curds forming. Do not let it hit a rolling boil. Boiling can toughen the curds and make the ricotta grainier than you want.
Step 3: Stop Stirring Once Curds Form
As soon as you see clear separation between curds and whey, stop stirring. This part matters. Stirring too much once the curds have formed can break them apart and reduce your yield. Gentle is the entire mood of this recipe.
Step 4: Let It Rest
Turn off the heat and let the mixture sit undisturbed for 10 to 20 minutes. This resting time helps the curds finish gathering and gives the ricotta a more delicate texture.
Step 5: Strain the Curds
Use a slotted spoon or ladle to transfer the curds into the prepared cheesecloth-lined strainer. You can pour the rest of the liquid through carefully, but do it gently. Let the ricotta drain for 15 to 30 minutes for a soft, spoonable texture. For a thicker ricotta, drain it longer.
Step 6: Chill or Use Right Away
You can eat the ricotta warm, which is one of life’s underrated pleasures, or transfer it to a container and refrigerate it. Fresh ricotta becomes slightly firmer as it chills.
What the Texture Should Be Like
Good homemade ricotta should be tender, creamy, and softly mounded. It should not be rubbery, dry, or weirdly squeaky. If it is too wet, simply let it drain longer. If it seems too firm, stir in a spoonful or two of cream, milk, or a little of the reserved whey until it relaxes.
Yes, cheese can relax. Frankly, many of us should try it.
Why This Method Works
This buttermilk ricotta recipe works because it balances heat and acidity. The milk proteins need enough heat to coagulate, but not so much that they seize into tight, tough curds. The buttermilk adds the acidity needed for separation while also contributing a fresh cultured flavor.
The result is a ricotta that tastes sweet, tangy, and distinctly fresh. That balance is why so many cooks love buttermilk-based ricotta for toast, pasta fillings, pancakes, baked dishes, and desserts.
Common Mistakes to Avoid
Using the Wrong Milk
Ultra-pasteurized milk can be unreliable. If your curds are weak or barely form, the milk may be the culprit. Choose regular pasteurized whole milk when possible.
Boiling the Mixture
Too much heat can make the curds tight and grainy. You want a gentle rise in temperature, not a volcanic dairy event.
Stirring Too Much
Once the curds form, back away from the spoon. Too much stirring breaks delicate curds into tiny bits and can leave you with lower yield and muddier whey.
Draining Too Long Without a Plan
Ricotta keeps draining as long as gravity is doing its thing. If you forget about it for ages, it can end up much thicker than expected. Delicious, yes. Spreadable, maybe not.
How to Use Homemade Ricotta
This is where homemade ricotta really earns its keep. A fresh batch can slide into breakfast, lunch, dinner, and dessert without breaking a sweat.
Savory Ideas
- Spoon it onto toast with olive oil, flaky salt, and black pepper
- Layer it into lasagna or stuffed shells
- Fold it into scrambled eggs
- Dollop it over roasted tomatoes, zucchini, or eggplant
- Spread it on crostini with herbs and roasted garlic
- Add it to pasta with lemon zest and peas
Sweet Ideas
- Top it with honey and berries
- Use it in pancakes or waffles
- Spread it on banana bread
- Blend it into cheesecake filling
- Serve it with peaches, figs, or jam
Fresh ricotta is one of those rare ingredients that feels equally at home next to grilled asparagus and a drizzle of hot honey. It contains multitudes.
What to Do With the Whey
Please do not pour the whey down the drain without at least considering its potential. The leftover whey can be used in bread dough, pancake batter, soups, smoothies, or grains like rice and farro. It adds a subtle tang and helps stretch your ingredients a little further.
Think of it as the bonus track on the cheese album.
How to Store Homemade Ricotta
Transfer the ricotta to a clean airtight container and refrigerate it promptly. For best flavor and texture, use it within 5 to 7 days. Fresh ricotta is not an ingredient that wants to linger in the back of the fridge while you “figure out your meal plan.” It wants attention now.
Freezing is possible, but the texture can become grainier and more crumbly after thawing. If you do freeze it, use it later in cooked dishes where texture matters less, such as baked pasta or casseroles.
Frequently Asked Questions
Can I use low-fat milk?
You can, but the ricotta will be less rich and the yield may be smaller. Whole milk gives the best texture for a classic homemade ricotta cheese recipe with buttermilk.
Can I use a buttermilk substitute made with lemon juice and milk?
For the most dependable results, real cultured buttermilk is the better choice. It has the acidity and texture this recipe expects.
Can I make ricotta without cheesecloth?
Yes. A very clean thin kitchen towel, butter muslin, or even a coffee filter in a pinch can help. Cheesecloth is just the easiest and least dramatic option.
Is homemade ricotta worth it?
Absolutely. The flavor is fresher, the texture is softer, and the whole process is strangely satisfying. It is one of those recipes that makes you feel more competent than you have any right to after heating milk in a pot.
Experience: What Making Homemade Ricotta With Buttermilk Feels Like in a Real Kitchen
One of the most charming things about making homemade ricotta with buttermilk is that it changes the mood of the kitchen almost instantly. At first, it feels like nothing is happening. You pour milk into a pot, add buttermilk, sprinkle in salt, and stand there wondering whether this was a wildly optimistic use of your afternoon. Then the temperature climbs, the steam starts to rise, and suddenly the surface changes. Soft white curds begin drifting through pale yellow whey, and the whole process goes from “am I just warming dairy?” to “I have become a tiny cheese wizard.”
Home cooks often describe that moment as the point where the recipe becomes addictive. Once you see the curds separate cleanly, you realize the method is not difficult at all; it simply asks you to pay attention. You watch the pot a little more closely. You lower the heat a little sooner next time. You get more confident about reading visual cues instead of panicking over every degree on the thermometer. And that confidence is part of the fun. Homemade ricotta teaches patience in a very tasty way.
There is also a noticeable difference between warm ricotta and cold ricotta, and many first-time makers are surprised by how wonderful the warm version is. Fresh from the strainer, it is delicate, loose, and almost cloud-like. Spread on toast with olive oil and cracked pepper, it tastes far more luxurious than the ingredient list suggests. After chilling, it firms up and becomes better for dolloping, stuffing pasta, or folding into desserts. So the experience is not just about making cheese; it is about noticing texture in real time and choosing how you want the final result to behave.
Another common experience is how quickly homemade ricotta disappears. People make it for lasagna and somehow end up eating half of it standing at the counter with a spoon. It drifts onto crackers, roasted vegetables, pancakes, and sandwiches. Guests become deeply impressed by the phrase “I made the ricotta,” even if the method was easier than assembling flat-pack furniture. That little burst of kitchen pride is real, and honestly, you deserve it.
There is also the practical satisfaction. This is not a recipe that demands rare ingredients or expensive gear. It works in an ordinary pot, in an ordinary kitchen, on an ordinary weeknight. That matters. It means homemade ricotta with buttermilk feels accessible rather than theatrical. You are not performing. You are just making something fresh and delicious from ingredients that were quietly waiting in the refrigerator all along.
And perhaps that is why the recipe sticks with people. It turns a routine cooking day into something a little more memorable. You slow down. You notice. You taste. You learn how a milk mixture looks right before separation, how draining time changes texture, and how fresh cheese can make the simplest meal feel special. That is a pretty good return for one pot, one thermometer, and a little bit of dairy courage.
Final Thoughts
A great homemade ricotta cheese recipe with buttermilk is not about culinary showing off. It is about getting a fresher, softer, more flavorful cheese with very little fuss. With whole milk, cultured buttermilk, gentle heat, and smart draining, you can make a batch of ricotta that outshines most grocery store versions and slides effortlessly into sweet and savory recipes alike.
Once you make it a couple of times, the process becomes wonderfully intuitive. You stop seeing it as a project and start seeing it as a useful kitchen skill. And that is when homemade ricotta really becomes dangerous, because then you start making it “just because,” which is how you end up eating heroic amounts of toast. There are worse fates.