Table of Contents >> Show >> Hide
- Why the Half-Wave Dipole Is the Best Method for Beginners
- Before You Design Anything, Define the Job
- The Core Formula for a Simple Dipole Antenna
- Materials You Need
- Step-by-Step: How to Design and Build a Simple Dipole
- What About a Quarter-Wave Vertical?
- Understanding SWR, VSWR, and Why Matching Matters
- Simple Antenna Design Tips That Actually Help
- Example: Designing a Simple FM Dipole
- Mistakes to Avoid
- Safety Matters More Than Signal Bragging Rights
- Best Method Summary
- Experience-Based Lessons From Building Simple Antennas
- Conclusion
- SEO Tags
Designing a simple antenna sounds intimidating until you realize that most antennas follow one stubbornly logical rule: radio waves like dimensions tied to wavelength. Once you understand that, antenna design becomes less mysterious wizardry and more “measure twice, cut once, maybe trim once more, and try not to drop the wire off the ladder.”
If you want the best method for designing a simple antenna, start with a half-wave dipole. For beginners, it is usually the easiest antenna to understand, cheap to build, predictable in performance, and forgiving enough that small mistakes do not automatically turn it into a decorative clothesline. It works well for receiving and can also work well for transmitting when built and matched correctly.
In this guide, you’ll learn how a simple antenna works, why the half-wave dipole is the best starting point, how to calculate the right length, what materials to use, how to mount it, and how to fine-tune it so your project works in the real world instead of only in your imagination.
Why the Half-Wave Dipole Is the Best Method for Beginners
There are many simple antenna types: quarter-wave verticals, random wires, loops, telescoping whips, and even improvised wire designs. But if your goal is to build a reliable simple antenna with the fewest surprises, the half-wave dipole usually wins.
What makes it so beginner-friendly?
- It is easy to calculate. The length is based on one clear formula tied to your frequency.
- It uses basic materials. A dipole can be built with wire, coax, a center connection, and supports.
- It does not depend on a big metal ground plane. A quarter-wave vertical often needs radials or a decent ground reference. A dipole is more self-contained.
- It performs well. Even a simple dipole can provide solid reception and very respectable transmission for its size.
- It teaches the right lessons. By building one, you learn wavelength, resonance, feed lines, polarization, and tuning all at once.
In other words, the dipole is the grilled cheese sandwich of antenna design: simple ingredients, classic method, and surprisingly satisfying when done right.
Before You Design Anything, Define the Job
The biggest mistake in antenna design is not bad soldering or sloppy measuring. It is building an antenna without deciding what it needs to do. Before you cut any wire, answer these questions:
1. Is this antenna for receiving, transmitting, or both?
A receive-only antenna can be more forgiving. A transmit antenna needs better matching, proper feed line choices, and careful attention to safety and power handling.
2. What frequency or band will it cover?
Antenna dimensions depend on frequency. The lower the frequency, the longer the antenna. That is why a simple FM dipole can fit in a room, while a low-frequency HF antenna may stretch across a yard like it has real estate ambitions.
3. What polarization do you need?
If the signal is vertically polarized, a vertical antenna usually works best. If the signal is horizontally polarized, mount the antenna horizontally. Matching polarization improves signal transfer and can make a dramatic difference in performance.
4. Where will it be installed?
Indoors, outdoors, attic, balcony, workshop, mast, or field setup? Nearby metal, walls, roofing materials, and even wiring can affect performance. Antennas do not enjoy being crowded.
The Core Formula for a Simple Dipole Antenna
For a practical half-wave dipole, a very common starting formula is:
Total length in feet = 468 / frequency in MHz
If you prefer metric:
Total length in meters = 143 / frequency in MHz
That gives the total dipole length. Each side is half of that number.
Example 1: FM Radio at 100 MHz
Total length = 143 / 100 = 1.43 meters
Each side = 0.715 meters
Example 2: VHF at 146 MHz
Total length = 143 / 146 = 0.98 meters
Each side = 0.49 meters
Example 3: A Quick Wavelength Check
The full wavelength is approximately:
Wavelength in meters = 300 / frequency in MHz
Then a half-wave antenna is about half of that. Practical formulas shorten the result slightly to account for real-world conductor effects, so do not panic if your math and your wire cutter are not in perfect philosophical agreement.
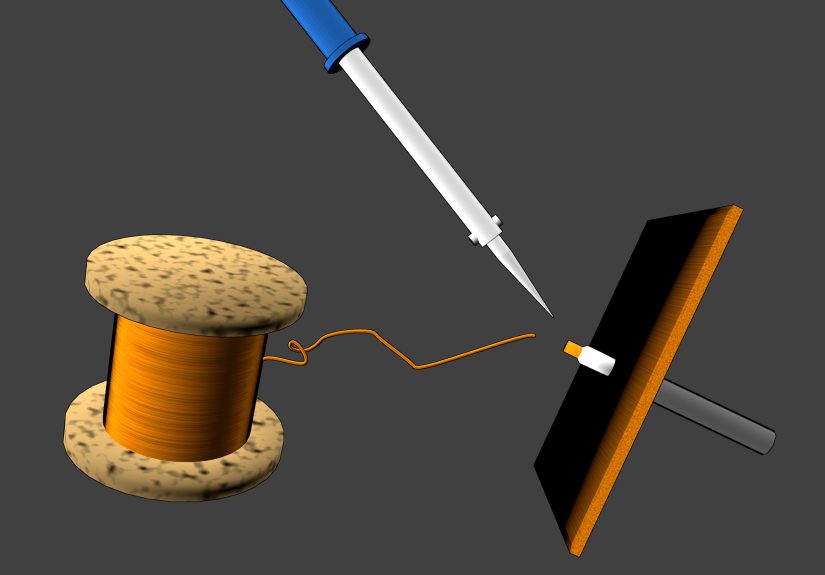
Materials You Need
You do not need a laboratory worthy of a spy movie. For a basic wire dipole, the parts list is refreshingly humble:
- Stranded or solid copper wire
- Coaxial cable for the feed line
- A center connection point or dipole center insulator
- Two end insulators
- Rope, paracord, or non-conductive support line
- A connector appropriate for your radio or receiver
- Optional: a 1:1 choke balun or coax choke
- Optional: an antenna analyzer or SWR meter if transmitting
If you are building for receive-only use, 75-ohm coax is common for TV and some audio-related receiving setups. For many radio projects and transmit-capable setups, 50-ohm coax is a common choice. The feed line does not need to be exotic; it just needs to be appropriate for the band, length, and use case.
Step-by-Step: How to Design and Build a Simple Dipole
Step 1: Pick the target frequency
Choose the exact frequency or the middle of the band you care about most. If you want the antenna to cover a range, design for the center frequency as a starting point.
Step 2: Calculate the total length
Use the formula:
Total length in meters = 143 / MHz
Then divide by two for the two legs.
Step 3: Cut the wire slightly long
Cut each side a little longer than the calculated value. A good rule is to leave extra length for trimming. It is much easier to shorten a wire than to negotiate with physics after you cut it too short.
Step 4: Attach the two legs to the feed point
One wire leg goes to the center conductor, and the other goes to the shield side through the dipole feed arrangement. Keep the center mechanically secure and electrically clean.
Step 5: Add support and isolate the ends
Use non-conductive supports and insulators so the wire stays under light tension without shorting into metal structures or supports.
Step 6: Mount it in the right orientation
If you need horizontal polarization, stretch the antenna horizontally. If vertical polarization matters, a vertical-style build may be better. Orientation is not decoration; it is part of performance.
Step 7: Keep it away from nearby metal
Gutters, metal roofs, ducts, racks, and large appliances can detune the antenna. Even a beautifully calculated dipole can behave badly when hung too close to conductive objects.
Step 8: Test and trim
If the antenna is too long, its resonant point will be lower than expected. If it is too short, resonance will shift higher. Trim in small, equal amounts from both sides. Tiny cuts can make a noticeable difference.
What About a Quarter-Wave Vertical?
A quarter-wave vertical is another simple antenna design, and it can be excellent. It is often compact and convenient, especially for mobile, embedded, or small-footprint applications.
But for beginners, it has one annoying catch: it usually needs a ground plane or radials to work properly. Without that, performance can drop, matching can get weird, and your “simple” build starts developing opinions. That is why the dipole is often the best first method. It gives you a more complete and predictable antenna without depending as heavily on the mounting structure.
Still, if you want a quick formula for a quarter-wave radiator:
Length in meters = 71.5 / frequency in MHz
For many monopole-style antennas, ground plane size and radial layout matter a lot. That is one reason two antennas cut to the same length can behave very differently in practice.
Understanding SWR, VSWR, and Why Matching Matters
If you are transmitting, one of the most important checks is SWR or VSWR, which reflects how well the antenna system is matched to the feed line and source impedance. A perfect match is 1:1, though real-world antennas are rarely perfect outside of textbooks and very smug marketing brochures.
For many practical systems, under 2:1 VSWR is considered workable, and lower is better. Poor matching means more reflected energy, lower efficiency, and less predictable performance.
Common reasons for bad matching
- The antenna is too long or too short
- Nearby metal is detuning the antenna
- The feed line routing is affecting the current pattern
- The antenna type does not match the application
- A vertical antenna is missing an effective ground plane or radials
A simple choke balun at the feed point can help reduce common-mode current on the coax and improve dipole behavior. You do not always need one, but many simple dipoles behave better with one than without one.
Simple Antenna Design Tips That Actually Help
Use the highest practical mounting height
In general, antennas benefit from clearer surroundings. Height can improve performance, though the exact result depends on the band, terrain, and antenna type.
Keep the feed line neat
Do not wrap coax into random artistic knots near the antenna. Route it cleanly and keep stress off the feed point.
Trim symmetrically
If you shorten a dipole, trim both sides equally to preserve balance.
Do not overbuild the first version
Your first antenna does not need titanium hardware, a wind tunnel, and a logo. Build a basic version, test it, learn from it, then improve it.
Match the antenna to the service
For a local VHF or UHF service, a vertical may make sense. For a simple general-purpose wire build, the dipole remains one of the best starting points.
Example: Designing a Simple FM Dipole
Let’s say you want a simple indoor antenna for around 98 MHz.
Total length = 143 / 98 = 1.46 meters
Each side = 0.73 meters
You could cut two wire legs slightly longer, attach them to a simple feed point, and mount the antenna in a T-shape. For many FM reception projects, this straightforward design works surprisingly well. If the signal seems weak, experiment with placement and orientation before blaming the antenna itself. Often the room is the drama queen, not the wire.
Mistakes to Avoid
- Choosing the wrong frequency. Always design for the actual operating frequency, not a vague guess.
- Ignoring polarization. A perfectly cut antenna can still underperform if it is oriented the wrong way.
- Mounting near metal. Metal changes the game, usually without asking permission.
- Cutting exactly to the formula with no trimming allowance. Leave a little extra.
- Assuming all coax and connectors are interchangeable. Impedance and quality matter.
- Skipping testing. Even simple antennas benefit from measurement and adjustment.
Safety Matters More Than Signal Bragging Rights
Any outdoor antenna project should be planned with basic safety in mind. Keep well away from overhead utility lines, use secure mounting methods, and do not install antennas in bad weather. If you are transmitting, pay attention to equipment guidelines, RF exposure considerations, power levels, and local regulations.
No contact is worth a slightly better signal report. A safe antenna that works is better than a perfect antenna installed recklessly.
Best Method Summary
If you want the best method for how to design a simple antenna, here it is in one clean sentence: start with a half-wave dipole designed for your target frequency, cut it slightly long, mount it in the correct orientation, and trim it based on real-world testing.
That method is simple, economical, educational, and effective. It teaches the fundamentals of antenna design without dropping you headfirst into unnecessary complexity. Once you build one good dipole, the rest of antenna design starts making a lot more sense.
Experience-Based Lessons From Building Simple Antennas
The interesting thing about simple antennas is that they almost never behave exactly like the neat sketch in your notebook. They behave like real objects in real places, which means walls, trees, wiring, nearby metal, and mounting height all get a vote. That is not bad news. It is actually where you learn the most.
A lot of beginners expect the first version of an antenna to work perfectly because the math looked clean. Then they hang it in an attic next to ductwork, run the coax in a strange loop, and wonder why the performance is a little moody. That experience is normal. In fact, it is part of the design process. The formula gets you close; experimentation gets you home.
One of the most valuable lessons people learn from building a simple dipole is that small changes matter. Move the antenna a few feet. Rotate it. Raise it a little higher. Pull it farther from a metal surface. Suddenly the signal improves. That moment teaches more than ten pages of theory because you can actually see how the environment interacts with the antenna.
Another common experience is discovering that trimming feels scarier than it should. You cut the wire a little long, test it, then stare at the extra length like it holds the meaning of life. The trick is to trim in very small, equal increments and stay patient. Antenna work rewards calm hands and punishes dramatic chopping.
People also learn quickly that “simple” does not mean “careless.” A simple antenna can perform very well when the feed point is solid, the wire lengths are balanced, and the mounting is thoughtful. Meanwhile, an expensive setup can underperform if installed badly. That is a humbling lesson, but also an encouraging one. Good design often beats fancy parts.
There is also a quiet satisfaction in hearing or receiving something through an antenna you built yourself. The first time that happens, the project stops being abstract. It becomes tangible. You are no longer just reading about resonance, polarization, and matching. You are seeing them work in front of you.
Over time, builders start noticing patterns. Dipoles are dependable. Verticals are convenient but pickier about ground conditions. Indoor builds are easy to test but more vulnerable to household interference. Outdoor builds often perform better but demand more planning and safety awareness. Those experiences help you choose the right antenna for the next project instead of guessing.
Perhaps the best experience-based lesson is this: your first antenna does not need to be your final antenna. Treat it like version one. Build it, test it, learn from it, and improve it. That mindset removes a lot of pressure and makes the process more enjoyable. Antenna design is not about creating a flawless masterpiece on day one. It is about building a working design, observing what happens, and getting smarter with every adjustment.
And honestly, that is why simple antenna projects remain so satisfying. They combine theory, hands-on problem solving, and just enough trial and error to keep you humble. Or at least humble-ish.
Conclusion
A simple antenna does not have to be crude, and an effective antenna does not have to be complicated. For most beginners, the best method is still the half-wave dipole because it balances easy math, low cost, strong performance, and valuable real-world learning. Start with the correct frequency, use the proper formula, build carefully, test patiently, and adjust with purpose. That approach gives you the best chance of creating an antenna that is not only simple on paper but genuinely useful in practice.