
Table of Contents >> Show >> Hide
Fresh grown catnip is one of those garden rewards that makes you feel oddly powerful. You plant a small green sprig, give it sunlight, water, and maybe a little pep talk, and suddenly you have a mint-family jungle that your cat treats like a five-star resort. The good news? Catnip is easy to grow. The even better news? It is also easy to dry, store, and use laterif you do it correctly.
Learning how to dry fresh grown catnip matters because the drying process protects the plant’s aroma, texture, and usefulness. Catnip leaves and flowers contain fragrant plant oils, and those oils are the reason dried catnip can make toys more exciting, scratching posts more interesting, and sleepy cats suddenly audition for the Olympics. But heat, sunlight, moisture, and poor storage can weaken that lovely herbal punch faster than a cat knocking a glass off the table while maintaining eye contact.
This guide walks you through a simple five-step process for harvesting, cleaning, drying, testing, and storing homegrown catnip. You will also find practical tips for air drying, dehydrator drying, preventing mold, keeping the best aroma, and avoiding the classic mistake of stuffing wet herbs into a jar and hoping for the best. Spoiler: hope is not a food-preservation method.
Why Dry Fresh Catnip at Home?
Drying catnip is one of the easiest ways to preserve a garden harvest. Fresh catnip is wonderful, but it does not stay fresh forever. Once harvested, the leaves begin losing quality. Drying removes enough moisture to help the herb store safely while keeping much of its scent and usefulness intact.
Home-dried catnip also gives you more control. You know where the plant grew, whether pesticides were used, when it was harvested, and how it was handled. That is especially useful if you plan to use dried catnip in cat toys, cat beds, enrichment puzzles, homemade sachets, or garden-inspired gifts for fellow cat people.
Another benefit is timing. Catnip grows enthusiastically in many home gardens. As a member of the mint family, it can spread quickly, so harvesting and drying it is a smart way to manage the plant while turning all that leafy energy into something useful. A well-timed trim can encourage bushier growth and give you a tidy supply of dried leaves for later.
Best Time to Harvest Catnip for Drying
The best catnip for drying is clean, healthy, and aromatic. Harvest when the plant has enough growth to recover after cutting. For a perennial herb like catnip, avoid removing the entire plant at once. A practical rule is to take only part of the growth so the plant can keep photosynthesizing, recovering, and producing fresh stems.
For peak aroma, harvest in the morning after dew has dried but before the day becomes hot. This timing helps reduce extra moisture on the leaves while preserving the oils that give herbs their scent. If you harvest while the leaves are wet, drying takes longer and mold risk goes up. If you harvest in blazing afternoon heat, the plant may wilt faster and lose quality.
Many herbs are most flavorful just before flowering or as the first buds appear. With catnip, leaves and flowering tops are both commonly dried. If your plant is starting to bloom, that is a great time to cut stems for drying. Just avoid old, damaged, diseased, dusty, or insect-chewed material. Your future self does not want a jar labeled “premium catnip” that looks like it was swept from under a lawn mower.
How to Dry Fresh Grown Catnip: 5 Steps
Step 1: Harvest Healthy Catnip Stems
Use clean scissors, garden snips, or pruners to cut catnip stems. Make clean cuts just above a set of leaves. This encourages the plant to branch out and grow back fuller. If you are harvesting from an established plant, choose stems that look fresh, green, and fragrant.
Do not harvest catnip that has been treated with pesticides not intended for edible or herb foliage use. Even if the dried catnip is meant for your cat rather than your dinner plate, it is still something your pet may sniff, lick, chew, or roll in. Clean growing practices matter.
After cutting, keep the stems out of direct sun. Bright light and heat can reduce color and aroma. Bring the catnip indoors soon after harvesting. If you are collecting several herbs at once, label the bundles. Dried herbs can look surprisingly similar, and nobody wants to discover that the “catnip mouse refill” is actually oregano. Your cat will judge you. Fairly.
Step 2: Clean and Prepare the Catnip
Shake the stems gently outdoors to remove loose soil or tiny garden visitors. Then inspect the leaves. Remove yellowed leaves, damaged stems, weeds, grass, and anything that clearly did not RSVP to the drying party.
If the catnip is visibly dirty, rinse it gently under cool running water. Do not soak it. After rinsing, shake off extra water and pat the stems dry with clean paper towels. A salad spinner can also help remove surface moisture from leaves. This step is important because excess water slows drying and increases the chance of mold.
If your catnip was grown in a clean container, away from soil splash and dust, you may not need heavy washing. Still, careful inspection is worth the extra minute. Drying concentrates what is already on the plant, so start with the cleanest material possible.
Step 3: Choose a Drying Method
There are several ways to dry fresh catnip, but the best method depends on your space, humidity, equipment, and patience level. The main options are air drying, dehydrator drying, oven drying, and microwave drying. For most home gardeners, air drying or using a dehydrator gives the best balance of quality and convenience.
Air Drying Catnip
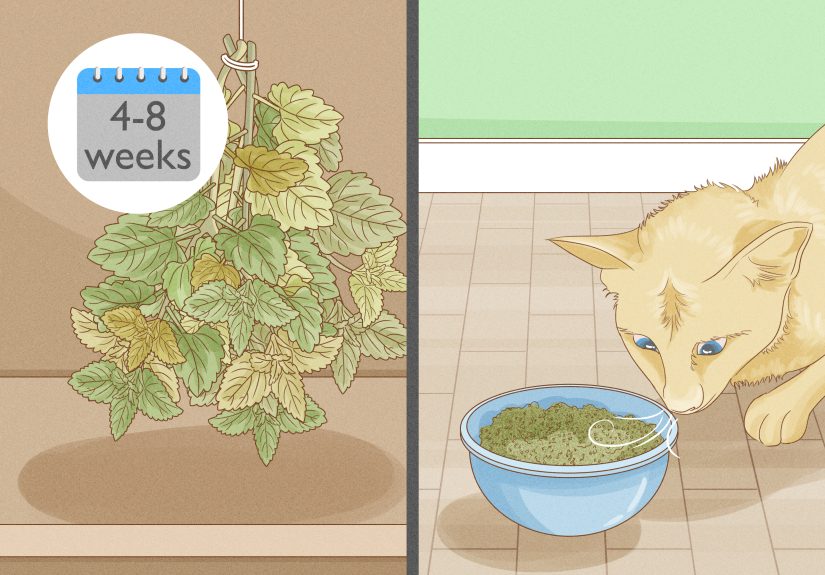
Air drying is simple and low-cost. Gather four or five stems into a small bundle and tie the cut ends with string or a rubber band. Keep bundles small because large bunches trap moisture inside, and trapped moisture is basically an engraved invitation for mold.
Hang the bundles upside down in a warm, dry, dark, well-ventilated room. A pantry, spare room, dry basement area, or airy indoor porch may work if humidity is low. Avoid hanging catnip near the stove, sink, dishwasher, bathroom, or laundry area because those places often add moisture to the air.
For extra protection, place each small bundle inside a clean paper bag with holes punched in the sides. The bag helps protect drying catnip from dust while still allowing airflow. Keep the stem ends near the opening, close loosely, and hang the bag where air can move around it. This method is especially helpful for mint-family herbs because they tend to hold more moisture than woody herbs.
Air drying usually takes about 5 to 14 days depending on humidity, room temperature, bundle size, and airflow. Catnip should dry slowly enough to protect aroma but quickly enough to prevent mold. If the room feels damp, choose a dehydrator instead.
Dehydrator Drying Catnip
A food dehydrator is faster and more controlled. Place catnip leaves or small stems in a single layer on dehydrator trays. Do not pile the leaves into fluffy green mountains. Air needs room to circulate.
Set the dehydrator to a low herb-friendly temperature, usually around 95°F to 115°F. In humid conditions, some guidance allows slightly higher settings, but lower heat generally protects flavor and aroma better. Drying time may range from 1 to 4 hours, though the exact time depends on the machine, humidity, leaf size, and how much catnip you load at once.
Check the catnip regularly. It is better to check too often than to forget it until it smells like sad lawn clippings. Properly dried leaves should crumble easily, and small stems should snap rather than bend.
Oven Drying Catnip
Oven drying can work, but it requires caution. Many ovens run too hot for delicate herbs, even on the lowest setting. Too much heat can reduce aroma, dull the color, and make the leaves taste or smell cooked rather than naturally dried.
If you use an oven, choose the lowest possible temperature, spread leaves in a thin layer, and keep the door slightly open if safe and practical. Check frequently. Oven drying is best reserved for humid climates where air drying is risky and no dehydrator is available.
Microwave Drying Catnip
Microwave drying is best for very small batches. Place clean, dry leaves in a single layer between plain white paper towels and heat in short intervals. Check often because herbs can go from “almost dry” to “crispy regret” very quickly. Always follow your microwave manufacturer’s guidance, and avoid recycled paper towels because they may contain tiny metal fragments that can spark.
For most gardeners drying a meaningful catnip harvest, the microwave is not the first choice. It is useful when you need a quick handful, not when your catnip plant has become a small shrub with ambitions.
Step 4: Test Catnip for Dryness
Do not store catnip until it is fully dry. This is the step where patience saves the harvest. Leaves should crumble easily between your fingers. Stems should feel brittle and snap when bent. If stems bend or leaves feel leathery, the catnip needs more drying time.
Check several pieces from different parts of the batch. The outside of a bundle may dry faster than the inside. If some leaves are crisp but others still feel soft, keep drying. Moisture hiding in the middle of a batch can cause mold later, even if the jar looked fine on day one.
Also use your senses. Properly dried catnip should smell herbal, minty, grassy, and pleasantly sharp. It should not smell musty, sour, damp, or dusty. If you see fuzzy growth, dark wet patches, or smell mold, discard the affected batch. It is frustrating, yes, but safer than giving questionable herbs to a pet.
Step 5: Strip, Store, and Label the Dried Catnip
Once the catnip is fully dry, strip the leaves and flowers from the stems. You can keep small tender pieces, but remove thick stems because they take up space and are less useful in toys or sachets.
For best aroma, store dried catnip leaves as whole as possible. Crushing herbs before storage exposes more surface area to air, which can speed aroma loss. Instead, crumble the leaves right before using them. Think of whole dried leaves as a savings account for scent. Crush only when you are ready to spend.
Place dried catnip in an airtight glass jar, tin, or food-safe container with a tight lid. Label it with the herb name and drying date. Store the container in a cool, dry, dark location away from sunlight, heat, moisture, and strong odors. A cupboard away from the stove and sink is much better than a sunny windowsill.
For best quality, use dried catnip within six months to one year. It may not become unsafe immediately after that, but the aroma will fade over time. If your cat sniffs it once and walks away with the facial expression of a disappointed restaurant critic, the batch may simply be old.
Common Mistakes When Drying Catnip
Mistake 1: Drying Bundles That Are Too Large
Big bundles look rustic and charming, like something from a cottage kitchen calendar. Unfortunately, they also dry unevenly. The outer leaves may become crisp while the inner leaves stay damp. Keep catnip bundles small so air can move through them.
Mistake 2: Drying in Direct Sunlight
Sunlight can reduce color and aroma. Dry catnip in a dark or shaded indoor space instead. The goal is not to roast the herb; it is to remove moisture while protecting its natural oils.
Mistake 3: Storing Catnip Too Soon
This is the big one. If catnip is not fully dry before it goes into a jar, moisture gets trapped. Trapped moisture can lead to mold. Always test leaves and stems before storage.
Mistake 4: Grinding the Whole Batch
Ground catnip loses aroma faster than whole leaves. Keep the dried leaves mostly intact and crush small amounts as needed. Your cat will not mind doing some of the crushing personally by rolling on it like a furry breadstick.
Mistake 5: Forgetting to Label the Jar
Dried herbs can become mystery jars very quickly. Label the container with “catnip” and the date. This helps you rotate older batches first and avoid confusing catnip with kitchen herbs.
How to Use Dried Catnip
Dried catnip is most often used for cat enrichment. You can sprinkle a small amount on a scratching post, add it to refillable cat toys, tuck it into a fabric sachet, or use it to refresh an older toy. Start with a small amount because some cats react strongly, some react mildly, and some act like you have offered them a tax form.
Not every cat responds to catnip. Sensitivity is influenced by genetics and age. Kittens often show little interest until they are older. If your cat does not care about catnip, the drying method may not be the problem. Your cat may simply have different hobbies, such as sitting in boxes that are clearly too small.
Use dried catnip in moderation. A pinch is usually enough for a toy or scratching area. Too much can make a mess and may overwhelm the scent. Store the rest tightly sealed so it stays fresh longer.
How to Keep Homegrown Catnip Productive
Catnip grows best when harvested regularly but not brutally. Cut stems above a leaf node, water the plant as needed, and give it enough sunlight. Because catnip belongs to the mint family, it may spread aggressively in the garden. Growing it in a container or a sunk pot can help keep it from wandering into places where you did not invite it.
If your plant flowers heavily and begins looking tired, trim it back lightly. This can encourage fresh leafy growth. Avoid overfertilizing. Many herbs produce stronger aroma when grown in reasonably lean, well-drained soil rather than overly rich conditions that push fast, soft growth.
At the end of the season, dry one final harvest before cold weather slows the plant. A few well-timed cuttings can give you enough dried catnip for months of toys, sachets, and feline entertainment.
Extra Experience: What Drying Fresh Catnip Teaches You After a Few Batches
The first time you dry fresh grown catnip, you may feel tempted to overcomplicate it. You might wonder whether the leaves need to be perfectly arranged, whether the room is exactly the right temperature, or whether your cat should be appointed quality-control manager. For the record, cats are enthusiastic quality-control managers but terrible at paperwork.
In real home gardening, the biggest lesson is that airflow matters more than fancy equipment. A small bundle in a dry room usually beats a giant bundle in a damp corner. The leaves need space. When catnip is packed too tightly, it dries slowly and unevenly. After a few harvests, you learn to make smaller bundles, spread leaves thinner, and stop trying to dry the entire plant in one heroic operation.
Another useful experience is learning your local humidity. In a dry climate, air drying may be beautifully simple. In a humid summer kitchen, the same method may feel like waiting for socks to dry in a rain cloud. If your catnip still feels soft after several days, switch to a dehydrator or use a better-ventilated room. The plant is not being difficult; the air is.
You will also notice that harvest timing changes the final aroma. Catnip cut after the dew dries tends to behave better than catnip cut early while wet. Leaves harvested from healthy, vigorous stems usually dry greener and smell stronger. Old, dusty, yellowing stems are not worth preserving. Drying does not magically upgrade poor-quality leaves. It simply preserves what you started with.
Storage is another place where small habits make a big difference. A clean glass jar with a tight lid works well. Keeping the jar in a dark cupboard helps preserve aroma. Opening the jar every day just to admire your work, while emotionally understandable, lets in air and reduces freshness. Admire responsibly.
One of the funniest parts of drying catnip is testing the finished batch around cats. Some cats become instant fans. They rub their cheeks on the toy, flop dramatically, kick with their back feet, and look briefly like they have discovered the meaning of life behind the couch. Other cats sniff once and stroll away. That does not always mean the catnip is bad. Catnip response varies, and freshness is only one part of the story.
For homemade cat toys, slightly crushed dried leaves work better than powder. Powder can leak through fabric and create a green dust situation that looks suspiciously like a tiny herb tornado. Whole dried leaves, lightly crumbled before use, hold their scent longer and are easier to handle. If you sew refillable toys, store the extra catnip separately and refresh the toy every couple of weeks.
Finally, drying catnip teaches you not to waste abundance. A plant that once looked like a cute little garden accent can become a generous producer. Instead of letting stems flop over, flower out, or spread too far, you can harvest, dry, share, and store. It is a simple garden rhythm: grow, cut, dry, label, and enjoy. Your cat gets enrichment, your garden stays tidier, and you get the quiet satisfaction of turning fresh leaves into something useful. That is a pretty good deal for a plant that started as a $3 nursery pot and a dream.
Conclusion
Drying fresh grown catnip is easy when you focus on the basics: harvest at the right time, remove moisture, dry in small batches, protect the leaves from heat and sunlight, and store the finished herb in an airtight container. Whether you air dry it in paper bags or use a dehydrator for faster results, the goal is the same: crisp leaves, brittle stems, fresh aroma, and no trapped moisture.
The five-step method is simple enough for beginners but reliable enough for serious herb gardeners. Start with clean, healthy catnip. Handle it gently. Keep air moving. Test for dryness before storage. Then tuck your dried catnip away in a cool, dark cupboard until your cat needs a toy refresh, a scratching-post upgrade, or a little herbal excitement on an otherwise ordinary Tuesday.


