
Table of Contents >> Show >> Hide
- Before You Start: Tools, Materials, and Reality Checks
- How to Install an Exterior Door: 14 Steps
- Step 1: Measure the existing opening (and the new unit) like you mean it
- Step 2: Protect the work area and remove hardware
- Step 3: Remove interior trim and expose the frame
- Step 4: Remove the old door and jamb
- Step 5: Inspect and repair the rough opening (this is where pros win)
- Step 6: Dry-fit the new prehung door (no sealant yet!)
- Step 7: Level the sill and prep support shims
- Step 8: Install (or build) a sill pan for water protection
- Step 9: Flash the opening and integrate with your weather-resistive barrier
- Step 10: Apply sealant in the right places (not everywhere)
- Step 11: Set the door in the opening and tack it in place
- Step 12: Plumb the hinge-side jamb and shim like a pro
- Step 13: Align the strike-side jamb, set consistent reveal, then fasten
- Step 14: Insulate, seal, trim, and weatherproof the exterior
- Troubleshooting: Common “Why Is My Door Doing That?” Problems
- Maintenance Tips (So You Don’t Have to Do This Again Soon)
- Real-World Lessons: of Door-Install Experiences (The Stuff People Learn the Hard Way)
- SEO Tags
Installing a new exterior door is one of those projects that looks intimidating until you realize it’s basically:
make opening flat and dry, make door square and happy, then seal everything like you’re frosting a very expensive cake.
Done right, you get better security, fewer drafts, less noise, and a front entry that doesn’t scream “1998 called, it wants its door back.”
This guide focuses on the most common DIY-friendly approach: installing a prehung exterior door
(the door already mounted in its frame). If you’re trying to hang a slab door into an old jamb with a mystery tilt, a creative twist,
and hinges from three different decades… that’s a different kind of adventure.
Before You Start: Tools, Materials, and Reality Checks
What you’ll typically need
- Tools: tape measure, level (2–4 ft), square, hammer, pry bar, drill/driver, utility knife, caulk gun, shims, oscillating tool or reciprocating saw (optional but helpful), putty knife, safety glasses, gloves.
- Materials: exterior-grade screws (often 3″), nails for trim, exterior sealant/caulk, low-expansion spray foam (doors/windows type), flashing tape, sill pan (store-bought or site-built), backer rod (if needed), new exterior trim/brickmold if replacing.
Quick safety + sanity notes
- Doors are heavy and awkward. Recruit a helper. Your lower back will send a thank-you card.
- Check local requirements. Some exterior doors (like doors between house and attached garage) may have fire-rating rules or self-closing requirements depending on jurisdiction.
- Water management is not optional. Most “my new door leaks” problems aren’t the doorthey’re the flashing and seal details around it.
Choose the right door (so it fits the hole you actually have)
Confirm the size (door slab size and frame size), swing/handing,
and jamb depth (common depths align with typical wall thickness).
A fast handing check: stand outside the house. If the hinges are on the left, it’s generally a left-hand door (and vice versa).
Also confirm whether your exterior is brick, siding, stucco, etc., because trim and flashing details can differ.
How to Install an Exterior Door: 14 Steps
Step 1: Measure the existing opening (and the new unit) like you mean it
Measure the door slab width/height, then measure the rough opening (framing opening) once trim is off,
or as best you can before demo. Your goal is a rough opening that gives you room to shim the unit plumb and level.
Check for a bowed wall, sagging header, or floor that slopes toward the house (a classic “welcome, water!” situation).
- Measure width at top/middle/bottom; height at left/middle/right.
- Check squareness by measuring diagonals of the opening (they should be close).
- Confirm new door unit size matches your situation before you remove the old one.
Step 2: Protect the work area and remove hardware
Remove the storm door (if any), doorbell parts (carefully), and any accessories in the way.
Inside, put down a drop clothold trim can come off with the enthusiasm of a popcorn ceiling.
Step 3: Remove interior trim and expose the frame
Score caulk lines with a utility knife to prevent paint tear-out. Pry off interior casing.
If you plan to reuse trim, pry gently and label pieces. If your trim looks like it’s been in three remodels already,
feel free to let it retire with dignity.
Step 4: Remove the old door and jamb
Take the door off its hinges first (less weight while you work). Then remove the fasteners securing the jamb to framing.
An oscillating tool can cut nails behind the jamb. Remove exterior brickmold/trim if it’s part of the old unit.
Once the frame is free, pull it out and clean the opening down to solid framing and subfloor/sill.
Step 5: Inspect and repair the rough opening (this is where pros win)
Look for rot, soft wood, mold, or a subfloor edge that crumbles when you glare at it.
Replace damaged framing, tighten loose sheathing, and make sure the sill area is solid.
If the opening is wildly out of square or the sill is severely crowned, fix it nowshims are helpful, but they’re not magic.
Step 6: Dry-fit the new prehung door (no sealant yet!)
Test the fit before you commit to caulk and flashing. Center the unit in the opening, check that the exterior trim/brickmold will sit flat,
and verify that the door clears your finished flooring plan (especially if new flooring is coming later).
If the unit rocks or gaps are huge, you’ve learned something valuablewithout getting sticky.
Step 7: Level the sill and prep support shims
Most exterior doors want a level base so the door doesn’t swing open, swing shut, or develop a personality.
Use composite shims or durable shim material under the threshold area as needed.
Support should be continuous and solid at the thresholdnot “three shims and a dream.”
- Check sill level left-to-right and front-to-back (follow the door manufacturer’s guidance if a slight slope is recommended for drainage).
- Pre-place shims where the threshold needs support so it won’t flex when stepped on.
Step 8: Install (or build) a sill pan for water protection
A sill pan helps catch water that gets past the door and sends it back outside, instead of into your subfloor.
You can use a manufactured pan or create one with flexible flashing tapeeither way, include a back dam (an upturned interior edge)
and a path for drainage to the exterior.
- Clean surfaces so flashing sticks.
- Lap components “shingle style” (lower layers first, upper layers overlapping) so water flows out, not in.
- Seal corners carefullycorners are where leaks go to party.
Step 9: Flash the opening and integrate with your weather-resistive barrier
Proper flashing is about directing water outward in layers. Use flashing tape around the rough opening as recommended for your wall type.
If your house has a weather-resistive barrier (housewrap), integrate tape with it so water can’t sneak behind the system.
For many setups, you’ll flash the sill first, then jambs, then headsaving the top WRB flap to come down over head flashing later.
Step 10: Apply sealant in the right places (not everywhere)
Use exterior-grade sealant where the sill pan or threshold needs it and where the manufacturer calls for itcommonly on the sill pan back dam,
and where trim meets frame (varies by door system). A common DIY mistake is sealing the entire bottom in a way that traps water inside.
The goal is airtight and watertight while still allowing drainage to the exterior where intended.
Step 11: Set the door in the opening and tack it in place
With a helper, tilt the unit into position. Press exterior trim/brickmold snug to the siding/sheathing, keeping it centered.
Use a couple of fasteners (or temporary nails through the trim, if applicable) to hold it while you adjust.
Keep the door closed and latched while you shimthis helps the frame stay aligned.
Step 12: Plumb the hinge-side jamb and shim like a pro
This is the “make the door behave for the next 20 years” step. Use a level to make the hinge side perfectly plumb.
Insert shims behind the jamb near each hinge location. Once aligned, secure the jamb per manufacturer guidance
many installers use longer screws through hinge locations for strength.
- Start at the hinge side: plumb first, fasten second.
- Shim behind each hinge and near the top/bottom corners.
- Don’t crush the jambsnug fasteners, don’t overdrive.
Step 13: Align the strike-side jamb, set consistent reveal, then fasten
Move to the latch/strike side. Shim behind the strike plate area and other recommended points.
Aim for an even “reveal” (the gap between door and frame) around the door.
Close the door and check latch engagement: it should latch smoothly without lifting, slamming, or shoulder-checking.
- If the top reveal is tight on one side, adjust shims before adding more fasteners.
- Use quality screws at structural points; finish nails alone aren’t the security strategy.
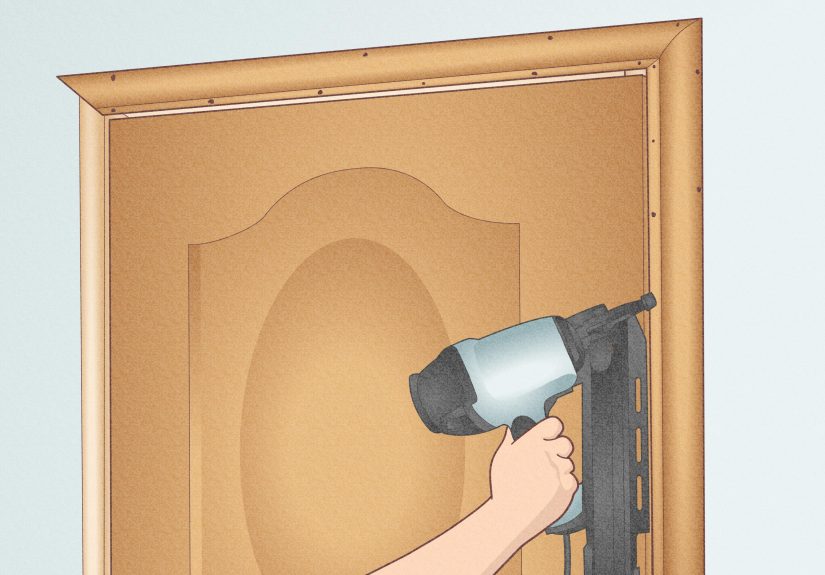
Step 14: Insulate, seal, trim, and weatherproof the exterior
Once the unit operates smoothlyopens, closes, and latches without dramainsulate the gap between jamb and framing.
Use low-expansion foam designed for doors/windows or fiberglass/backer rod as appropriate.
Trim shims flush, reinstall interior casing, and install/repair exterior trim details.
Finally, caulk exterior joints (trim-to-siding, trim corners, etc.) and confirm any head flashing/drip cap is correctly integrated.
- Foam in small lifts; too much can bow the jamb.
- Exterior caulk should be neat and continuousthink “raincoat,” not “modern art.”
- Adjust threshold/sweep as needed so it seals without scraping.
Troubleshooting: Common “Why Is My Door Doing That?” Problems
The door won’t latch unless you push hard
Usually a reveal/alignment issue. Recheck that the hinge side is plumb, then tweak strike-side shims.
Sometimes the strike plate needs minor adjustment, but don’t “hardware your way” out of a framing problem.
The door swings open or closed by itself
That’s gravity tattling: the jamb is out of plumb or the threshold isn’t level. Re-level and re-plumb.
Drafts at the bottom or light you can see
Adjust the threshold (many are adjustable), confirm the sweep is intact, and check that the sill support is solid.
A flexing threshold can break the seal every time someone steps on it.
Water shows up inside during rain
Don’t panicinvestigate. Many leaks come from missing head flashing/drip cap, incorrect flashing tape layering,
or gaps where trim meets siding. Water is patient and will find the single spot you forgot to seal.
Maintenance Tips (So You Don’t Have to Do This Again Soon)
- Re-caulk exterior joints when they crack or separate.
- Keep weatherstripping clean and replace it when compressed or torn.
- Check hinge screws yearly; tighten as needed.
- If it’s a wood door, keep the finish maintainedsun and moisture are relentless.
Real-World Lessons: of Door-Install Experiences (The Stuff People Learn the Hard Way)
If you ask ten homeowners how their exterior door install went, you’ll hear eleven storiesbecause someone will also tell you about the neighbor’s door.
The good news: most “door disasters” aren’t dramatic. They’re small, sneaky issues that show up later as drafts, sticky latching, or mystery moisture.
Here are the most common real-world lessons installers and DIYers share after the fact (usually while staring at a caulk line they wish they could unsee).
1) The shim shuffle is real. People underestimate shimming because shims look like tiny wooden compliments. They are not compliments.
They’re the fine-tuning knobs of the entire installation. The moment you think, “Eh, that gap is close enough,” is the moment your latch starts acting like a toddler refusing bedtime.
The best approach is slow and methodical: adjust shims in tiny moves, check the reveal, close and latch the door, recheck, repeat.
It’s boring, which is exactly why it works.
2) Low-expansion foam is the hero… if you don’t summon the Foam Monster.
Many first-timers treat spray foam like whipped cream: more is better. Then the jamb bows inward, the door rubs,
and suddenly you’re Googling “why won’t my new door close” with a level in one hand and regret in the other.
Use foam labeled for doors/windows, apply it in small passes, and let it cure before adding more. Foam is powerful. Respect it.
3) Water management is 80% of the job. A door can be perfectly plumb and still leak if the sill pan and flashing details are wrong.
The most frequent “I wish I knew” moment is realizing that caulk isn’t a magic shieldit’s just one part of a layered system.
Flashing tape needs to be layered so water drains outward. Head flashing (or a drip cap) matters. Integrating with housewrap matters.
If your climate sees wind-driven rain, these details stop being optional and start being the whole point.
4) The threshold needs real support. People step on the threshold thousands of times a year.
If it flexes because it’s floating over a gap, you can get broken seals, air leaks, and even fastener movement.
The best installs treat the threshold like a mini structural component: level base, supported shims/composite packers, stable contact.
5) “Close enough” reveals become “why is it sticking?” later. Wood framing moves, houses settle, humidity changes.
A door that’s barely acceptable on install day can become annoying six months later. If you can get the reveal even and the latch smooth now,
do it. That tiny extra patience often saves you from re-shimming in the rain while holding a flashlight in your mouth.
Final experience-based truth: the best exterior door installs feel almost anticlimactic. The door swings smoothly, latches with a polite click,
and nothing leaks. If that sounds boring, congratulationsthat’s what success looks like.


