Table of Contents >> Show >> Hide
- What Are Bifold Doors (and Why Do People Love Them)?
- Before You Start: Measure and Prep the Opening
- Tools and Materials You’ll Need
- Step-by-Step: How to Install Bifold Doors
- Fine-Tuning: Adjusting and Troubleshooting Bifold Doors
- Safety Tips and Code Considerations
- Common Mistakes to Avoid When Installing Bifold Doors
- Real-World Experiences Installing Bifold Doors
- Final Thoughts
If your closet still has those heavy, cranky sliding doors that jump the track every time you grab a hoodie, it might be time for an upgrade. Enter bifold doors: light, space-saving, and surprisingly simple to install once you know the basics. Think of this as a Bob Vila–style walkthroughpractical, detailed, and just DIY enough to impress your in-laws.
In this guide, you’ll learn how to install bifold doors from start to finish: measuring the opening, prepping the frame, installing the track and hardware, hanging the doors, and making those final adjustments so everything glides smoothly and closes neatly. Along the way, we’ll borrow best practices from pros and major home-improvement brandslike BobVila.com, This Old House, Lowe’s, and morethen translate them into simple, step-by-step instructions you can actually follow.
What Are Bifold Doors (and Why Do People Love Them)?
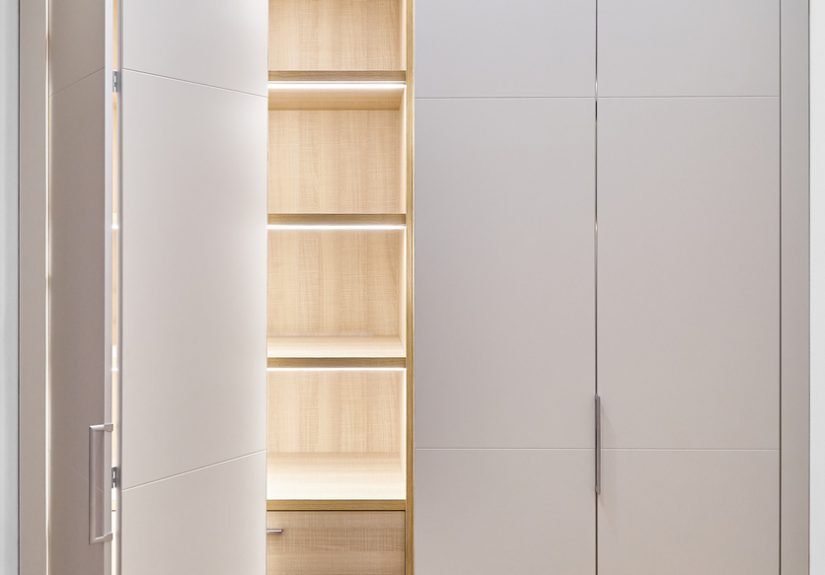
Bifold doors are composed of two (or more) narrow panels hinged together that fold like an accordion as they open. They’re commonly used on bedroom closets, laundry areas, pantries, and utility spaces where you want full access to the opening without a big swinging door in the way.
Compared with traditional sliding closet doors, bifold doors:
- Give you a wider, more open view of the closet interior.
- Use lightweight panels that are easy to operate.
- Come in a wide range of styleslouvered, shaker, mirrored, molded, and more.
- Are usually sold as complete bifold door kits with track and hardware included.
Most interior bifold door kits for closets are relatively affordable and sized to fit standard openings, which makes them ideal for weekend DIYers.
Before You Start: Measure and Prep the Opening
Check the finished opening size
Bifold doors are designed to fit a finished openingmeaning drywall, jambs, and trim are already installed. Manufacturers typically allow only about 1/4 inch of variation from the stated opening size on the packaging, so accurate measuring is critical.
- Measure the width of the opening at the top, middle, and bottom. Use the smallest measurement.
- Measure the height of the opening at both sides. Again, use the smaller number.
- Confirm your opening matches the size listed on the bifold door kit (for example, a 48-inch-wide opening for a pair of 24-inch panels).
If the opening is too large, you may need to add filler strips (like 1×4 or 1×6 pine) at the sides or top to bring it into spec. If it’s slightly out of level or plumb, shims and careful hardware adjustments can still give you a pro-looking result.
Inspect the framing and floor
Before installing the track, make sure:
- The header (top of the opening) is reasonably level.
- The jambs (vertical sides) are mostly plumb.
- The floor beneath the opening is solid and flat where the bottom pivot bracket will sit.
Tiny imperfections can be corrected with shims or hardware adjustments later, but major dips or humps in the floor should be addressed before you continue. Think of it this way: if the opening is a mess, the doors will tattle on you every time they swing.
Tools and Materials You’ll Need
Most bifold door installation kits include track, pivots, brackets, and screws. You’ll supply the tools and a bit of patience. Common tools recommended by major DIY resources include:
- Measuring tape
- Pencil and notepad
- Level (2-foot or 4-foot)
- Drill/driver and bits
- Screwdrivers
- Hammer and wood shims
- Chisel (for minor hinge recesses, if needed)
- Safety glasses and work gloves
- Wood filler, sandpaper, and paint or stain (if you’re finishing the doors yourself)
Many pros recommend painting or staining the doors and letting them dry completely before installationespecially if they’re solid wood or primed only. It’s much easier to finish them lying flat than dangling from a track.
Step-by-Step: How to Install Bifold Doors
Step 1: Mark the track position
Start by deciding where the top track will sit. Most manufacturers suggest installing it near the front of the jamb so that the doors sit nicely under the trim but still have enough clearance to swing and fold.
- Hold the track up to the top of the opening, centered from left to right.
- Leave a small setback (often about 1 inch) from the front edge of the header to allow space for trim or casing.
- Use a pencil to mark the screw-hole positions.
Check the marks with a level. If your header is out of level, you may need to slightly shim the track to ensure the pivot points end up where you want them, especially if you want even gaps between the doors and jambs.
Step 2: Install the top track
With your positions marked, install the track:
- Pre-drill pilot holes (especially in hardwood jambs) to prevent splitting.
- Fasten the track with the screws provided, starting at one end and checking for level as you go.
- Install any pivot brackets or hanging hardware that attach directly to the track according to the manufacturer’s diagram.
Most how-to guidesfrom Bob Vila to Lowe’s and This Old Houseemphasize the importance of a level, firmly secured top track for smooth bifold door operation.
Step 3: Attach hardware to the door panels
Lay the door panels flat on a pair of sawhorses or a clean floor. Follow the kit instructions to install:
- Hinges connecting the two panels.
- Top pivots at the outer corners of the panels.
- Top guides or hangers that ride in the track.
- Bottom pivots that will sit in the floor bracket.
Typically, the outermost corner gets a fixed pivot, while the adjacent top corner gets a spring-loaded guide that snaps into the track. Manufacturer diagrams will show exact distances from the panel edgesdon’t eyeball those. Tiny inaccuracies here can turn into big headaches later.
Step 4: Install the bottom pivot bracket
The bottom pivot bracket anchors the outer edge of the bifold door at the floor. It works in tandem with the top pivot to keep the door straight and stable.
- Measure in from the side jamb according to the door kit instructions (often about the thickness of the door plus a small reveal).
- Mark the bracket location on the floor or sill.
- Pre-drill and screw the bracket into place, ensuring it’s straight and secure.
Many modern kits include adjustable brackets so you can tweak the pivot location slightly if the opening isn’t perfect. That adjustability is your frienddon’t crank everything down so tight that you can’t move it later.
Step 5: Hang the bifold doors
This is where it starts to look like a real door instead of a woodworking puzzle.
- Insert the top pivot into its bracket at the end of the track.
- Compress the spring-loaded top guide and fit it into the track slot.
- Set the bottom pivot pin into the hole in the floor bracket.
Many pros recommend starting with the bottom pivot first on some systems, then tipping the door into place and snapping in the top guidefollow your manufacturer’s sequence. This Old House and other pro guides stress gently easing the pivot into place to avoid bending hardware or scratching the track.
If you’re installing two pairs of bifold doors in a wide opening, repeat the process for the second set. Use a tape measure to keep the gap between pairs consistent so they meet neatly at the center.
Step 6: Install aligners and pulls
To keep the two panels in each bifold pair operating together, most kits include a small aligner that mounts on the back edges where the doors meet when closed.
- Close the doors and mark where the panels meet.
- Attach the aligner so it engages when the doors are nearly shut, helping them close evenly.
- Drill pilot holes and install the door pull or knob at the recommended heightusually around 36 to 42 inches from the floor.
Test the operation by opening and closing the doors several times. If they rub, scrape, or pop out of the track, don’t panicthat’s what the adjustment step is for.
Fine-Tuning: Adjusting and Troubleshooting Bifold Doors
Almost every bifold door installation needs a little adjusting. Even the pros expect to tweak pivot height, bracket position, and track alignment to get perfect gaps and smooth motion.
Adjusting door height and gap
Most bifold systems let you raise or lower the door by turning the adjustable bottom pivot or top pivot screw:
- Turn clockwise to lift the door.
- Turn counterclockwise to lower it.
Start with the bottom pivot. Many installation and adjustment guides emphasize dialing in bottom alignment first, then trimming the top hardware to match. This ensures the door sits square on the floor and doesn’t drift open on its own.
Fixing rubbing or dragging doors
If your bifold door scrapes the floor or drags on the jamb:
- Raise the bottom pivot slightly.
- Check that the track is level; shim it if needed.
- Ensure the bottom bracket isn’t twisted or skewed.
If one panel sticks out more than the other or the doors don’t sit flush when closed, small adjustments to the top guide position and pivot angle usually fix the issue. Guides from door manufacturers and window-and-door pros repeat this theme: tiny turns on the adjustment hardware can make a big difference in how the doors behave.
Dealing with loose or noisy operation
Over time, bifold doors may squeak, rattle, or wobble. Family Handyman and other repair-focused resources suggest:
- Tightening all visible screws on pivots, brackets, and hinges.
- Spraying a dry lubricant on the track (avoid greasy lubricants that attract dust).
- Replacing worn plastic guides or pins with new parts from the manufacturer.
The good news: most bifold hardware is inexpensive and easy to swap. If something looks badly bent or cracked, replacement is usually faster than trying to bend it back into shape.
Safety Tips and Code Considerations
Interior bifold doors rarely raise major building-code issues, but a few safety basics are worth keeping in mind:
- Always wear eye protection when drilling or cutting.
- Use the correct fasteners for your jamb material (for example, longer screws for solid wood vs. MDF).
- Don’t reduce clearances too muchtight gaps can cause pinched fingers or sticking panels.
- If the doors close off mechanical equipment (like a furnace closet), be sure you’re not blocking required ventilation or access clearances.
When in doubt, check local codes or the appliance manufacturer’s instructions to ensure bifold doors are allowed in that location.
Common Mistakes to Avoid When Installing Bifold Doors
After reviewing multiple pro and DIY guides, the same mistakes come up again and again:
- Skipping the measuring step: Assuming the opening is “standard” can leave you with doors that don’t fit or gaps you can’t hide.
- Ignoring level and plumb: Installing track and brackets on crooked framing guarantees alignment issues later.
- Over-tightening hardware: Cranking screws too hard can strip holes or deform brackets.
- Finishing doors after installation: Painting in place risks drips, stuck edges, and a colorful new track.
- Not testing as you go: You should open and close the doors frequently during installation to catch issues early.
Avoid these traps and your bifold door installation will feel less like a wrestling match and more like a satisfying weekend win.
Real-World Experiences Installing Bifold Doors
Every bifold door installation looks straightforward on paper: measure, screw, hang, adjust, done. In real homes, though, walls are rarely perfect, floors are sometimes a little wavy, and older houses have quirks that no instruction sheet fully prepares you for. That’s where real-world experience becomes just as helpful as the hardware diagram.
One common scenario: the closet opening is technically the right width, but the header bows slightly in the middle. When you install the top track, it mirrors that bowwhich means the doors want to tilt toward or away from the jamb as they travel. In practice, DIYers often solve this by shimming the track wherever the header dips. A few carefully placed wood shims between the track and the header can straighten the “path” and help the doors run smoothly, even though the original framing wasn’t perfect.
Another frequent surprise is how much difference the bottom pivot position makes. Installers with a few bifold projects under their belt will tell you they now take extra time locating the bottom bracket. If it’s too far in, the doors can bind against each other; too far out, and you get a wide, awkward gap at the jamb. The trick many pros use is to loosely mount the bracket first, hang the door, and then nudge the bracket in or out until the margins look good and the doors fold naturally. Only then do they fully tighten the screws. It’s a small tweak, but it can save you from uninstalling everything later.
Hardware quality and consistency also show up as “experience lessons.” On some budget kits, the plastic guides and pivot pins feel a little flimsy. Experienced DIYers often check every moving part before they start: if something looks fragile or slightly out of square, they’ll straighten it or, if necessary, replace it with a sturdier aftermarket part. It’s easier to upgrade questionable hardware on the bench than to discover a weak pivot after the door has popped out of the track for the third time.
Then there’s finishing. People who’ve installed multiple sets of bifold closet doors almost all agree on one thing: pre-finish everything. That means painting or staining the door panels, touching up the edges, and even giving the jambs and trim a fresh coat before hanging the doors. Not only does this result in a cleaner, more polished look, but it also prevents the panels from sticking together at the edges once the paint dries. Lightly sanding between coats, especially on the meeting edges, keeps the doors operating smoothly instead of gluing themselves shut the first humid day of summer.
Finally, seasoned installers think about long-term use. Bifold doors in kids’ rooms, laundry areas, or busy hallways will see a lot of action. That’s why experienced DIYers and carpenters tend to:
- Use long, high-quality screws to secure brackets into solid framing where possible.
- Double-check that knobs or pulls are installed at a height and position comfortable for everyone who will be using them.
- Show the household how to open the doors gently by the pull instead of yanking on the edges or corners.
These small habits and adjustments aren’t always spelled out in instructions, but they come directly from living with bifold doors day in and day out. When you combine the manufacturer’s guidance with these lived-in tipschecking alignment early, pre-finishing, tweaking the bottom pivot, and securing hardware into solid materialyou’ll end up with a bifold installation that looks good on day one and still works smoothly years down the line.
Final Thoughts
Installing bifold doors is one of those projects that looks intimidating but becomes very manageable once you break it into steps. By measuring carefully, installing the track level, placing pivots accurately, and taking the time to adjust the hardware, you can achieve a clean, professional result that feels worthy of a Bob Vila–style home upgrade.
Whether you’re hiding laundry machines, organizing a bedroom closet, or updating a hallway storage nook, a well-installed bifold door setup delivers a lot of function in a small footprint. Take your time, test as you go, and remember: if something doesn’t feel right, a small adjustment is usually all it takes to get those doors folding and gliding exactly the way you want.