
Table of Contents >> Show >> Hide
- Why a DIY Chicken Wire Picture Frame Is So Popular
- What You Need
- How to Make a DIY Chicken Wire Picture Frame
- Best Design Ideas for a DIY Chicken Wire Picture Frame
- Mistakes to Avoid
- How to Make It Look More Expensive
- Is Chicken Wire the Best Choice?
- Hands-On Experiences and Lessons Learned From Making One
- Final Thoughts
If your walls are begging for personality and your pile of favorite photos is starting to look like a tiny paper mountain, a DIY chicken wire picture frame might be exactly what your home needs. It is rustic, affordable, customizable, and just the right amount of crafty without requiring a woodworking degree, a fully equipped garage, or a dramatic montage set to banjo music.
This project turns a basic frame into a charming photo display, memo board, card holder, or farmhouse-style wall accent. The magic is simple: instead of traditional glass and backing, you attach chicken wire to the frame so you can clip on photos, notes, postcards, dried flowers, holiday cards, or little reminders that say things like “buy milk” and “please stop buying more frames.”
Better yet, this DIY works with thrifted frames, old mirrors, yard-sale finds, or simple wood frames you build yourself. You can stain it, paint it, distress it, wrap it in fabric, or leave it gloriously imperfect. In other words, this is the kind of project that looks intentional even when you change your mind halfway through. That is true creative freedom.
Why a DIY Chicken Wire Picture Frame Is So Popular
There is a reason this project keeps showing up in farmhouse decor, craft rooms, entryways, and dorm rooms. It checks all the boxes. It is inexpensive, easy to personalize, and useful in ways a traditional picture frame is not. Instead of holding one photo forever, it becomes a flexible display that can evolve with the seasons, your family, or your current obsession with printable quotes.
A chicken wire picture frame works especially well if you want:
- A rustic photo display for family snapshots
- A farmhouse memo board for notes and to-do lists
- A holiday card holder you can reuse every year
- A wall organizer for postcards, invitations, and small art prints
- An upcycled picture frame project with real visual impact
Because the wire has an open pattern, the finished piece feels lighter and more casual than a solid corkboard. It also adds texture, which is design-speak for “it makes your wall look a lot more interesting without trying too hard.”
What You Need
Before you start, gather your supplies. This is not a complicated materials list, which is excellent news for your budget and your patience.
Materials
- One picture frame or an old wooden frame
- Chicken wire or poultry netting
- Staple gun and staples
- Mini clothespins or clips
- Paint, stain, or wax finish if desired
- Hanging hardware
Tools
- Wire cutters or tin snips
- Work gloves
- Safety glasses
- Tape measure or ruler
- Pliers
- Sandpaper
- Optional: wood filler, primer, paintbrush
If you are using a thrifted frame, inspect it before you begin. Make sure the corners feel stable and the frame is not warped. A little wear is charming. A frame that feels like it might collapse if you look at it too hard is less charming.
How to Make a DIY Chicken Wire Picture Frame
Step 1: Pick the Right Frame
You have two solid options here. The first is to repurpose an old frame. This is the easiest route and often the most stylish because vintage frames already have character. Old mirror frames, oversized art frames, and worn wooden frames all work beautifully.
The second option is to build a simple wood frame from scratch. If you go this route, use lightweight boards and keep the design uncomplicated. Straight cuts, a rectangular shape, and a little sanding go a long way. This project is meant to feel accessible, not like you accidentally enrolled in advanced cabinetmaking.
Large frames create more drama and give you more room to display photos. Smaller frames work well on gallery walls or in tight spaces like hallways, kitchens, and home offices.
Step 2: Remove the Backing and Glass
Take the frame apart and remove the glass, cardboard backing, and any inserts. Keep only the outer frame unless you want to reuse the backing as a guide while measuring the wire.
If the frame still has dusty corners, leftover hardware, or mysterious glitter from a previous life, clean it thoroughly. A quick wipe-down now saves you from trapping grime under your finish later.
Step 3: Sand and Prep the Frame
Now give the frame some attention. Sand any rough spots, peeling finish, or splinters. If the surface has dents or holes, use wood filler and sand again once it dries. This step matters more than people think. Even rustic decor looks better when it is smooth enough not to attack your fingertips.
If you plan to paint the frame, apply primer first for a cleaner finish and better paint adhesion. If you love the natural wood look, use stain or a clear wax instead. Want farmhouse style? Try matte white, black, sage green, or a distressed wood stain. Want something more modern? Go with a clean black frame and minimal styling.
Let the finish dry completely before attaching the wire. Wet paint and chicken wire are not friends. They create the kind of texture nobody asked for.
Step 4: Measure the Opening Carefully
Measure the inside opening of the frame, not the outer edges. You want the chicken wire to cover the full opening with a little extra around the perimeter so you can staple it securely to the back.
A good rule is to add 1 to 2 inches on each side. That extra material gives you room to pull the wire taut and fasten it without coming up short. Running out of wire half an inch before the edge is a classic DIY heartbreak.
Step 5: Cut the Chicken Wire
Put on work gloves and safety glasses before touching the wire. Chicken wire can be surprisingly sharp, and this is not the time to discover that your fingers are more delicate than your optimism.
Roll out the chicken wire on a flat surface. Use your measurements to mark the size, then cut with wire cutters or tin snips. Cut slowly and deliberately so the shape stays neat. If a few ends stick out awkwardly, trim them or bend them inward with pliers.
If you prefer a more refined look, you can also use a smaller wire mesh or hardware cloth. Chicken wire gives a more rustic, farmhouse appearance, while tighter mesh feels slightly cleaner and more structured.
Step 6: Attach the Wire to the Back of the Frame
Lay the frame face down on a protected work surface. Center the chicken wire over the back opening. Pull it gently so the pattern looks even and the mesh sits flat.
Start stapling in the middle of one side, then move to the opposite side. Continue with the remaining sides, pulling the wire taut as you go. This keeps the mesh from sagging and helps the finished piece look intentional rather than vaguely exhausted.
Once the wire is anchored at the center points, add staples along all sides every few inches. Make sure the wire is secure, but avoid over-tightening to the point that the frame twists or the wire warps oddly.
If needed, use pliers to tuck in sharp ends or flatten edges against the back. If the back looks messy, do not panic. No one is judging the reverse side of a picture frame unless they are incredibly bored.
Step 7: Add Hanging Hardware
If your frame already has sturdy hanging hardware, great. If not, add D-rings, sawtooth hangers, or picture wire depending on the frame size and weight. Test the balance before hanging it on the wall.
For larger frames, make sure the hanging method matches the weight. A dramatic statement piece is fun. A dramatic crash at 2 a.m. is less fun.
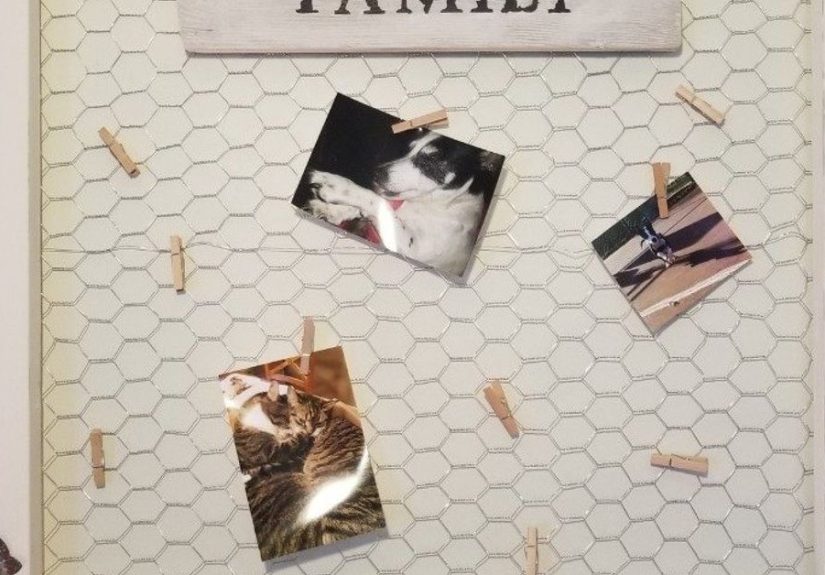
Step 8: Style Your Chicken Wire Frame
This is where the project really comes alive. Use mini clothespins, tiny binder clips, or decorative clips to hang:
- Printed photos
- Postcards
- Holiday cards
- Kids’ artwork
- Recipe cards
- Inspirational quotes
- Dried flowers or greenery
- Wedding table numbers or event memorabilia
For a softer look, weave ribbon or twine across the wire and clip photos to both. For a seasonal display, swap items throughout the year. Fall leaves, Christmas cards, spring botanicals, summer snapshots, done. Your decor now has range.
Best Design Ideas for a DIY Chicken Wire Picture Frame
Farmhouse Entryway Organizer
Use a distressed white or natural wood frame in the entryway for mail, reminders, and family notes. It adds function without looking like office equipment wandered into your house.
Rustic Photo Wall
Create a gallery wall using multiple chicken wire frames in different sizes. Keep the finishes coordinated for a collected, intentional look.
Wedding or Party Display
These frames are great for seating charts, photo displays, favor tags, or cards from guests. After the event, you can reuse the frame at home instead of storing another one-time decoration in the closet forever.
Craft Room Inspiration Board
Hang fabric swatches, color palettes, sketches, and inspiration images. It works like a memo board, but with much more charm and significantly less cubicle energy.
Mistakes to Avoid
Even simple DIY projects can go sideways. Here are the most common problems and how to avoid them:
- Skipping gloves: Chicken wire edges can scratch your hands quickly.
- Cutting the wire too small: Always leave extra material for stapling.
- Not sanding the frame: Rough wood makes even a pretty finish look unfinished.
- Stapling unevenly: Start at the center and work outward for better tension.
- Overloading the display: Too many heavy items can distort the wire and clutter the look.
How to Make It Look More Expensive
A DIY chicken wire picture frame can be budget-friendly without looking cheap. The trick is all in the finishing details.
- Choose a frame with thicker wood or decorative trim
- Use a matte paint or rich wood stain
- Keep your photo display curated instead of overcrowded
- Add coordinated mini clips in black, brass, or natural wood
- Style around it with complementary decor such as baskets, greenery, or candles
If you want a more elevated version, line the back edge with trim or staple ribbon over the wire edges to hide fasteners. Small details make a big difference.
Is Chicken Wire the Best Choice?
For a rustic picture frame, yes, chicken wire is usually the best fit. It is lightweight, easy to cut, inexpensive, and visually interesting. If you want a tighter grid for jewelry, tiny cards, or a cleaner look, hardware cloth may work better. If you want a softer decorative effect, metal screen can also be an option.
But for the classic farmhouse photo holder? Chicken wire wins. It has texture, personality, and just enough imperfection to feel warm and handmade.
Hands-On Experiences and Lessons Learned From Making One
The first time I made a DIY chicken wire picture frame, I started the way many people do: with confidence, a thrift-store frame, and absolutely no appreciation for how springy chicken wire can be. I assumed I would cut one tidy piece, staple it in place, and be done before my coffee got cold. Instead, the wire rolled itself back up like it had opinions. That was my first lesson: this project is easy, but it rewards patience more than speed.
I also learned that an old frame does not always become beautiful just because you have good intentions. Mine looked promising from the front, but the back had loose tabs, flaky finish, and enough dust to qualify as a historical layer. After cleaning it, sanding it, and repainting it, the difference was huge. That experience taught me that prep work is not the boring part of a DIY project. Prep work is the part that saves the final result.
Another lesson came when I tried to pull the wire tight with bare hands for “just a second.” That second was memorable for all the wrong reasons. Gloves are not optional. Neither are safety glasses. Tiny bits of wire and sharp ends do not care that you are making something cute for your hallway. Safety equipment may not look glamorous, but neither does explaining a craft-related injury.
When it came time to staple the wire, I discovered that starting in one corner was a mistake. The mesh skewed, sagged, and looked slightly seasick. Once I removed a few staples and restarted from the center of each side, everything aligned much better. That one adjustment made the project feel polished instead of improvised. It reminded me that neat tension is what makes this kind of frame look store-bought in the best way.
Styling the frame turned out to be the most fun part. I originally thought I would use it only for photos, but once it was hanging, it became a rotating display. Family snapshots mixed with postcards, a handwritten recipe, a dried stem of eucalyptus, and one tiny note with a grocery reminder somehow made the whole piece feel personal. That is probably my favorite thing about a chicken wire picture frame: it is never truly finished. It changes with your life.
Over time, I have found that these frames also make great gifts. They feel handmade, but they are practical enough that people actually use them. A wedding version can hold engagement photos and cards. A dorm-room version can display snapshots, ticket stubs, and reminders. A kitchen version can hold recipes, menus, and cheerful notes. The project is simple, but it does not feel generic.
If I had to sum up the experience, I would say this: the best DIY projects are the ones that leave room for personality. A chicken wire frame is not about perfection. It is about texture, memory, and making something useful with your own hands. And if the back has a few extra staples nobody can see, that is not failure. That is called character.
Final Thoughts
A DIY chicken wire picture frame is one of those rare projects that hits the sweet spot between easy, affordable, and genuinely attractive. It lets you upcycle old frames, personalize your decor, and create a flexible display you can update whenever inspiration strikes. Whether you lean farmhouse, vintage, modern rustic, or somewhere between “curated cottage” and “I had leftover wire,” this project can fit your style.
The best part is that it does not require perfect craftsmanship to look good. With a little sanding, careful measuring, and a few well-placed staples, you can make something that feels thoughtful, useful, and full of charm. That is a pretty great return on one frame and a roll of chicken wire.


