Table of Contents >> Show >> Hide
- Why DIY Floating Witch Hats Are So Popular
- Supplies You’ll Need
- Step 1: Plan the Floating Witch Hat Display
- Step 2: Attach Hooks or Anchors
- Step 3: Thread the Fishing Line Through the Hat
- Step 4: Add Lights Inside the Witch Hats
- Step 5: Hang the Hats at Different Heights
- Step 6: Style the Area Around the Floating Witch Hats
- Safety Tips for Outdoor Floating Witch Hats
- How to Make Floating Witch Hats Look More Expensive
- Troubleshooting Common Problems
- Budget Breakdown
- How to Store Floating Witch Hats After Halloween
- Creative Variations to Try
- Real-Life Experience: What I Learned Making DIY Floating Witch Hats
- Conclusion
Every Halloween porch needs one decoration that makes neighbors slow down, point, and whisper, “Okay, that’s actually cool.” DIY floating witch hats are exactly that kind of magic. They look like a coven parked its broomsticks somewhere nearby and left the hats hovering in midair while everyone went inside for cider. The best part? This project is beginner-friendly, budget-friendly, and does not require a secret spell book, unless your junk drawer counts.
Floating witch hats are made by suspending lightweight witch hats from clear fishing line, invisible thread, or nylon line. Add battery-operated LED tea lights, fairy lights, or puck lights inside each hat, and suddenly your porch, hallway, entryway, tree branch, or party room has a glowing haunted-house effect. This guide walks you through every step: supplies, planning, hanging, lighting, styling, safety, troubleshooting, and real-life decorating tips learned the slightly wobbly way.
Why DIY Floating Witch Hats Are So Popular
DIY floating witch hats work because they deliver a big visual payoff with very simple materials. A few black hats, clear line, and warm lights can transform a plain ceiling or porch into a Halloween scene that feels whimsical, spooky, and polished. They are also highly customizable. You can go classic black, elegant velvet, rustic burlap, glittery purple, orange-and-black party style, or full “witch academy entrance exam” drama.
They are especially great for covered porches because the floating illusion looks best when hats hang at different heights over a walkway. Trick-or-treaters see the hats before they see the candy bowl, which is exactly how Halloween curb appeal should work. Indoors, they look fantastic over a dining table, stair landing, entry bench, mantel area, or kids’ Halloween party dessert station.
Supplies You’ll Need
Before you begin, gather everything in one place. Nothing ruins crafting momentum faster than standing on a ladder while realizing the scissors are in another room and your hat is slowly spinning like a confused bat.
Basic Supplies
- 6 to 12 lightweight witch hats
- Clear fishing line, invisible thread, or thin nylon line
- Small sewing needle, upholstery needle, or safety pin
- Clear outdoor adhesive hooks, cup hooks, ceiling hooks, or small nails
- Battery-operated LED tea lights, fairy lights, or puck lights
- Scissors
- Measuring tape
- Ladder or step stool
- Optional: floral wire, hot glue, mini clothespins, ribbon, faux spiders, bats, or tulle
Choosing the Right Witch Hats
For the easiest floating effect, use lightweight fabric witch hats. Costume hats from craft stores, dollar sections, party shops, and seasonal aisles usually work well. Look for hats with a soft cone and a brim wide enough to hide a small light. Avoid heavy hats if you plan to use adhesive hooks, because a hat that thinks it is a chandelier is going to cause drama.
If you are decorating outdoors, choose hats made from nylon, polyester, Oxford cloth, or another durable synthetic fabric. These materials hold up better than paper when the air gets damp. For a covered porch, fabric hats are usually fine. For trees or open-air areas, you may want sturdier waterproof hats and stronger hooks.
Step 1: Plan the Floating Witch Hat Display
Start by deciding where the hats will hang. A covered porch ceiling is the classic choice, but you can also hang them from a pergola, balcony, tree branch, hallway ceiling, curtain rod, or party tent frame. The key is to choose a location where the hats can be seen from below and where the clear line has a place to anchor.
Lay the hats on the floor first to test spacing. This simple step saves you from climbing up and down the ladder like a Halloween-themed fitness instructor. Arrange hats in a loose zigzag pattern instead of a perfect row. Magic rarely stands in line politely. Use odd numbers, varied heights, and a mix of angles to make the display feel more natural.
Best Spacing for Floating Witch Hats
For a porch or hallway, space hats about 18 to 30 inches apart. If your ceiling is low, use fewer hats and keep them close to the ceiling so guests do not accidentally headbutt the coven. For tall ceilings or outdoor beams, hang hats at different lengths, such as 12 inches, 18 inches, 24 inches, and 30 inches from the ceiling.
Step 2: Attach Hooks or Anchors
Once you like the layout, mark your hanging points. If you are using adhesive hooks, clean the surface first and let it dry completely. Smooth, painted, sealed, or finished surfaces usually work best. Press each hook firmly in place and allow it to bond before adding weight. Many removable hook products recommend waiting before hanging anything, so follow the package instructions carefully.
For wood porch ceilings, beams, or trim, small cup hooks or tiny nails may be more secure than adhesive hooks, especially in humid or windy conditions. If you rent or do not want holes, removable outdoor hooks are a good option. Just make sure the hook rating is higher than the weight of the hat and light combined.
Outdoor Hanging Tip
Wind changes everything. A hat that behaves beautifully indoors may turn into a tiny tornado outside. If your porch gets breezy, use stronger line, shorter hanging lengths, and secure the light inside the hat so it does not swing separately. You can also add a small piece of floral wire inside the brim to help the hat keep its shape.
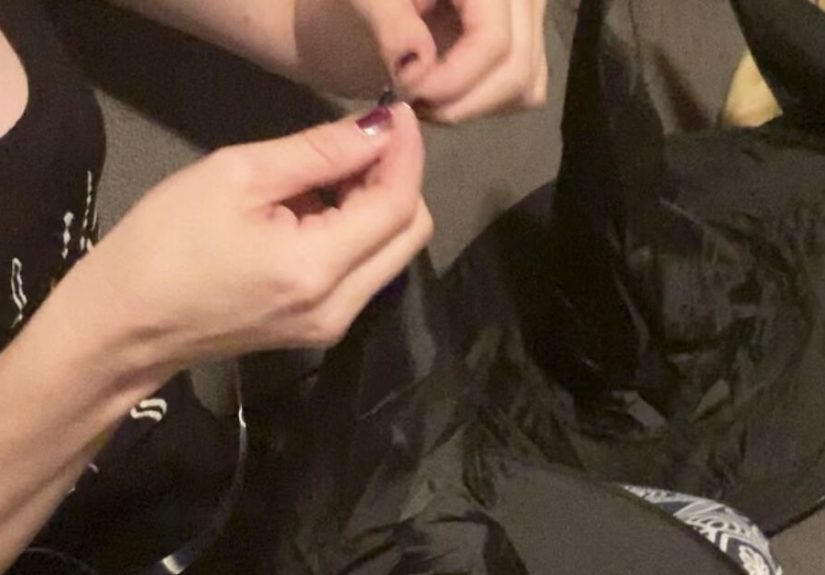
Step 3: Thread the Fishing Line Through the Hat
Cut a length of fishing line longer than you think you need. For each hat, 2 to 4 feet is usually enough, depending on your ceiling height. Thread the line through a sewing needle and push it through the very tip of the witch hat from the inside out. If the hat fabric is thick, use a safety pin or sharp needle to create a small starter hole.
Pull the line through until you have enough inside the hat to tie a secure knot. Tie several knots near the top so the line will not slip through the fabric. For extra hold, add a tiny dot of hot glue inside the tip around the knot. Let it cool before hanging.
How to Create the Floating Illusion
Clear fishing line is the magic ingredient. It catches very little light, so the hats appear to hover. Thin line is less visible, but slightly thicker line is easier to handle and stronger outdoors. For most porches, a medium clear fishing line works well. Indoors, invisible thread can look even more delicate, but it tangles faster than a haunted necklace.
Step 4: Add Lights Inside the Witch Hats
Battery-operated LED lights are the safest and easiest choice. LED tea lights give each hat a soft glow, while fairy lights create a twinkling magical effect. Puck lights are brighter and useful if your hats are large or your porch is dark. Remote-control lights are extra convenient because you will not need to open each hat every night like a tiny electrical goblin.
To attach an LED tea light, tie a second short piece of fishing line around the light or tape it gently inside the cone. Another simple method is to clip the light to the interior seam of the hat with a mini clothespin. Make sure the light hangs high enough to glow through the brim but low enough that it does not distort the hat shape.
Warm White vs. Colored Lights
Warm white lights create a cozy, storybook glow. Purple lights feel witchy and theatrical. Orange lights look classic and festive. Green lights add a potion-lab vibe. If your porch already has pumpkins, corn stalks, or fall wreaths, warm white or amber lights blend beautifully. If your theme is spooky mansion, try purple or eerie green.
Step 5: Hang the Hats at Different Heights
Tie a loop at the top of each fishing line and place it over the hook. Step back often to check the arrangement. This is the part where the display starts looking magical, so try not to squeal too loudly unless you want the neighbors to know the witching hour has started early.
Vary the heights so the hats do not look stiff. Place one hat low near the front, one higher near the back, and a few in the middle. Slightly rotate the hats so the brims point in different directions. If a hat spins too much, tie a second nearly invisible stabilizing line from the brim to a nearby hook or beam.
Step 6: Style the Area Around the Floating Witch Hats
Floating witch hats look great on their own, but the surrounding decor can make the whole scene feel intentional. Add pumpkins below the hats to ground the display. Place a broom near the door, drape faux spiderwebs lightly around porch railings, or add paper bats to the wall behind the hats. A Halloween doormat, lanterns, mums, and a black wreath can tie everything together.
Easy Theme Ideas
- Classic Witch Porch: Black hats, orange pumpkins, broomsticks, warm lights, and a “Witches Welcome” sign.
- Elegant Gothic Entry: Black velvet hats, white pumpkins, dark florals, lanterns, and deep purple ribbon.
- Kid-Friendly Magic School: Floating hats, battery candles, paper stars, faux spell books, and candy cauldrons.
- Haunted Forest: Hats hanging from tree branches, moss, faux ravens, lanterns, and green fairy lights.
- Pink Halloween: Black hats mixed with blush pumpkins, pastel ghosts, pink lights, and cute bat cutouts.
Safety Tips for Outdoor Floating Witch Hats
Halloween decorations should be spooky, not genuinely dangerous. Use battery-operated lights instead of real candles. Fabric hats and open flames are not friends; they are a fire report waiting to happen. If you use plug-in lights anywhere in your display, choose outdoor-rated products for outdoor areas, keep cords out of walkways, and avoid overloading outlets.
Do not hang hats where they block doors, stairs, railings, security cameras, house numbers, or walking paths. If you expect trick-or-treaters, keep the lowest hats above head height or off to the side. Check the display after wind, rain, or a particularly enthusiastic squirrel visit.
How to Make Floating Witch Hats Look More Expensive
You do not need pricey decorations to get a high-end look. The secret is repetition, spacing, and texture. Use at least six hats for a fuller display. Stick to a limited color palette, such as black, cream, and orange, or black, purple, and silver. Add ribbon around the hat bands, glue on small buckles, or wrap the cones with gauzy black tulle.
Another trick is to mix hat sizes. A few oversized hats near the front and smaller hats farther back create depth. If your hats arrive flattened, steam them lightly or stuff the cones with tissue paper for a day to help them regain shape. A hat with a strong silhouette photographs better and looks more magical from the street.
Troubleshooting Common Problems
The Hats Keep Spinning
A little movement looks magical. Too much movement looks like the hats are trying to escape. Shorten the line, use heavier fishing line, or add a second stabilizing line from the brim. Indoors, turn off nearby ceiling fans. Outdoors, move hats closer to a wall or beam where wind is calmer.
The Hooks Keep Falling
Make sure the surface is clean, dry, and suitable for adhesive hooks. Avoid rough brick, dusty wood, peeling paint, and damp surfaces. Check the hook’s weight rating. If adhesive hooks continue to fail, switch to cup hooks, small screw eyes, or temporary tension rods where appropriate.
The Lights Are Too Dim
Try brighter LED puck lights or mini fairy lights. Place lights higher inside the cone so they glow through the hat. If your hats are thick black fabric, the light may not shine through much, so position the light beneath the brim for a lantern-like glow.
The Fishing Line Is Too Visible
Use thinner clear line, hang hats away from strong direct light, and avoid placing the line in front of bright white walls. At night, the line becomes much harder to see. During the day, the overall shape and styling matter more than perfect invisibility.
Budget Breakdown
A DIY floating witch hat display can be surprisingly affordable. A basic setup with six hats, fishing line, hooks, and LED tea lights can often be made with low-cost seasonal supplies. If you already own hooks, lights, or extra hats from costumes, the price drops even more. Spend more only where it improves durability: outdoor hooks, better lights, and sturdier hats.
For a porch that looks full, six hats is the minimum. Eight to ten hats creates a stronger visual effect. Twelve hats gives you that “the entire coven arrived for brunch” look, which is ideal if your porch is long, your ceiling is high, or you enjoy being the house everyone photographs.
How to Store Floating Witch Hats After Halloween
When Halloween is over, remove the lights and batteries before storing. Coil the fishing line loosely or cut it off and replace it next year. Stuff each hat cone with tissue paper, newspaper, or plastic bags so it keeps its shape. Stack hats gently in a storage bin and keep them in a dry place.
Label the bin with “Floating Witch Hats” so you do not spend next September opening six containers of mystery garland while muttering seasonal nonsense. Store hooks, extra line, and lights in a zip bag inside the same bin. Future you will be grateful, and future you deserves nice things.
Creative Variations to Try
Once you master the basic version, the project becomes easy to customize. Add floating candles between the hats for a magical dining-hall effect. Hang paper bats at different heights for movement and depth. Attach tiny broomsticks below a few hats, as if invisible witches are hovering overhead. Use glow-in-the-dark stars on the ceiling for indoor displays.
You can also turn floating witch hats into party markers. Hang one over the drink station, one over the candy table, and one near the photo booth. For a kids’ party, place a number or name tag on each hat and use them for a Halloween scavenger hunt. The hats become both decoration and activity, which is excellent because children love anything that looks like forbidden ceiling candy.
Real-Life Experience: What I Learned Making DIY Floating Witch Hats
The first time I made floating witch hats, I underestimated two things: wind and my own optimism. I imagined a perfectly spooky porch with hats gently hovering like they were waiting for a moonlit meeting. What I actually got at first was one elegant hat, two lopsided hats, and one hat spinning in circles like it had discovered espresso. The good news is that every problem was easy to fix, and the final display looked far more impressive than the effort required.
My biggest lesson was to plan the layout on the ground before touching the ladder. When I skipped that step, the hats ended up too evenly spaced, almost like a Halloween retail display. After rearranging them in a loose pattern, the whole porch looked more natural. Different heights made the illusion much stronger. One hat hung low near the front corner, two floated higher near the beam, and a few filled the middle. Suddenly, the porch had movement and depth.
The second lesson was to choose the right hooks for the surface. Adhesive hooks worked beautifully on a smooth indoor ceiling, but on a slightly dusty outdoor beam, they were less dependable. Cleaning the surface helped, and waiting before hanging the hats helped even more. For the breezier side of the porch, small cup hooks were the better choice. They were discreet, strong, and easy to reuse for string lights later.
Lighting also made a huge difference. Tiny LED tea lights looked charming up close, but from the sidewalk they were a little shy. Fairy lights gave the hats more sparkle, while puck lights created a brighter glow. My favorite result came from warm white fairy lights tucked inside the cone and loosely coiled under the brim. The hats looked enchanted without becoming too bright or cartoonish.
I also learned not to hang the hats too low. A floating witch hat is delightful until a tall guest walks into it while carrying cider. Keeping the lowest brim above head height made the display safer and more comfortable. For indoor parties, I would hang them over a table or corner instead of a busy walkway.
The final lesson: imperfections help. A slightly tilted brim, a soft wrinkle in the cone, or a tiny spin in the air makes the hats feel alive. Do not spend half an hour trying to make every hat face the same direction. The charm comes from the sense that they just floated in and settled wherever they pleased. That casual, magical look is exactly why DIY floating witch hats are such a satisfying Halloween project.
Conclusion
DIY floating witch hats are one of the easiest ways to create a memorable Halloween display without spending a fortune. With lightweight hats, clear fishing line, secure hooks, and battery-operated LED lights, you can turn a porch, hallway, party room, or tree into a glowing witchy scene. The project is simple enough for beginners but flexible enough for decorators who love adding dramatic details.
Plan your layout, vary the hanging heights, use safe lighting, and style the surrounding area with pumpkins, bats, brooms, lanterns, or spiderwebs. Whether your Halloween style is cute, spooky, elegant, or delightfully chaotic, floating witch hats bring instant atmosphere. They are proof that a little fishing line and imagination can make your home look like it has been politely invaded by magic.