
Table of Contents >> Show >> Hide
- Before You Melt: Set Yourself Up for Success
- Method 1: How to Melt Chocolate in the Microwave (Fast, Easy, Surprisingly Foolproof)
- Method 2: How to Melt Chocolate with a Double Boiler (Bain-Marie, a.k.a. Gentle Stovetop Heat)
- Method 3: Slow Cooker Chocolate Melting (Best for Big Batches)
- Troubleshooting: Fixes for Seized, Grainy, Thick, or Burnt Chocolate
- Melted vs. Tempered: When “Melted” Isn’t Quite Enough
- Specific Examples: What to Do with Your Perfectly Melted Chocolate
- Conclusion: Smooth Chocolate, Zero Drama
- Kitchen Experiences: 10 Chocolate-Melting Lessons You’ll Recognize Immediately (and Laugh About Later)
Melting chocolate sounds like the kind of task that should come with a tiny violin and a warning label: Handle gentlymay throw a tantrum. One minute it’s glossy and dreamy, the next it’s grainy, scorched, or clumped up like it’s protesting your life choices.
The good news: once you understand what chocolate “hates” (water, high heat, and being ignored), you can melt it smoothly on commandwhether you’re making ganache, drizzling brownies, dipping strawberries, or building the world’s most convincing “I totally bake all the time” dessert board.
Before You Melt: Set Yourself Up for Success
1) Pick the right chocolate (because not all chocolate behaves the same)
For the smoothest melt, use good-quality chocolate bars, wafers, or couverture (chocolate with higher cocoa butter). Chocolate chips can melt, but they’re designed to hold their shape in cookies, so they may melt more slowly and end up thicker. If you’re dipping or coating and want a silkier flow, chopped bars or melting wafers are usually easier to work with.
Dark chocolate is generally the most forgiving. Milk chocolate and especially white chocolate are more delicate and can burn fasterthink “sunburn at the beach with no sunscreen” fast.
2) Chop it like you mean it
Chocolate melts more evenly when the pieces are small and uniform. Big chunks plus tiny shards equals uneven melting: some pieces scorch while others sit there like, “I’m fine, thanks.”
3) Keep everything bone-dry
Chocolate and water are not star-crossed lovers. Even a small amount of moistureone wet spoon, a droplet of steam, a bowl that wasn’t fully drycan cause chocolate to seize (turn thick, grainy, and uncooperative). Dry your bowl, spatula, and any measuring tools completely. If you’re using a double boiler, avoid letting steam sneak into your chocolate.
4) Use gentle heat and stir often
Chocolate can hold its shape even while it’s melting, which tricks people into overheating it. The magic move is to heat briefly, stir, and let carryover heat do the rest. Stirring spreads heat evenly and keeps you from accidentally cooking your chocolate into sadness.
Method 1: How to Melt Chocolate in the Microwave (Fast, Easy, Surprisingly Foolproof)
The microwave is a top pick for most home bakers because it’s quick, controlled, and keeps you away from the biggest chocolate villain: steam from the stove.
Microwave steps (smooth chocolate, minimal drama)
- Put chocolate in a microwave-safe bowl. Glass or ceramic works well. Make sure it’s completely dry. If using bars, chop into small, even pieces.
- Microwave in short bursts. Start with 20–30 seconds at 50% power (or medium power). Then stir well.
- Repeat in shorter bursts. Continue microwaving in 15–20 second bursts, stirring every time. As it starts to soften, reduce to 10–15 seconds if needed.
- Stop before it looks fully melted. When most of the chocolate is melted and a few lumps remain, stop microwaving and stir until smooth. Carryover heat finishes the job without scorching it.
Microwave tips for different goals
- For ganache or baking: You can melt until smooth and warm, but keep it gentleno boiling-hot chocolate.
- For dipping strawberries or pretzels: Aim for a smooth, fluid melt. If it’s too thick, you’ll get “chocolate boulders” instead of a neat coating (tasty, but… chunky).
- For white chocolate: Use even shorter intervals (often 15–20 seconds max) and stir like it’s your job. White chocolate burns easily.
Microwave mistakes to avoid
- Using full power the whole time. This creates hot spots and scorches chocolate fast.
- Trusting the “melt chocolate” preset. Presets can be inconsistent and may overheat your chocolate. Manual control (short bursts + stirring) is safer.
- Not stirring. Stirring isn’t optionalit’s how you prevent hot spots.
Method 2: How to Melt Chocolate with a Double Boiler (Bain-Marie, a.k.a. Gentle Stovetop Heat)
A double boiler is great when you’re melting a larger batch or want steady, gentle heat. The key is to keep the water at a bare simmernot a rolling boiland prevent steam from sneaking into the bowl.
How to set up a DIY double boiler
- Fill a saucepan with about 1–2 inches of water.
- Bring it to a gentle simmer (small bubbles, not a full boil).
- Set a heatproof bowl on top so it fits snugly and does not touch the water. Indirect heat is the whole point.
Double boiler steps
- Add chopped chocolate to the dry bowl.
- Warm gently over simmering water. Stir frequently as it begins to melt.
- Remove from heat before it’s fully melted. When most pieces are melted, lift the bowl off the pot and stir until smooth. This helps avoid overheating.
Keeping chocolate warm for dipping
If you’re dipping lots of items (hello, party tray), keep the bowl over the pot on very low heat and stir occasionally. Just be careful: too much heat can thicken or scorch the chocolate over time. If you notice steam, lower the heat and make sure water isn’t boiling.
Method 3: Slow Cooker Chocolate Melting (Best for Big Batches)
If you’re making chocolate-covered everything for a crowd, a slow cooker can keep chocolate warm longer without constant babysitting. Use low heat and stir occasionally.
Slow cooker steps
- Add chopped chocolate (or chips) to the slow cooker insert.
- Set to LOW (or the lowest setting).
- Stir every few minutes until melted and smooth.
- Keep it on warm/low for serving or dipping, stirring occasionally.
Tip: Slow cookers vary a lot. If yours runs hot, stir more often and turn it off briefly if the chocolate seems too warm.
Troubleshooting: Fixes for Seized, Grainy, Thick, or Burnt Chocolate
Why chocolate seizes (and how to prevent it)
Seizing usually happens when moisture hits melted chocolate. A tiny amount of water can trigger sugar in the chocolate to clump, turning your smooth melt into a stiff, grainy paste. Overheating can also cause chocolate to break or turn gritty, especially with milk and white chocolate.
How to fix seized chocolate (your rescue plan depends on your goal)
First: don’t panic. Second: don’t throw it out yet.
- If you can switch to a sauce or drizzle: Add a small amount of hot water (start with about 1 teaspoon at a time), stirring vigorously until it smooths out. This works because adding enough liquid can help the mixture re-form into a smooth emulsionperfect for a drizzle, sauce, or glaze.
- If you’re making ganache: Warm cream (or milk) can smooth seized chocolate into a glossy ganache. Combine and stir until silky.
- If you needed it for tempering: Sadly, seized chocolate isn’t a good candidate for re-tempering. But it can still be used in baked goods (brownies, cookies, banana breadchocolate forgives you there).
Chocolate too thick for dipping?
Thick melted chocolate often comes from using chips (which melt thicker) or chocolate with less cocoa butter. For a thinner coating, use couverture or melting wafers when possible. If you need a quick fix, you can stir in a little cocoa butter (best option) to thin it while keeping a firm set. If you add oils, remember: some oils can make the coating softer and less “snappy.”
Burnt chocolate: when to stop trying
If chocolate smells scorched, looks dry and clumpy, or tastes bitter in a “campfire ash” way, it’s usually done for. Burnt chocolate doesn’t magically un-burn. Chalk it up as a lesson and start over with lower heat and shorter intervals.
Leftover melted chocolate: store and re-melt it gently
Let melted chocolate cool, then store it tightly covered at room temperature (short term) or in the fridge (longer). When re-melting, use the same low-and-slow rules: short microwave bursts or gentle double-boiler heat, stirring often.
Melted vs. Tempered: When “Melted” Isn’t Quite Enough
If you’re baking brownies, making ganache, or mixing chocolate into batter, just melted is perfect. But if you want shiny chocolate that snaps (like a professional candy shell), you’re looking for tempered chocolate.
Quick tempering overview (the tiny cheat sheet)
Tempering is about controlling chocolate crystals so it sets glossy and firm instead of dull or streaky. A thermometer helps a lot. As a general guide:
- Dark chocolate: melt to about 110–115°F, cool to around 88–90°F for working.
- Milk chocolate: typically works a few degrees lower than dark.
- White chocolate: also works lower and burns easilygentle heat is essential.
If that sounds like a lot, you can skip tempering and still make excellent treats. Just know that untempered dipped chocolate may set softer and may show white streaks (bloom) over time. Bloom is harmlessit’s just not as pretty.
Specific Examples: What to Do with Your Perfectly Melted Chocolate
Easy chocolate ganache (for cakes, cupcakes, and “I meant to be fancy” moments)
Warm cream until steaming (not boiling), pour over chopped chocolate, let sit for a minute, then stir until glossy. Thicker ganache uses more chocolate; thinner ganache uses more cream. It’s one of the best reasons to learn how to melt chocolate smoothly.
Chocolate drizzle that looks intentional
Melt chocolate gently, then spoon it into a zip-top bag, snip the tiniest corner, and drizzle over cookies, bark, popcorn, or fruit. If your drizzle is too thick, warm the chocolate briefly and stir again.
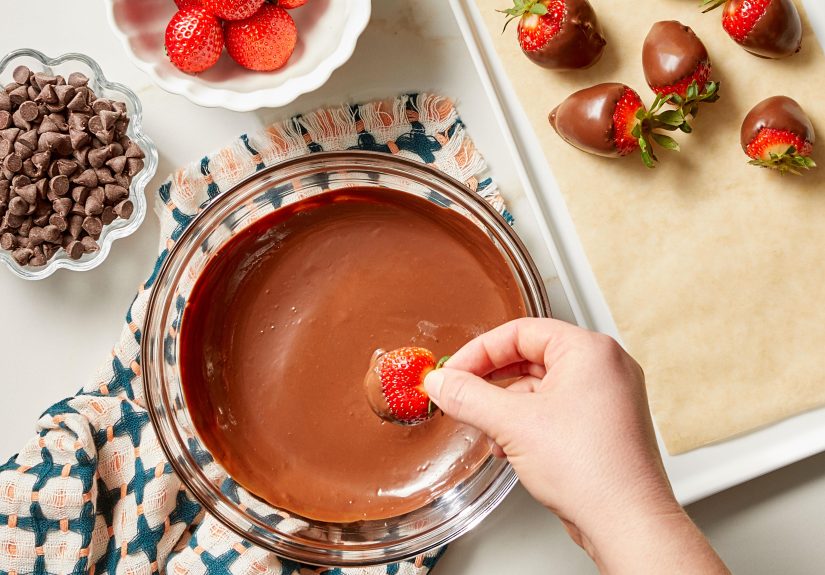
Dipped strawberries (and how to avoid “chocolate armor”)
Dry strawberries completely before dippingwater droplets can seize chocolate instantly. Dip, let excess drip off, then set on parchment paper. If you want a smoother, thinner coat, choose a chocolate that melts fluidly (often bars or couverture) and keep the chocolate warm but not hot.
Conclusion: Smooth Chocolate, Zero Drama
The secret to melting chocolate isn’t secret at all: low heat, short bursts, lots of stirring, and absolutely no water. Microwave melting gives you control and convenience; a double boiler gives you gentle, steady heat; a slow cooker is your best friend for big dipping projects. And if chocolate seizes, you’re not doomedyou may just be making sauce now.
Master these basics and you’ll stop treating melted chocolate like a high-stakes science experiment. It’ll become what it should be: delicious, glossy, and very obedient.
Kitchen Experiences: 10 Chocolate-Melting Lessons You’ll Recognize Immediately (and Laugh About Later)
The first time I tried melting chocolate, I treated it like butter: crank the heat, walk away, come back to greatness. Chocolate responded by scorching in record timean impressive feat for something that usually melts slowly. Lesson one: chocolate is a sensitive artist, not a rugged construction worker.
Then came the “it still looks like chips” phase. Chocolate chips can sit there in the bowl, holding their shape like they’re auditioning for a statue role, while secretly melting underneath. I assumed nothing was happening, microwaved again, and created a hot spot so intense it could’ve hosted a beach party. Now I stir early and often, because stirring is basically chocolate’s love language.
My next adventure was the double boileraka the method that makes you feel like a professional until steam betrays you. I once used a lid “to be safe,” and condensation dripped into the bowl like tiny sabotage droplets. The chocolate seized instantly, turning into a gritty paste that looked like it had lost all hope. I learned to keep the heat gentle, skip the lid, and treat steam like a supervillain.
White chocolate taught me humility. I assumed it would behave like milk chocolate. It did not. It went from “almost melted” to “burnt and grainy” in the time it took to blink. Now I melt white chocolate with tiny intervals and maximum attentionlike I’m defusing a dessert bomb.
I’ve also learned the joy of “accidental sauce.” If chocolate seizes and you add enough hot liquid (a bit at a time), it can transform into a smooth drizzle situation. Is it what you planned? Maybe not. Is it delicious on ice cream? Absolutely. Some of my best desserts started as chocolate mistakes.
The biggest confidence boost came when I finally stopped overheating chocolate to get it “fully melted.” Letting carryover heat finish the job felt like cheatingin the best way. Pull it early, stir until smooth, and suddenly you look like a person who owns matching ramekins.
And if you ever want to feel truly alive, try dipping a tray of strawberries while your chocolate slowly thickens. You’ll learn quickly why pros keep chocolate gently warm and why “I’ll just reheat it” is a sentence that should be followed by “in very short bursts while stirring.”
In the end, melting chocolate becomes easy the moment you accept one truth: chocolate rewards patience and punishes rushing. Treat it gently, keep it dry, stir like you’re in a tiny delicious workout class, and it will melt into that glossy, smooth dream you wanted all along.


