
Table of Contents >> Show >> Hide
- First: “Geranium” Means Two Different Plants (And Only One Is What Most People Propagate)
- Why Propagate Geraniums Instead of Buying More?
- Supplies Checklist (No Fancy Lab Coat Required)
- When to Take Geranium Cuttings for the Highest Success Rate
- The Most Reliable Method: Propagating Geraniums in Soil (or Soilless Mix)
- Step 1: Pick the right stem (a.k.a. “the future overachiever”)
- Step 2: Make a clean cut
- Step 3: Strip the lower leaves (and tidy up the top)
- Step 4: Optionalbut helpfulcallus time
- Step 5: Use rooting hormone safely (optional)
- Step 6: Stick the cutting into the medium
- Step 7: Water once, then go easy
- Step 8: Create a mini greenhouse (without creating a swamp)
- Step 9: Give bright, indirect light
- Step 10: Wait for roots (and don’t yank the cutting every day)
- Can You Propagate Geraniums in Water?
- Potting Up Rooted Cuttings (Where They Become Real Plants)
- How to Turn Your Propagated Geraniums Into Bloom Machines
- Troubleshooting: What Can Go Wrong (and How to Fix It)
- Frequently Asked Questions
- Real-World Experiences: What Propagating Geraniums Usually Looks Like (and How to Win Anyway)
- Conclusion
Geraniums are the kind of plant that make you feel like a gardening genius… right up until you look at the price tag for replacing a whole patio’s worth.
The good news: you can turn one great plant into a whole “geranium extended universe” with a few snips, a clean pot, and a little patience.
Even better? Propagating geraniums (the common garden types, a.k.a. Pelargonium) is one of the fastest ways to get fuller containers, backup plants for
next season, andyesmore blooms without buying more plants.
This guide walks you through the most reliable, least fussy way to propagate geraniums from stem cuttings, plus exactly how to keep those baby plants growing
into bloom machines. Along the way we’ll cover timing, materials, step-by-step technique, aftercare, and the most common mistakes (so you can avoid them and
keep your ego intact).
First: “Geranium” Means Two Different Plants (And Only One Is What Most People Propagate)
Garden centers in the U.S. typically sell “geraniums” that are actually Pelargoniumzonal geraniums, ivy geraniums, scented geraniums, and
regal (Martha Washington) geraniums. These are the ones people keep in pots, porch planters, window boxes, and sunny flowerbeds.
“True geraniums” (cranesbill geraniums) are different plants altogether and are usually propagated by division rather than the tip-cutting method below.
So if your plant has thick-ish, branching stems and classic summer bedding-plant vibes, you’re in the right place.
Why Propagate Geraniums Instead of Buying More?
- More plants, same budget: One healthy mother plant can yield multiple cuttings.
- Insurance plan: If winter knocks out your patio pots, your rooted cuttings can save the season.
- Better-looking containers: More plants = fuller pots = more blooms and fewer awkward bare patches.
- Keep a favorite variety: Cuttings clone the parent plant, so you don’t lose that perfect color.
Supplies Checklist (No Fancy Lab Coat Required)
You’ll get the best results when you set yourself up for clean, fast, low-drama rooting.
What you need
- Sharp, clean pruners or a knife (sharp matters; crushing stems slows rooting)
- Small pots or cell trays with drainage holes
- Sterile, well-draining rooting medium (examples below)
- Clear humidity cover: a plastic bag, dome, or a big clear container turned upside down
- Label + pen (future-you will not remember what’s what)
- Optional rooting hormone (useful, but not mandatory)
Good rooting media options
- Vermiculite
- Perlite + peat moss (or perlite + a soilless mix) in roughly a 50/50 blend
- Coarse sand or a sand-based blend
- A sterile, soilless potting mix with extra perlite for drainage
The big rule: light and airy beats rich and heavy. Cuttings need oxygen around the stem base. Soggy, dense mixes are basically an invitation
for rot to move in rent-free.
When to Take Geranium Cuttings for the Highest Success Rate
Geraniums can be propagated many times of year, but your “easy mode” windows are:
- Late summer to early fall: Ideal if you want to overwinter young plants indoors before frost.
- Spring to early summer: Great for fast growth and planting out once weather is warm.
Avoid taking cuttings when your plant is stressedduring heat waves, after it’s dried out for too long, or when it’s battling pests. Healthy parent plants
produce sturdier cuttings that root faster.
The Most Reliable Method: Propagating Geraniums in Soil (or Soilless Mix)
You can root geraniums in water, but soil/soilless propagation is usually more dependable for long-term success. The goal isn’t just “a root.”
It’s a strong, transplant-ready root system that doesn’t panic the minute it leaves its water spa.
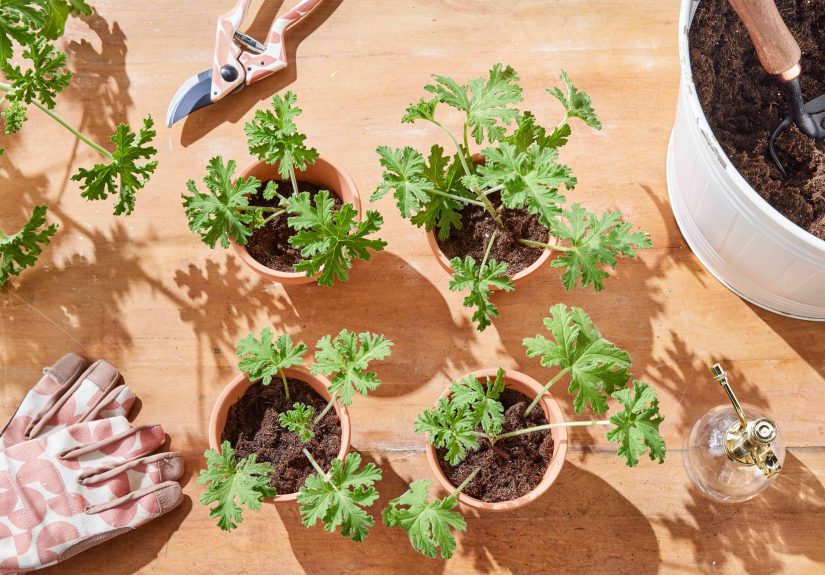
Step 1: Pick the right stem (a.k.a. “the future overachiever”)
Choose a healthy, non-flowering stem tip. Flowers look cute, but they steal energy from rooting. You want a stem that’s firm, green, and actively growing.
- Cutting length: about 3–4 inches is a sweet spot (some gardeners go 4–6 inches).
- Nodes matter: aim for at least 2–3 nodes (nodes are where leaves attach).
Step 2: Make a clean cut
Cut just below a node with sharp, sanitized tools. A clean cut heals better and reduces the chance of disease.
Step 3: Strip the lower leaves (and tidy up the top)
Remove leaves from the lower half (or lower two inches) of the cutting. Leaving too many leaves increases moisture loss and encourages mildew inside a humidity
cover. Keep a small tuft of leaves at the top.
If the remaining leaves are huge, you can trim them by about half to reduce water loss. Your cutting doesn’t need a full sail; it needs a life raft.
Step 4: Optionalbut helpfulcallus time
Some gardeners let cut ends dry for a few hours or overnight before sticking the cutting. This can reduce rot, especially with juicy stems. If you do this,
keep cuttings out of direct sun and don’t let them shrivel.
Step 5: Use rooting hormone safely (optional)
Rooting hormone can improve consistency, but keep it hygienic:
- Pour a little hormone into a separate container.
- Dip the stem base lightly.
- Throw out leftoversdon’t put used powder back in the original jar.
Step 6: Stick the cutting into the medium
- Pre-moisten the rooting medium so it’s damp, not dripping.
- Make a small hole with a pencil or chopstick (helps avoid scraping off hormone).
- Insert the cutting about 1–2 inches deepdeep enough to stand on its own.
- Gently firm the medium around the stem for good contact.
Step 7: Water once, then go easy
Water the medium so it settles around the cutting, then let excess drain. After that, resist the urge to “help” by watering daily. Overwatering is the
#1 reason cuttings fail.
Step 8: Create a mini greenhouse (without creating a swamp)
Cover the pot with a clear plastic bag or humidity dome to prevent wiltingespecially in dry indoor air. The cover should not press tightly against leaves.
Use small stakes or chopsticks to keep plastic off foliage.
Ventilation tip: Crack the cover a little once a day (or every couple of days) to reduce mold risk.
Step 9: Give bright, indirect light
Place cuttings in bright light but out of harsh direct sun, which can overheat the covered cutting. A bright window with filtered light is perfect.
If you’re using grow lights, keep them close enough for brightness but not so close that the cutting cooks.
Step 10: Wait for roots (and don’t yank the cutting every day)
Rooting time varies with temperature, light, and variety. You might see roots in as little as 3–4 weeks, but some setups take 6–8 weeks.
Signs rooting is happening:
- New leaf growth at the top
- Cutting stays firm and upright
- Gentle tug meets resistance (be gentlethis isn’t a strength test)
Can You Propagate Geraniums in Water?
Yes, sometimes. But water propagation is more likely to cause soft stems, rot, or weak roots that struggle when transplanted into soil.
If you want to try it anyway, do it like a cautious scientist:
- Use a clean glass and fresh water.
- Keep leaves out of the water.
- Change water every few days.
- Move to potting mix as soon as you have roots (don’t wait for a whole hairdo of roots).
For most gardeners who want reliable results (and fewer heartbreak monologues), soil/soilless propagation wins.
Potting Up Rooted Cuttings (Where They Become Real Plants)
Once your cutting has a decent root system, it’s time to move it into a real potting mix.
How to transplant without stressing the plant
- Choose a small pot with drainage holes (don’t jump straight to a huge pot).
- Use quality potting mixlight, well-draining, and not overly rich.
- Lift the cutting gently, keeping roots intact.
- Plant at the same depth it was rooting.
- Water thoroughly once, then let the top inch of mix dry slightly before watering again.
When to start fertilizing
Wait until you see new growth and the plant looks settled (usually a couple of weeks after potting up). Then feed lightly with a balanced fertilizer.
Too much nitrogen can create lush leaves with fewer flowerspretty, but not the goal.
How to Turn Your Propagated Geraniums Into Bloom Machines
Rooting is only the first chapter. The “more blooms” part comes from how you grow the plant once it’s established.
1) Sunlight: the bloom switch
Most container geraniums bloom best with plenty of sunoften 6+ hours daily. If your plant is healthy but stingy with flowers, light is usually the culprit.
Indoors, a bright south- or west-facing window (or a grow light) helps.
2) Pinch for branching (more branches = more flower clusters)
When your rooted cutting reaches about 6–8 inches tall, pinch the growing tip. This encourages branching, creating a fuller plant with more potential bloom sites.
Think of it as telling the plant, “We’re going for volume, not height.”
3) Deadhead like you mean it
Remove spent blooms (and their stems) regularly. This keeps the plant from putting energy into seed production and nudges it toward more flowering.
4) Watering: steady, not soggy
Geraniums prefer to dry slightly between waterings. Constant wet soil invites root problems and fungal issues. Water thoroughly, then let excess drain.
If your pot sits in a saucer, empty it after watering.
5) Don’t overfeedespecially with nitrogen
A light, consistent feeding schedule beats heavy doses. Too much nitrogen can lead to leafy growth with fewer flowers. For blooming, a balanced or bloom-leaning
fertilizer (used according to label instructions) is usually enough.
6) Mind the potting mix and pH (for serious bloom optimization)
Many geraniums perform poorly when the growing medium is too acidic. If you’ve ever had “mystery yellowing” or weak flowering despite good care,
an off-balance medium can be part of the story. For home gardeners, the simplest approach is:
- Use a quality potting mix made for containers.
- Avoid letting salts build upflush the pot occasionally with plain water (let it drain fully).
- Don’t keep plants constantly wet (low oxygen + wet mix = problems).
Troubleshooting: What Can Go Wrong (and How to Fix It)
Problem: Cutting turns black or mushy at the base
Likely cause: Rot from excess moisture, poor airflow, or non-sterile medium.
Fix: Start over with sterile, well-draining medium; water less; ventilate the humidity cover; use clean tools and containers.
Problem: Leaves wilt hard, even under a cover
Likely cause: Cutting is too large, too leafy, or in too much light/heat.
Fix: Remove extra leaves, trim large leaves, move to bright indirect light, and keep the cover from overheating.
Problem: Mold on soil or leaves
Likely cause: Too much humidity + zero airflow.
Fix: Vent daily, keep leaves from touching plastic, and avoid wetting foliage. If mold persists, remove the cover for longer periods.
Problem: Cuttings root, then collapse later
Likely cause: Disease spread (often through tools or splashing water) or root issues from constantly wet conditions.
Fix: Discard infected plants; sanitize tools; use sterile media; water at the soil level; avoid splashing and overcrowding.
Frequently Asked Questions
How many geranium cuttings can I put in one pot?
For rooting, one cutting per small pot is easiest and reduces disease spread. If you’re short on space, you can root multiple cuttings in a tray with spacing,
then pot them up individually once rooted.
Should I remove flower buds on a cutting?
Yes. Buds and blooms pull energy away from root formation. Pinch them off until the cutting is rooted and actively growing.
What’s the best indoor setup?
A bright window with indirect light, a small pot of sterile rooting mix, and a loose humidity cover is enough. If your indoor air is very dry, the cover helps.
If your indoor air is already humid, you may not need a cover at alljust keep the medium lightly damp.
Real-World Experiences: What Propagating Geraniums Usually Looks Like (and How to Win Anyway)
Propagation guides can sound like a smooth, cinematic montage: snip, dip, stick, cue triumphant roots. Real life is more like a sitcom where moisture,
lighting, and human impatience all audition for the role of “main character.” Here are a few common scenarios gardeners run intoplus the simple tweaks
that turn “meh” cuttings into thriving, blooming plants.
The “I Watered It Because I Love It” phase
Many first-time propagators assume cuttings need constant moisture, so they keep the mix wet, the cover sealed tight, and the pot in a warm spot. A week later,
the stem base looks dark and softclassic rot. The fix usually isn’t a fancy product; it’s less enthusiasm. Geranium cuttings root best when the medium is
damp but airy, not soggy. If you squeeze a handful of your rooting mix and water streams out, it’s too wet. Aim for “wrung-out sponge,” then let it drain.
After the first settling-in watering, check the pot every couple of days instead of every couple of hours. If the surface looks dry but the pot still feels
heavy, it’s probably fine. Your cuttings want oxygen almost as much as they want moisture.
The “Sunlight = Growth… right?” mistake
Bright light is good. Hot, direct sun on a covered cutting is not. A clear plastic bag or dome can turn into a tiny solar oven, especially on a sunny windowsill.
Gardeners often notice leaves suddenly crisping, wilting, or developing weird spotsthen assume the cutting is doomed. Usually it just got overheated.
Moving the pot back from the glass, using filtered light (sheer curtain), or switching to bright indirect light solves it quickly. If you’re using a grow light,
keep it bright but not scorching. The goal is photosynthesis without turning your propagation station into a terrarium on “broil.”
The “Why is nothing happening?” week (a.k.a. Impatience Season)
Geranium cuttings don’t send a push notification when roots form, so gardeners start tug-testing daily. That repeated tugging can damage delicate new roots.
A better strategy: watch for new growth at the top and overall firmness. If the cutting remains upright and starts pushing new leaves, rooting is likely underway.
If you need confirmation, do one gentle tug test after a few weeksthen leave it alone. Propagation rewards patience in the same way baking rewards not opening
the oven every 90 seconds: the science works better when we stop interrupting it.
The “My rooted cutting is alive… but it’s not blooming” reality check
Even perfectly rooted cuttings can take a little time to shift into flowering mode, especially if they’re growing indoors in winter. Gardeners often assume
something is wrong when the plant stays green and leafy. Usually it’s just asking for better bloom conditions: more light, a pinch for branching, and steady care.
Once the cutting has settled into a potting mix and is producing new growth, pinching the tip encourages multiple brancheseach one a potential flower stem.
Pair that with brighter light and a light feeding schedule, and the bloom show typically catches up. It’s less “instant fireworks” and more “building a stage
so the fireworks have somewhere to launch.”
The biggest takeaway from real-world propagation isn’t a secret trickit’s consistency. Clean tools, airy media, sensible watering, and good light beat
complicated routines every time. Do those basics well, and you’ll end up with sturdy young plants that bloom like they’ve been auditioning for a garden catalog.
Conclusion
Propagating geraniums is one of the easiest ways to get more color for your moneyand more control over your garden’s look. Start with healthy stems, keep the
rooting setup clean and well-drained, and resist the temptation to drown your cuttings “just to be safe.” Once rooted, focus on light, pinching, deadheading,
and steady watering to encourage branching and bloom production.
Do it once and you’ll realize propagation isn’t just a gardening skillit’s a superpower. The best part is next season, when your neighbors ask where you bought
all those gorgeous geraniums… and you can say, “Oh, these? I made them.”


