
Table of Contents >> Show >> Hide
- Why staking tomatoes is worth the effort
- Step 1: Know your tomato type (this changes everything)
- Step 2: Stake early (future you will send a thank-you note)
- Step 3: Pick the right staking method for your garden
- Step 4: Choose stakes and ties that won’t betray you in August
- Step 5: Tie tomatoes correctly (so you support, not strangle)
- Step 6: Match pruning and training to your staking system
- Troubleshooting: common tomato staking mistakes (and how to fix them)
- Quick “choose your method” cheat sheet
- End-of-season cleanup: don’t skip this
- Conclusion
- Extra: Real-world experiences and lessons from staking tomatoes (about )
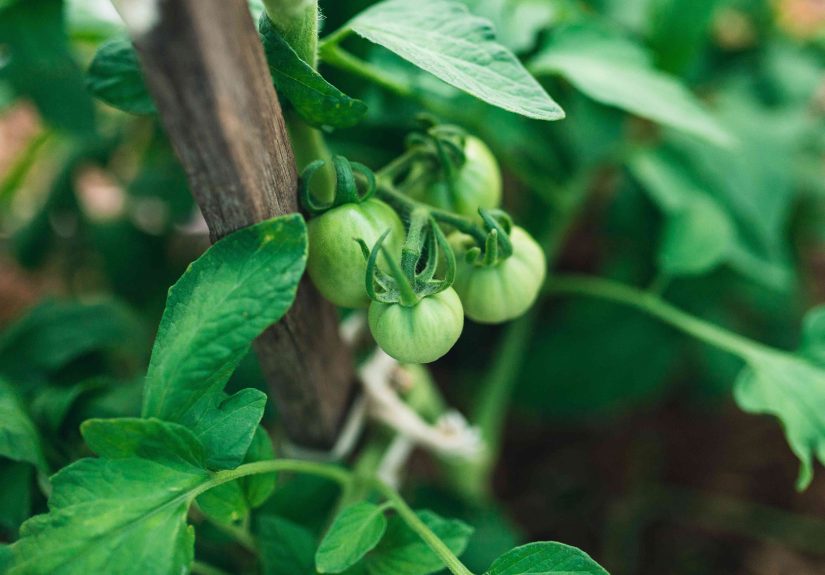
Tomato plants have two settings: “innocent little seedling” and “help, I’ve become a leafy octopus holding 12 pounds of fruit.”
Staking is how you keep that octopus upright, healthier, and way easier to harvestwithout playing hide-and-seek with tomatoes in a jungle of vines.
In this guide, you’ll learn exactly how to stake tomatoes, when to do it, which staking method fits your garden (and your patience level),
what materials work best, and the common mistakes that turn “support” into “plant injury.”
Why staking tomatoes is worth the effort
Staking (or otherwise supporting) tomatoes isn’t just about keeping things tidy. It can help keep fruit off the soil,
improve airflow through foliage, make pruning and harvesting easier, and reduce the odds of rot or disease problems that love damp, crowded leaves.
Plus, your tomatoes stay cleanerbecause “garden dirt” is charming until it’s crusted onto every single ripe fruit.
Step 1: Know your tomato type (this changes everything)
Before you choose a support system, check whether your plant is determinate or indeterminate:
-
Determinate (bush) tomatoes grow to a more compact height, set a lot of fruit in a shorter window, and then slow down.
They still benefit from support, but they usually don’t need an 8-foot skyscraper. -
Indeterminate (vining) tomatoes keep growing and producing until frost. They typically need stronger, taller supportand ongoing training.
These are the plants most likely to flop, snap, or sprawl if you don’t plan ahead.
Quick rule of thumb: if your plant tag says it can reach “6+ feet,” that’s a polite way of saying, “You will stake me, or you will regret it.”
Step 2: Stake early (future you will send a thank-you note)
The easiest time to install stakes or cages is soon after transplanting, while you can still see the soil and your tomato isn’t wrapped around itself.
Waiting until the plant is huge often means damaging roots, breaking stems, and inventing new words.
Step 3: Pick the right staking method for your garden
There’s no single “best” methodjust the best match for your space, variety, climate, and how much weekly maintenance you’re willing to do.
Here are the most popular, proven systems.
Method A: Single-stake staking (great for small spaces and neat rows)
This is the classic approach: one tall stake per plant (or per main stem), with the tomato tied as it grows. It’s clean, simple, and space-efficient,
but it usually works best when you prune and train the plant to fewer main stems.
Best for: indeterminate tomatoes, tight spacing, gardeners who don’t mind regular tying and pruning.
What you’ll need:
- Stakes: typically 6–8 feet tall (wood, bamboo, metal, or T-posts)
- Hammer or post driver (your wrists will appreciate this)
- Soft ties: fabric strips, stretchy plant tape, soft twine, or tomato clips
How to do it (step-by-step):
-
Place the stake 4–6 inches from the plant and drive it into the soil deeply enough to stay stable (aim for about 8–12 inches or more, depending on soil).
Install it early to avoid root damage. -
Choose your training style: keep 1–3 main stems for a tidy plant that’s easier to support.
(If you let the plant keep every sucker, you’ll be tying up a leafy chandelier.) - Tie the stem loosely as it grows, starting when it’s about 10–12 inches tall. Add ties every 8–12 inches of growth, or whenever the stem starts leaning.
- Use a “figure-eight” tie: loop around the stake, cross, then loop around the stem. This creates a cushion so the tie doesn’t rub or cut into the plant.
- Adjust ties during the season so they don’t constrict swelling stems.
Pro tip: If you’re growing a heavy-fruiting variety (think big slicers), add ties beneath fruit clusters so the weight doesn’t torque the main stem.
Method B: Florida weave (stake-and-weave) for rows
The Florida weave (also called basket weave or stake-and-weave) is a favorite for gardeners growing tomatoes in a row.
Instead of tying each plant individually, you create horizontal “bands” of twine that sandwich plants between layers as they grow.
It’s fast, scalable, and surprisingly sturdy when done right.
Best for: multiple plants in a row, both determinate and indeterminate types, gardeners who want efficiency.
What you’ll need:
- Strong stakes (often 6–8 feet for indeterminates; sturdy wood or metal/T-posts work well)
- Durable twine or tomato string (poly twine holds tension better than some natural fibers)
- Optional: gloves (twine can burn like a tiny rope of spite)
How to do it (step-by-step):
- Set end stakes firmly at both ends of the row. These carry the most tension, so make them strong and deep.
- Add stakes along the row (commonly between every other plant or every few plants, depending on plant vigor and your stake strength).
- Start weaving when plants are ~10–12 inches tall (or as they begin to lean).
-
Run twine down one side of the row, looping around each stake to keep tension.
The twine should press gently against plants, keeping them upright. - Return up the other side of the row, creating a “sandwich” of twine with plants in the middle.
-
Add a new level of twine every 6–10 inches of plant growth (or about weekly in peak summer).
Tuck stray branches inside as you go.
Reality check: The Florida weave can become a “tomato wall.” That’s awesomeuntil airflow disappears.
If your plants are extremely vigorous, consider light pruning and reasonable spacing to prevent a humid jungle.
Method C: Tomato cages (low-maintenance, but choose the right kind)
Cages are popular because they’re simple: place the cage, let the plant grow through it, and harvest later.
The catch is that many store-bought cages are too flimsy for large indeterminate tomatoes. If you’ve ever watched a cage collapse like a folding chair at a comedy club,
you know what I mean.
Best for: determinate varieties, smaller gardens, gardeners who want minimal tying and pruning.
Cage tips that actually work:
- Go sturdy: heavy-duty cages or concrete reinforcement mesh cages hold up better than thin-wire cones.
- Install early: put cages on when plants are small so you don’t break branches later.
- Anchor them: in wind-prone areas, stake the cage itself to prevent toppling.
- Plan spacing: caged plants often need more room for airflow and access.
Method D: Trellis or string method (vertical training for serious growers)
If you want a clean, vertical systemespecially in raised beds, high tunnels, or along fencesa trellis can be a game-changer.
One version is the string method, where an overhead support holds a vertical string that the tomato is clipped or wrapped to as it grows.
Best for: indeterminate tomatoes, limited ground space, gardeners who like structured training.
Basic setup ideas:
- Fence trellis: attach horizontal wires and tie stems upward.
- Cattle panel arch: strong, durable, and great for vining growth.
- Overhead string line: anchor twine above and secure the plant with clips or loose ties as it grows.
Step 4: Choose stakes and ties that won’t betray you in August
Stake materials
- Wood stakes: sturdy (especially 2×2), but can rot over time if not treated or stored well.
- Bamboo: inexpensive and easy for smaller plants; may snap under heavy fruit loads.
- Metal stakes/T-posts: strong and long-lasting; great for Florida weave and heavy indeterminates.
- Rebar: tough and effective, but can be hard on hands and ties; cap ends for safety.
Tie materials (soft is the whole point)
- Cloth strips (old T-shirts): gentle and adjustable
- Stretchy plant tape: supports without cutting in
- Tomato clips: quick and tidy (especially for trellis/string systems)
- Twine: works well if tied properly and checked often
Avoid thin wire or anything that can “girdle” the stem. Tomatoes grow fast; what’s loose today can become a tourniquet next week.
Step 5: Tie tomatoes correctly (so you support, not strangle)
The goal is to stabilize the plant while allowing movement and stem thickening.
Your tie should be snug enough to support but loose enough to avoid pinching.
A reliable tie technique:
- Loop tie around the stake.
- Cross the tie to form a figure-eight.
- Loop around the stem on the other side.
- Secure with a simple knot that’s easy to adjust later.
Place ties on the main stem (not leaf stems), and add support below heavy fruit clusters when needed.
If a branch is loaded with green tomatoes and drooping dramatically, it’s not being “artistic.” It’s asking for help.
Step 6: Match pruning and training to your staking system
Staking and pruning are best friends. You can stake a wild, unpruned indeterminate tomato,
but you’ll spend the season tying up a plant that’s trying to become a shrubbery.
For single-stake systems
- Train to 1–3 main stems for easier tying and better airflow.
- Remove suckers strategically (especially low on the plant) so energy goes into fruit and the plant stays manageable.
- Clear lower leaves that touch soil to reduce splash-up issues during watering and rain.
For Florida weave
- Light pruning can help airflow, but many gardeners keep pruning minimal and rely on weaving layers for support.
- As the plant grows, tuck branches inside the twine layers so they don’t snap outside the “sandwich.”
For cages
- Pruning can be lightercages are designed to let plants branch naturally.
- Still remove leaves that touch the ground and thin a little if the center becomes too dense.
Troubleshooting: common tomato staking mistakes (and how to fix them)
1) Staking too late
If your tomato is already flopping, don’t panicjust be gentle. Add a stake slightly farther out to avoid roots, then tie the plant up in stages over a week.
Forcing it upright in one go can crack stems.
2) Weak supports for big plants
If you grow indeterminates, choose sturdier stakes or a trellis. Reinforce cages with a stake if winds are common.
A support system that fails mid-season is basically a tomato emergency.
3) Ties that cut into stems
Swap to softer ties immediately and check ties weekly. If you see indentation, loosen or replace the tie and add a second tie higher up for stability.
4) Plants packed too closely
Tight spacing can boost disease pressure by reducing airflow. If you’re growing in a humid area, give plants extra room,
prune for openness, and avoid creating a solid wall of leaves.
5) Under-weaving the Florida weave
One or two strings won’t hold a heavy crop. Add layers regularly as plants climb.
Think of it like building a ladderskipping rungs makes everything wobbly.
Quick “choose your method” cheat sheet
- I have a few plants and want tidy growth: single stake + light pruning.
- I’m growing a row and want efficiency: Florida weave.
- I want minimal tying and pruning: sturdy cages (especially for determinates).
- I love vertical structure and neat training: trellis or string method.
End-of-season cleanup: don’t skip this
Reusing stakes and cages is smartbut only if you clean them. Plant disease organisms can overwinter on gardening gear.
At season’s end, remove plant debris and wipe down supports before storage (especially if you had disease issues).
Conclusion
Learning how to stake tomatoes is one of those gardening skills that pays off fast:
sturdier plants, cleaner fruit, easier harvesting, and fewer “why is everything on the ground?” moments.
Stake early, choose a method that fits your garden and tomato type, use soft ties, and keep up with light training as plants grow.
Do that, and your tomatoes will spend more time ripening in the sunand less time auditioning for a compost pile.
Extra: Real-world experiences and lessons from staking tomatoes (about )
If you ask a group of gardeners about staking tomatoes, you’ll hear a familiar theme: everyone becomes a staking expert right after their first collapse.
A common experience is starting the season with the best intentionsone neat stake, one neat plantthen hitting mid-summer when growth explodes and suddenly the plant
is taller than the stake, wider than the cage, and producing fruit like it’s being paid per tomato. That’s usually when people learn the first big lesson:
supports need to match the plant’s “final form,” not its springtime personality.
Another frequent “aha” moment happens with ties. Many gardeners begin with whatever is handythin twine, twist ties, or (in truly desperate times) something
scavenged from the garage. Then the stems thicken, the ties tighten, and the plant looks like it’s wearing a belt two sizes too small.
The takeaway is simple: soft, wide ties and a little slack prevent damage. People who switch to cloth strips or stretchy tape often report fewer broken stems,
especially after thunderstorms when plants sway and rub against supports.
The Florida weave has its own shared set of experiences. Gardeners love it because it’s fast and works beautifully in rowsright up until they miss a week.
When you skip adding a layer, tomatoes don’t pause growth to be polite. They lean, sprawl, and set fruit anyway, and the row starts to bow outward.
The best Florida weave stories usually include the phrase, “I thought it would be fine,” followed by a frantic session of re-tensioning twine like it’s a
sailing rig in a windstorm. The lesson: short, regular maintenance beats one big rescue mission.
Caging brings a different kind of reality check: not all cages are created equal. Many gardeners try the classic lightweight cone cage once, then watch it tip over
under a heavy indeterminate varietyespecially after rain, when foliage is wet and fruit is heavier. That’s often when they upgrade to heavy-duty cages,
concrete-mesh cylinders, or cages reinforced with a stake. The memorable experience here is realizing that the “cheap” cage can become expensive
if it costs you fruit, breaks branches, or forces you to re-support the plant mid-season.
Finally, gardeners often notice how staking changes harvesting behavior. With a supported plant, tomatoes are more visible, easier to reach, and less likely to hide
until they’re overripe. People frequently report harvesting more consistentlybecause it’s simply easier. And that leads to one of the most satisfying outcomes:
fewer cracked fruits and fewer “mystery tomatoes” discovered weeks later. In the end, the most common experience is this:
once you find a staking method that fits your space and routine, you stop wrestling tomato vines and start enjoying the part you wanted all alongfresh,
sun-warmed tomatoes that didn’t spend their lives touching the dirt.


