
Table of Contents >> Show >> Hide
- Why Mangoes (and Tropical Anything) Make Perfect Silk Art
- Why Silk Is the Dream Canvas (and a Little Bit a Diva)
- Supplies I Actually Use (and Why)
- My Step-by-Step Process for Mango Silk Drawings
- 1) Prep: pre-wash, dry, stretch
- 2) Design: mango first, then the “tropical atmosphere”
- 3) Resist lines: the “fences” that keep color in place
- 4) Color application: wet-to-wet, controlled gradients, and mango glow
- 5) Texture: salt sparkles, sunburst blooms, and tropical “air”
- 6) Setting the color: steaming vs. heat-setting (and why it matters)
- 7) Finishing: rinsing, removing clear resist (when appropriate), and pressing
- 7 Pics: Mango & Tropical-Inspired Silk Drawings Gallery
- Common Problems (and the Fixes I Use)
- Care Tips for Wearable Silk Art
- Ideas to Try If You Want Your Own Mango Silk Moment
- Conclusion: Why I Keep Coming Back to Mangoes on Silk
- My Real-Life Studio Notes (Extra Experiences ~)
If you’ve ever looked at a perfectly ripe mango and thought, “This color deserves a museum gift shop scarf,”
welcomeyou are my people. I paint mango and tropical-inspired drawings on silk because it’s basically the only surface
that can keep up with tropical vibes: glossy, luminous, and just dramatic enough to make even a simple leaf look like it
has a publicist.[1]
This post is a behind-the-scenes peek at how these pieces come to lifewhat I use, what I avoid, why mangoes are the
ultimate color mentors, and what I’ve learned after watching dye move across silk like it’s late for a flight.
And yes: you’ll get the “7 pics” gallery (with captions) so you can see the rangefrom juicy fruit slices to full
tropical daydream mode.
Why Mangoes (and Tropical Anything) Make Perfect Silk Art
Mangoes are basically nature’s color palette: green that shifts to yellow, yellow that warms into gold, gold that turns
into orange, and orange that flirts with coral and red. I love them because they create natural gradients without feeling
forcedlike the fruit is quietly saying, “Relax. I already did the hard part for you.”
Tropical inspiration goes beyond fruit, too: palm fronds, hibiscus-like blooms, ocean blues, warm sunsets, and those bold
graphic shadows you see when sunlight hits big leaves at noon. On silk, those contrasts look extra crisp because the fabric
catches light differently as it movesyour highlights literally change when you walk.[1]
My go-to tropical “motif toolkit”
- Mango forms: whole fruit silhouettes, slices, cubes, and seed shapes for graphic centers.
- Leaves with personality: palm, banana, monstera-inspired cuts, and long blade-like fronds.
- Micro-details: speckles, freckles, and tiny starburst dots to mimic mango skin texture.
- Color families: mango-gold + leaf-green + ocean-teal + a little sunset-pink for attitude.
Why Silk Is the Dream Canvas (and a Little Bit a Diva)
Silk is a protein fiber, which is why dye behaves differently on it than on many plant fibers. The short version:
dye can become part of the fabric instead of sitting on top like a layer of paint, so the finished work can keep silk’s
softness and drape.[1] That’s the magicyour artwork doesn’t feel like a stiff poster; it feels like… silk,
just with a tropical secret.
The diva part? Silk shows everything. If your hand wobbles, silk will remember. If your resist line has a tiny gap,
dye will find it like it’s playing hide-and-seek on expert mode.[2] But honestly, that’s also why I love it:
silk rewards patience and good prep.
Supplies I Actually Use (and Why)
There are many ways to make silk artdyes, paints, resists, primers, stamping, watercolor-like approaches. The key is
picking a method that matches the final use (wearable scarf vs. wall art) and your tolerance for steps like
steaming or heat-setting.[3]
Core setup for crisp outlines (Serti-style)
- Silk: smooth habotai is beginner-friendly and takes color beautifully.[1]
- Frame/stretching method: I keep silk taut so the dye doesn’t puddle in surprise valleys.[1]
- Resist (gutta or water-based resist): creates “fences” so colors stay where I want them.[1]
- Dyes or dye-like color: I choose based on whether I plan to steam-set or heat-set.[2]
- Brushes + applicator tip: a fine tip is the difference between elegant outlines and noodle soup lines.[1]
Optional helpers for specific effects
- No-flow/stop-flow primer: helps detail work by reducing how far color spreads.[2]
- Salt technique: can create starburst textures that look like sun on water or mango “sparkle.”[2]
- AirFix-style additive (when heat setting is impractical): helpful for certain paint-like color systems.[8]
My Step-by-Step Process for Mango Silk Drawings
1) Prep: pre-wash, dry, stretch
If I want the color to behave, I start by treating silk like a serious project, not a “we’ll figure it out” craft.
Pre-washing helps remove residues that can interfere with dye absorption, then I dry and stretch the silk taut in a frame
so it stays suspended above my work surface.[1] The goal: a smooth, even “stage” where color can move the way I
expect it to.
2) Design: mango first, then the “tropical atmosphere”
I sketch lightly with a water-soluble marker (or a faint pencil if the fabric and project allow). I usually build the
design in layers:
- Hero subject: the mango slice, cube pile, or whole fruit silhouette.
- Support cast: leaves and blooms that frame the fruit and push the eye around the composition.
- Energy: dots, tiny color pops, and shadow shapes to keep it from feeling flat.
Composition trick: I try to keep at least one “resting zone” where the eye can breathenegative space is the friend who
stops your party from becoming a traffic jam.
3) Resist lines: the “fences” that keep color in place
When I’m using a serti-style approach, I outline shapes with resist so the dye doesn’t bleed across boundaries.[10]
The resist needs to penetrate the fabricif it doesn’t go through, dye can sneak under it and blur your edges.[2]
I let it dry fully before adding color (and yes, I’ve learned this the hard way).
Pro tip I live by: if a dye starts escaping through a tiny gap, I stop it by drying the area quickly, patch the resist,
let it dry, and only then continue painting.[2] Silk is forgiving… if you catch the problem before it becomes a
full-color jailbreak.
4) Color application: wet-to-wet, controlled gradients, and mango glow
For vivid color with soft transitions, I work “wet-to-wet” inside outlined areas so I don’t get harsh edges where I don’t
want them.[2] I often touch the brush down slightly away from a resist line and let the color travel toward it
rather than forcing it right up to the border.[5]
Mango shading is my favorite part. I’ll usually start with a warm yellow base, then drop in orange or coral while the area
is still damp. For depth, I add tiny amounts of darker tone near the seed or under a “slice lip,” then blend outward with a
damp brush. The goal is juicy, not muddy.
5) Texture: salt sparkles, sunburst blooms, and tropical “air”
If I want that tropical shimmerlike light bouncing off water or dew on leavesI’ll use a salt technique on very wet color:
sprinkle, let it dry completely, then brush off the salt for a starburst pattern.[7] Used sparingly, it’s magic.
Used everywhere, it’s… chaotic confetti energy. (Sometimes fun. Often loud.)
6) Setting the color: steaming vs. heat-setting (and why it matters)
Setting is the part that makes the artwork durable. Depending on the dye/paint system, this can involve steam-setting
(often praised for the most brilliant results with true dyes) or heat-setting with an iron for certain paint-like
products.[2]
-
Steam-setting (common for professional dye systems): often yields especially vivid color when the product
is designed for steaming.[2] -
Heat-setting (common for many fabric paints/dye-like paints): typically involves ironing after the piece
is fully dry; some instructions recommend ironing for several minutes depending on the product and fabric.[7]
I always follow the specific directions for the color system I’m usingsilk painting is one of those crafts where the
“close enough” approach tends to show up later… usually during washing.
7) Finishing: rinsing, removing clear resist (when appropriate), and pressing
Some clear water-based resists can be rinsed out in warm water, but removal can become difficult depending on the resist brand
and the setting method used.[2] Once the piece is clean and dry, I press gently (low heat, protection cloth if needed)
so the silk looks polished without losing that fluid drape.
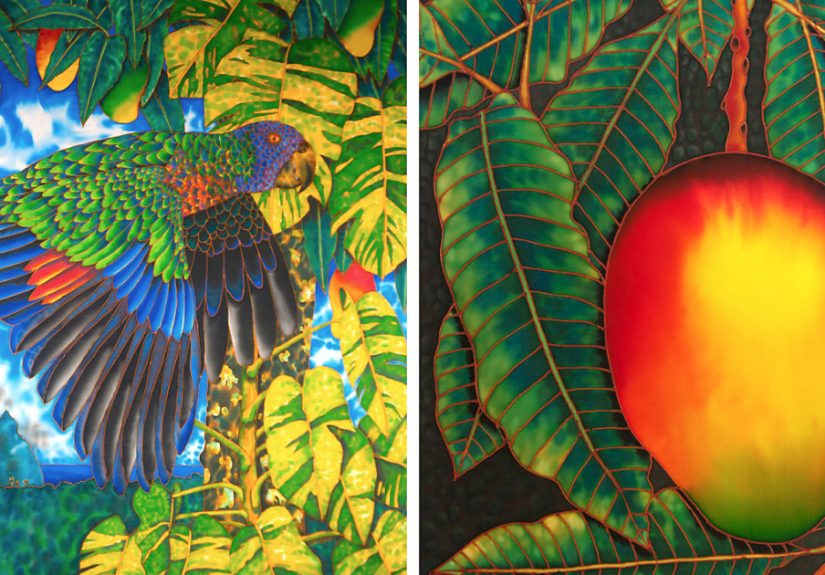
7 Pics: Mango & Tropical-Inspired Silk Drawings Gallery
Below are placeholders for the seven imagesswap in your photo URLs or media library paths. I wrote the captions the way I’d
want someone to explain my work: what you’re seeing, what technique mattered, and the tiny detail that made me irrationally happy.

while the resist line keeps the edge crisp.[2]

without looking heavy.

positioned so the cubes look glossy instead of flat.

humid air.[7]

where the focal point lands when the scarf drapes.

vacations outside the lines.[10]

of the fabric can look so alive on wearables.[1]
Common Problems (and the Fixes I Use)
Problem: My color bled under the outline
Usually this is a resist penetration issue: the resist didn’t go through the fabric, or there was a gap. I check the back
of the silk, patch weak areas, and let everything dry before continuing.[2]
Problem: Hard edges where I wanted smooth blends
That’s often a timing problempart of the area dried before you re-wet it. Working wet-to-wet helps, and so does planning
sections so you’re not racing the clock across a giant background.[2]
Problem: The silk feels stiff
True dyes typically don’t leave the same “surface layer” feel that many paints do, which is why many silk artists choose
dye systems when drape matters.[1] If I’m using a paint-like product, I heat-set properly and avoid overloading
the fabric with thick, repeated coats.
Care Tips for Wearable Silk Art
I treat finished silk pieces as delicatesgentle washing, cool water, and no aggressive wringing. Hot water can be rough
on delicate fabrics like silk, so I keep things cool and calm unless the care instructions say otherwise.[13]
And if a piece is especially precious (or the dye system is sensitive), I handle it like a museum item that happens to be
fashionable.
Ideas to Try If You Want Your Own Mango Silk Moment
- “Two-mango palette” challenge: one warm mango (yellow/orange) + one green mango (more leafy/acidic).
- Pattern remix: repeat tiny mango slices like a tropical polka dot scarf.
- Negative space trick: leave one big unpainted area to make the colors feel brighter.
- Texture sparingly: one salt-texture zone per piece so it reads intentional, not accidental.[7]
Conclusion: Why I Keep Coming Back to Mangoes on Silk
Mango and tropical-inspired silk art is my favorite mix of control and surprise: I plan the drawing, build the color story,
set boundaries with resist, and then let the dye do its graceful little dance across the fabric. The final piece feels alive
not just because the colors are bold, but because silk itself carries light, movement, and mood in a way paper never can.[1]
If you’re thinking about trying silk painting, start small, pick one juicy mango palette, and practice making clean lines.
After that, it’s basically you + fabric + a tropical daydream… and maybe a tiny bit of salt for sparkle.
My Real-Life Studio Notes (Extra Experiences ~)
The first time I tried painting mangoes on silk, I assumed it would feel like watercolor on paper. It does not. Silk is more
like watercolor on a surface that’s simultaneously absorbent and eager to gossip. Put down one drop of color and it will
travelfastuntil it hits something that stops it. That “something” can be a resist line, a dry edge, or the moment you
realize you forgot to stretch the fabric and now your mango is slowly sliding downhill like it’s escaping a bad date.
My earliest mangoes looked… enthusiastic. The colors were bright, but the shapes felt puffy, like balloon fruit. The fix was
learning where to place shadows and highlights so the form reads as juicy instead of cartoony. Mango slices taught me a
surprisingly useful lesson: the most important part isn’t the orangeit’s the subtle shift from golden yellow to warm
midtone and the tiny darker curve near the seed that tells your eye, “This has depth.” Once I practiced that curve a few
times, everything improved, including leaves and flowers, because the same logic applies: depth comes from deliberate value
changes, not from adding more color everywhere.
Another thing I learned: tropical doesn’t mean “use every tropical color at the same time.” Early on, I tried to add teal,
hot pink, lime green, and sunset orange all in one small area. The result was visual noiselike a tourist shirt arguing with
itself. Now I build a hierarchy. Mango-gold is usually the star. Greens support. Teals and pinks are accents. When I keep
that structure, the piece feels vibrant without feeling chaotic.
Resist work changed my whole relationship with silk. At first, I hated it because it felt like the boring part you have to
do before the fun begins. Then I realized resist is the funbecause it lets you design how color behaves. A clean
outline means you can flood an area with glowing pigment and relax, knowing it won’t invade the next section. I started
enjoying the slow, careful pace of drawing the “fences,” and I got pickier: consistent pressure, steady speed, and checking
the back of the fabric so I’m not setting myself up for a surprise bleed later.
My favorite “happy accident” moment is when the silk catches light and a painted mango looks different depending on the angle.
On the table it’s one thing; worn as a scarf it becomes another, because the sheen shifts and the artwork moves. That’s the
part that keeps me coming back. A mango on silk doesn’t just sit thereit performs. And honestly, if a fruit is going to be
painted, it might as well have stage presence.


