
Table of Contents >> Show >> Hide
- Why a window box is a smart DIY upgrade
- Design decisions that make the difference
- Tools and materials
- Build the window box (step-by-step)
- Add the patriotic twist (without regretting it later)
- Finish it for outdoor life
- Mount it safely (the part where we respect gravity)
- Soil, watering, and feeding: how to keep plants happy in a box
- Patriotic planting recipes (red, white, and blue)
- Keep it looking sharp all season
- Troubleshooting common window box problems
- Real-world experiences and lessons learned (the 500-word “what it’s actually like” section)
- Conclusion
Want instant curb appeal without repainting your entire house (or spiraling into a “while we’re at it…” weekend)?
A window box is the sweet spot: it’s practical, pretty, and it makes your home look like it has its life together.
Add a red-white-and-blue twist and suddenly your windows are dressed for the holiday partywithout being the neighbor
who permanently lives in “Fourth of July mode.”
This guide walks you through building a sturdy DIY window box, mounting it safely, and planting it with a patriotic
color scheme that looks intentional (not like you panic-bought whatever was closest to the garden center entrance).
You’ll also get finishing ideaspaint, stencils, and removable accentsso you can go bold for summer holidays and
dial it back later without sanding your feelings.
Why a window box is a smart DIY upgrade
Window boxes do three big jobs at once: they frame your windows, soften hard lines (brick, siding, trim), and bring
color up at eye level where it actually gets noticed. They also let you control soil quality, drainage, and plant
placement more easily than in-ground bedsespecially if your yard’s soil is more “mystery clay” than “garden loam.”
Patriotic doesn’t have to mean “theme park”
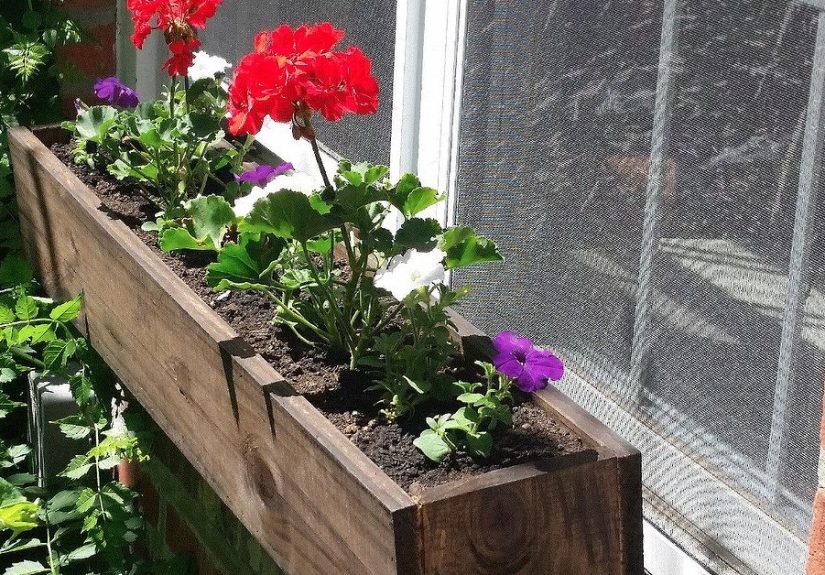
A patriotic window box can be subtle and classy. Think navy-and-white stripes with a single red accent plant. Or a
classic flower trio: red geraniums, white alyssum, and blue lobelia. It reads “festive,” not “I bought every flag at
the hardware store.”
Design decisions that make the difference
Pick rot-resistant materials (your future self will thank you)
For outdoor planters, rot resistance matters more than perfection. Cedar is a favorite because it naturally holds up
well outdoors and is easy to work with. Redwood and cypress are also solid options if they’re common in your area.
Whatever you choose, use exterior-rated screws and a finish meant for outdoor exposure.
Size it right: the “looks good” rule
A simple guideline: make the box a little shorter than the window casing so it looks custom, not clunky. Depth and
height should match your plant plandeeper boxes hold moisture better but weigh more once watered. If you’re mounting
the box to your home, remember: water + soil = “surprisingly heavy.”
Drainage is not optional
If your window box can’t drain, your plants will sit in wet soil and sulk (and then dramatically collapse). Drainage
holes plus a barrier to keep soil from washing out is the combo you want. You’ll also want a strategy to protect the
woodeither a liner or a good sealing plan.
Tools and materials
- Rot-resistant wood boards (cedar is ideal)
- Exterior-rated screws (deck screws) and optional exterior wood glue
- Drill/driver + bits (including a bit for drainage holes)
- Saw (miter saw, circular saw, or even a handsaw if you’re patient)
- Sandpaper or a sander (80–120 grit is usually plenty)
- Exterior primer + exterior paint (or exterior stain) + outdoor sealer
- Landscape fabric (or a breathable barrier) and optional washed stone
- Mounting hardware: brackets/cleats, lag screws, washers, level
- Exterior-grade caulk (for sealing pilot holes and keeping water out)
- Potting mix made for containers + slow-release fertilizer (optional but helpful)
- Plants in red, white, and blue tones (ideas below)
- Optional: small flags, removable bow/bunting, or stencil for stars
Build the window box (step-by-step)
Step 1: Choose a simple, strong build
The easiest DIY window box is a classic rectangle: front, back, two sides, and a bottom. You can make it stronger by
adding interior cleats (thin strips of wood) that support the bottom, plus corner blocks or braces.
Step 2: Example cut list (customize to your window)
Here’s a common “starter size” that works for many standard windows. Adjust measurements to fit your space:
- Front & back: 1×8 boards cut to length (for example, 30–36 inches)
- Sides: 1×8 boards cut to your desired depth (for example, 7–9 inches)
- Bottom: 1×6 or 1×8 board cut to match the front/back length (or use multiple slats)
- Interior cleats: 1×2 strips to run along the inside bottom edges
If you prefer a “fancier” look, you can add a top trim strip or a small front face frame. Just remember: trim is
frosting. The box still needs to be structurally sound.
Step 3: Assemble the frame
- Pre-drill screw holes to reduce splitting (especially near board ends).
- Attach the sides to the front and back to form a rectangle.
- If using wood glue, use a thin bead rated for exterior use, then screw the joints tight.
- Add corner blocks inside the corners if you want extra strength (especially for longer boxes).
Step 4: Install bottom supports (cleats) and attach the bottom
Interior cleats make your bottom much sturdier. Screw the cleats along the inside of the front and back panels,
aligned so the bottom piece can rest on them. Then attach the bottom board(s) onto the cleats.
If you’re using multiple bottom slats, leave tiny gaps between them for drainage and airflow. If you’re using a
single bottom board, you’ll rely on drainage holes (next step).
Step 5: Drill drainage holes
Flip the box over and drill drainage holes across the bottom. Space them evenly so water doesn’t collect in one sad,
swampy corner. More (smaller) holes are often better than fewer (larger) holes because they distribute drainage.
Step 6: Sand and prep for finishing
Sand the edges and corners so you don’t snag sleeves, skin, or your dignity during installation. Focus on splinter
zones and any sharp corners. Wipe off dust before priming or staining.
Add the patriotic twist (without regretting it later)
Option A: Painted stripes + a “star moment”
A simple design that looks crisp:
- Paint the box a clean white as your base (primer first if needed).
- Add navy stripes (horizontal or vertical) with painter’s tape.
- Stencil one small cluster of stars on a corner or center panel.
Keep the stars minimal. One tasteful constellation beats a full-on galaxy of chaos.
Option B: Classic wood + removable accents
Love the idea of patriotic flair but want the ability to “un-theme” fast? Leave the wood natural (stain + seal), then
add removable pieces:
- Small flag picks tucked into the soil for holidays only
- A removable bow or bunting attached with outdoor Command-style hooks (if appropriate for your surface)
- Ribbon wrapped around a bracket rather than stapled to the box
Option C: Two-tone paint that still works in August
Paint the exterior a soft navy or charcoal, then paint the top trim white. Your flowers provide the red-white-blue
moment. The box still looks great when you swap plant colors later.
Finish it for outdoor life
Outdoor planters deal with sun, water, and temperature swings. Your finish should match that reality:
- If painting: use exterior primer and exterior paint, then add a protective outdoor sealer if needed.
- If staining: choose an exterior stain and re-seal as recommended by the product.
- Protect the inside: consider a liner or at least a barrier layer so wet soil isn’t constantly pressed against raw wood.
Mount it safely (the part where we respect gravity)
Find solid support
A properly planted window box is heavy, and it gets heavier after watering or rain. Mounting into structural support
(like studs) is the goal, not “into siding and hope.”
A straightforward mounting approach
- Mark stud locations (or mounting points) and hold the box in position.
- Drill reference holes through the box where it will attach.
- Create clearance through siding so it can move slightly with temperature changes.
- Drill pilot holes into the structural support.
- Seal pilot holes with exterior caulk to help prevent water intrusion.
- Use lag screws with washers to fasten the box level and tight.
Bracket-and-cleat method (extra handy for maintenance)
If you like the idea of removing the box without emptying it, a bracket/cleat setup can help. Brackets mount to the
wall, the box rests on them, and you screw the box to the cleats. This can make repainting, deep cleaning, or
off-season storage easier.
Safety note: Wear eye protection when drilling. If you’re installing into masonry or you’re unsure
what’s behind your siding, consider getting help from someone experienced. “DIY confidence” is great, but “DIY
surprises” are not.
Soil, watering, and feeding: how to keep plants happy in a box
Use a potting mix made for containers
Regular garden soil compacts in containers and drains poorly. A container potting mix is designed to stay lighter,
hold moisture while still draining, and keep roots healthier. Look for mixes that include ingredients that balance
moisture retention and airflow.
Optional: add a drainage barrier layer
Line the bottom with landscape fabric so soil doesn’t escape through drainage holes. Some gardeners add a thin layer
of washed stone to help keep the fabric in place and improve drainage behavior. Don’t overdo the stoneyour plants
still want soil volume for roots.
Fertilizer: small, consistent, and label-friendly
Container plants use nutrients quickly, and watering can wash nutrients out over time. A slow-release fertilizer at
planting can help, and many gardeners supplement with a water-soluble fertilizer later in the season. The key is not
“more,” but “consistent”and following the label so you don’t burn plants or create excess runoff.
Watering: expect to water a lot
Window boxes dry out faster than in-ground bedssun, wind, and shallow soil volume all speed evaporation. In hot
weather, you may need daily watering, sometimes more depending on conditions. Aim for evenly moist soil, not soggy.
Patriotic planting recipes (red, white, and blue)
Recipe 1: Classic “parade-ready” combo (full sun)
This one is popular for a reason: it’s bold, balanced, and easy to spot from the street.
- Red: Geraniums (upright, dependable color)
- White: Sweet alyssum (soft, trailing-ish filler) or white petunias
- Blue: Heat-tolerant lobelia or blue/purple-blue petunias
- Optional foliage: Dusty miller for a silvery “sparkle” effect
Recipe 2: Heat-loving and low-drama (hot, sunny spots)
- Red: Salvia or red verbena
- White: White euphorbia (airy texture) or white petunias
- Blue: Ageratum or blue-purple petunias
- Optional: A red-leaf coleus as a bold accent (especially if you want color even when blooms slow down)
Recipe 3: Part shade (still festive, less sun stress)
If your window gets morning sun or bright shade, aim for plants that won’t melt by mid-July.
- Red: Begonias or impatiens (depending on your conditions)
- White: White begonias or white impatiens
- Blue: Choose a blue-toned annual suited to your light level (often a blue-purple shade works best)
- Foliage: Add a trailing vine or textured leaf plant for fullness
Planting layout tip: thriller, filler, spiller
It’s the easiest design formula that doesn’t feel like a formula:
- Thriller: taller focal plants (geraniums, salvia)
- Filler: mounding plants (petunias, euphorbia)
- Spiller: trailing plants (alyssum, trailing petunia varieties)
Keep it looking sharp all season
Deadhead, pinch, and don’t be afraid to “haircut”
Many flowering annuals bloom more when you remove spent flowers. Petunias especially may appreciate a mid-season trim
(yes, it feels rude; yes, it works). After trimming, water well and consider a light fertilizer boost if your plants
look hungry.
Watch for salt buildup and tired soil
Because fertilizers are salts, containers can accumulate salts over time. If plants start looking stressed even when
you’re watering correctly, flushing the soil occasionally (watering deeply so excess drains out) can help. Also,
refreshing the top few inches of potting mix mid-season can give plants a second wind.
Holiday upgrade trick: swap accessories, not the whole planting
For Memorial Day, Flag Day, and the Fourth of July, add small flag picks or a removable bow. After the holiday, pull
them out and your window box instantly goes from “celebration” back to “charming.”
Troubleshooting common window box problems
“My plants droop at noon but recover later”
That can be normal heat response. Check soil moisture early morning. If the soil is dry, water more consistently.
If it’s wet and they still droop, they may be stressed by heat or root crowding.
“My soil stays wet and things look sad”
That’s usually a drainage issue. Make sure the box has drainage holes, and that they aren’t blocked. Also check if
your liner is trapping waterliners should allow drainage, not create a bathtub.
“It looks amazing… for two weeks”
Welcome to containers! Fast growth uses nutrients quickly. A steady feeding plan (based on label directions) plus
regular watering and trimming keeps things looking full longer.
Real-world experiences and lessons learned (the 500-word “what it’s actually like” section)
Building a DIY window box feels like a simple project right up until you’re standing in the driveway holding a board
and thinking, “Wood is just… rectangles. How hard can rectangles be?” The answer: rectangles are easy. Keeping them
square while you’re juggling screws, gravity, and the sudden realization that your drill bit is missing is where the
character development happens.
One of the first “aha” moments most people have is that the box isn’t the hard partthe planning is. Measuring the
window, deciding how far the box should extend, and picturing how plants will spill over the edge is what separates a
charming window box from one that looks like it’s wearing shoes two sizes too big. A lot of DIYers end up loving the
“slightly shorter than the window casing” look because it feels intentional. It also gives you breathing room during
installation, when perfect alignment suddenly becomes a competitive sport.
Then there’s the weight factor. Before planting, the box is light enough to lift with one hand while you sip coffee
with the other. After soil and watering? Suddenly you’re negotiating with your core muscles like, “We can do this, but
only if you promise not to laugh when I make that lifting noise.” That’s why mounting into real support matters so
much. People who skip the stud-finding step tend to learn an important life lesson: water is heavy, and gravity is
consistent.
The finishing stage is where personalities show up. Some folks love the clean, crisp “nautical stripes and a few
stars” approach because it’s festive but still classy when the holidays pass. Others start with “subtle” and end up
painting a full flag mural by accidentbecause once you buy a stencil set, it whispers ideas at you. The best
compromise is often removable accessories: a couple of small flags, a bow, or bunting that can come off after the
Fourth. That way, your window box doesn’t feel trapped in a never-ending summer celebration.
Planting is its own mini-adventure. In garden centers, everything looks like it’s thriving, perfectly spaced, and
professionally styled. At home, you realize the plant tag doesn’t mention “will aggressively expand into its
neighbor’s personal space.” That’s why the classic “thriller, filler, spiller” layout is so helpful. It gives you a
plan: taller plants in back, mounding plants in the middle, trailing plants in front. And it makes troubleshooting
easierif your “spiller” isn’t spilling, it might need more sun, a trim, or a different plant choice next time.
The maintenance reality is this: window boxes are a little high-maintenance, but in a satisfying way. They’re like a
pet that doesn’t run away and doesn’t need a vetjust water, occasional trimming, and a steady snack supply
(fertilizer). The payoff is huge: every time you pull into the driveway or walk up to the house, it feels welcoming.
And when you switch out those holiday accents, you’ll get that “I made this” pride boost all over againwithout
repainting your entire porch. Which, honestly, is a win for everyone.
Conclusion
A DIY window box is the kind of project that looks impressive, adds real curb appeal, and stays flexible: you can
refresh plants, swap seasonal accents, and update colors without rebuilding anything. Build it sturdy, prioritize
drainage, mount it safely, and use smart container-growing habits. Then have fun with the patriotic twistpaint,
plants, or removable accessoriesso your window box can celebrate summer holidays and still look great the rest of
the year.


