Table of Contents >> Show >> Hide
- Why This Kitchen Makeover Still Hits So Hard
- The Transformation Strategy: A Long Game That Actually Works
- The Star of the Show: Taking Oak Cabinets to Creamy, Timeless White
- The “Custom Cabinet” Illusion: DIY Staggered Uppers + Crown Molding
- Open Shelving Dreams vs. Dusty Reality (and the Smart Compromise)
- Design Choices That Keep the Look “Timeless,” Not “Trendy-2011”
- Practical Planning: How to Pull Off a Multi-Year Kitchen Transformation
- Common Mistakes to Avoid (So Your “After” Doesn’t Become “After… we fix it”)
- of Real-World Experience: What Kitchens Like This Teach You
- Conclusion
Some kitchens are like perfectly nice khaki pants: they fit, they function, they offend no one… and they make your personality quietly evaporate.
That was the situation in the famous My Uncommon Slice of Suburbia kitchen makeover featured on Remodelaholicsolid bones, builder-grade finishes,
and a whole lot of “meh” where “mine” should be.
What makes this transformation so fun (and so copyable) is that it wasn’t a “demo day + designer + unlimited budget” glow-up.
It was a real-suburbia, real-life, live-in remodel that happened in phasesbecause most of us can’t just stop eating for six weeks while a contractor
reimagines our pantry as an emotional support wine wall.
Why This Kitchen Makeover Still Hits So Hard
The original space was functional, but it had the classic builder package: oak cabinets, basic square tile, and grout that somehow gets dingier every time
you clean it (a scientific mystery). The goal wasn’t “trendiest kitchen on the internet.” It was a timeless, bright, classic looksomething that would still
feel good years later.
The design inspiration blended two vibes that rarely get invited to the same potluck: a crisp, elegant white kitchen (the kind you see in movies and
magazine spreads) and a slightly softer cottage/French warmth that keeps the room from feeling like a showroom you’re afraid to touch.
The Transformation Strategy: A Long Game That Actually Works
Here’s the secret sauce: instead of trying to change everything at once, the makeover progressed in clear “wins” that built momentum.
If you’re planning a kitchen transformation, this phased approach can save your budget, your sanity, and your ability to find the coffee filters.
Phase 1: Fix the Surfaces That Date the Room Fast
In many builder-grade kitchens, the biggest “time stamp” isn’t the cabinet layoutit’s the finishes. Swapping out a dated backsplash or countertop surface
changes the visual temperature of the entire room. That’s exactly why this makeover began by replacing the old tile situation with upgraded surfaces,
including a lighter, more elevated backsplash look.
- Quick impact: Backsplash and counters sit in your direct line of sightupdate them and the whole room reads “newer.”
- Budget control: You can upgrade in stages without tearing out cabinets that still function perfectly well.
- Style flexibility: Once the backdrop is cleaner, your cabinet color and hardware choices become easier.
Phase 2: Upgrade Appliances Without Paying “New Appliance” Prices
Stainless appliances became part of the transformationbut the more interesting detail is how they were sourced: secondhand deals and local finds
instead of full-price retail. If you’ve ever shopped for a fridge and briefly considered taking up foraging as a lifestyle, you know why this matters.
A smart way to shop used is to focus on condition, completeness (cords, racks, manuals if available), and fitmeasure twice, because “it’ll probably fit”
is how people end up storing a spare dishwasher in the garage for six months like it’s a seasonal decoration.
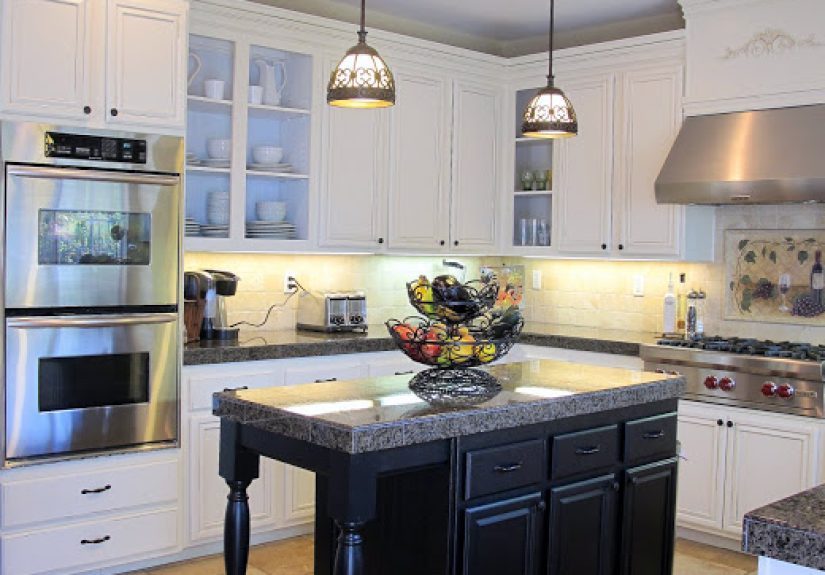
The Star of the Show: Taking Oak Cabinets to Creamy, Timeless White
Painting oak cabinets is the makeover equivalent of cutting bangs: it can look amazing, but there is a point of no return. The Remodelaholic-featured kitchen
leaned into that bold moveand it paid off with a brighter space that looks custom instead of cookie-cutter.
How to Paint Kitchen Cabinets So They Don’t Peel, Chip, or Break Your Heart
The difference between “freshly painted cabinets” and “why is my cabinet door sticky?” is prep. If you want a finish that lasts, the process matters more
than the pep talk.
- Label everything: Doors, drawers, hinges, and hardware. Your future self will send you a thank-you card.
- Degrease like you mean it: Kitchens build up invisible oil. Paint hates oil. This is not a romance story.
- Scuff sand for adhesion: You’re not carving a canoe; you’re creating tooth so primer can grab.
- Prime strategically: Use a primer that matches your cabinet material and blocks bleed-through.
- Use durable cabinet paint/enamel: Cabinets take abuseheat, steam, fingerprints, and that one drawer everyone slams.
- Let it cure: Dry is not cured. Give it time so your hard work doesn’t imprint under a plate stack.
Pro tip: If you’re brushing and rolling, use the right roller (fine finish) and don’t overwork the paint. If you’re spraying, prep is even more intense,
but you can get that smoother, “factory-ish” look.
The “Custom Cabinet” Illusion: DIY Staggered Uppers + Crown Molding
One of the most memorable upgrades in this transformation is the DIY staggered cabinet lookwithout paying the staggered cabinet price tag.
The idea: build clean, sturdy box extensions above the existing cabinets to add height and architectural presence, then finish with crown molding
so the whole wall reads built-in and intentional.
What Makes This Detail So Powerful
- It adds height: Taller uppers draw the eye up and make the kitchen feel larger.
- It feels higher-end: The layered trim and crown mimic custom cabinetry.
- It modernizes builder-grade: Oak cabinets look less “1990s starter home” and more “tailored and updated.”
The Basic Build (DIY-Friendly, Not Magic)
The approach is straightforward: remove old top trim, construct smooth-finish plywood boxes sized to your cabinet tops, anchor them securely,
add layered trim to hide seams, then caulk and paint until it looks like it was always that way.
Crown molding is the finishing move. A popular DIY method is to preassemble a nailing cleat and molding so installation is cleaner and strongerespecially
helpful if you’re doing long runs and corners.
Open Shelving Dreams vs. Dusty Reality (and the Smart Compromise)
At one point in the transformation, the kitchen flirted with open cabinets/shelvingbecause open storage looks airy, styled, and vaguely European.
But real kitchens have steam, grease, and dust. The practical solution that emerged: bring in glass-front cabinet doors.
Glass fronts keep the openness while reducing dust buildup and visual chaos. Plus, they’re a natural place to show off your “nice stuff”
without actually having to live like a minimalist who owns exactly three matching bowls.
DIY Glass-Front Cabinets: A High-Impact Upgrade That’s Not as Scary as It Sounds
The Remodelaholic-featured transformation used an economical, clever method: remove the center panel of existing doors (creating a frame),
clean up the opening, add small trim if needed to hide rough edges, then have glass cut to size and set it in place with clear silicone.
- Best for: Upper cabinets where you want lightness and display.
- Looks great with: Simple interiors (painted backs, neat stacks, a few intentional pieces).
- Keep it realistic: Glass shows what’s inside. If you store snack bags in there, the snack bags will be seen. Loudly.
Design Choices That Keep the Look “Timeless,” Not “Trendy-2011”
A white kitchen can feel classic for decadesor it can feel cold and flat. The difference comes down to balance:
warm elements, thoughtful contrast, and details that look architectural instead of decorative-for-decorative’s-sake.
Timeless Elements You Can Borrow
- Soft white (not stark hospital white): Creamy whites are forgiving and warm under real-life lighting.
- Simple hardware: Clean shapes in classic finishes help the cabinets feel tailored.
- Layered trim: Crown molding and seam-hiding trim make cabinets look built-in and intentional.
- Practical elegance: A kitchen should feel beautiful and survivable on a Tuesday night.
Practical Planning: How to Pull Off a Multi-Year Kitchen Transformation
The “five-year glow-up” approach works if you treat it like a plan, not a series of random DIY impulses (which is how people end up repainting the same
pantry door three times and calling it “a journey”).
A Simple Framework
- Pick your north star: Decide what “timeless” means to youmovie-kitchen white, cottage warmth, modern minimal, etc.
- Prioritize high-visibility changes: Backsplash, counters, lighting, cabinet color, hardware.
- Batch messy work: Do sanding/painting/cutting in a contained window so your home doesn’t live in dust forever.
- Upgrade function along the way: Better faucet, better sink, better lightingsmall wins add up.
- Finish with details: Trim, crown, glass fronts, and styling are the “custom” signals.
Common Mistakes to Avoid (So Your “After” Doesn’t Become “After… we fix it”)
- Skipping cleaning: Paint will fail if grease is still on the surface. Kitchens are sneaky like that.
- Rushing cure time: Cabinets need time to harden. Treat them gently at first.
- Overdoing open storage: If you don’t love tidying, mix open and closed storage (or choose glass fronts).
- Forgetting lighting: Updated cabinets under harsh lighting can still feel “off.” Layer lighting for warmth and clarity.
- Not testing white paint: White changes dramatically with bulbs, daylight direction, and countertops.
of Real-World Experience: What Kitchens Like This Teach You
Watching a transformation like My Uncommon Slice of Suburbia (and doing similar projects in real homes) teaches you that the best kitchen upgrades
aren’t always the loudest onesthey’re the ones that quietly improve your daily routine. A painted cabinet makeover sounds like a “look” project, but it
becomes a “life” project the first time spaghetti sauce splatters near the stove and wipes off without staining the grout you used to battle for hours.
It also teaches you the difference between a Pinterest kitchen and a functioning household. Open shelving is a perfect example: it photographs beautifully,
then reality shows up with dust, grease, and the fact that not everyone in your house stacks bowls like they’re auditioning for a home organization show.
Glass-front cabinets are such a smart middle ground because they give you that airy, curated feel while protecting the contents from turning into a
fine layer of kitchen “seasoning.” And if you’re worried that glass means you must keep everything perfecthere’s the truth: you only need a few sections
to be pretty. The rest can be solid doors hiding the chaos like the heroes they are.
The DIY cabinet-height trickadding box extensions and finishing with crownteaches another big lesson: architectural details do more heavy lifting than
most people realize. You can spend a fortune on trendy décor and still feel like you live in a builder-grade box if the lines and edges aren’t finished.
Crown molding, stacked trim, and seam work are the quiet “custom” cues that make guests assume you hired someone fancy. (You don’t have to correct them.
Accept compliments. It’s part of the payment plan.)
Budget sourcing teaches you a mindset shift: you don’t need everything new, you need everything intentional. Finding stainless appliances secondhand is less
about being cheap and more about being strategicespecially if you’re putting your money into surfaces or paint products that truly affect durability.
I’ve also learned that patience beats panic buying. When you plan a kitchen transformation in phases, you have time to wait for the right deal, the right
hardware finish, and the right light fixture instead of grabbing something “fine” that you’ll secretly hate every time you make toast.
Finally, projects like this teach you that there’s no going backso make peace with commitment. Once you paint oak cabinets, you’ve crossed into a new
identity: the person who owns a paint brush, strong opinions about primer, and a mysterious collection of labeled hinge bags. But the payoff is huge.
The kitchen becomes not just updated, but personal. It stops being a khaki-pants room and turns into a space that actually feels like you live there
happily, messily, and with a backsplash you don’t want to argue with.
Conclusion
The Remodelaholic feature of My Uncommon Slice of Suburbia works as both inspiration and blueprint: keep the layout that functions, upgrade the
finishes that date the room, and use smart DIY detailspaint, trim, crown, and glass frontsto make builder-grade cabinetry look custom.
The best part? You don’t need to do it all at once. You just need a plan, some patience, and the willingness to become the kind of person who gets excited
about caulk. (It happens. Don’t fight it.)