
Table of Contents >> Show >> Hide
- Why a painted TV tray is such a good DIY candidate
- What “image transfer” really means
- Best surfaces and materials for this project
- How to prep a TV tray for paint and transfer
- How to paint the tray for the best final look
- How to do the image transfer step by step
- How to seal a painted TV tray with image transfer
- Common mistakes to avoid
- Design ideas that look especially good on TV trays
- Is this project beginner-friendly?
- Final thoughts
- Experience section: what this project feels like in real life
A TV tray is the overachiever of small furniture. It holds dinner, laptops, coffee, craft supplies, and sometimes the emotional weight of a very dramatic Tuesday. So if you have an old tray hiding in a closet, flea market corner, or garage stack of “I’ll fix that someday” items, this project is a smart way to give it a stylish second life. A painted TV tray with image transfer combines color, personality, and just enough crafty flair to make people ask, “Wait, you made that?”
The beauty of this DIY is that it feels custom without demanding a full woodshop, a design degree, or the patience of a saint. You can transform a worn tray into a vintage accent table, a breakfast perch, a plant stand, or a compact workspace with one standout feature: an image transferred right onto the surface. Think botanical art, old maps, family photos, typography, sheet music, labels, sketches, or French café graphics. In other words, it is furniture makeover meets personality test.
If you want a project that looks thoughtful, costs less than buying a new accent table, and gives old furniture a fresh story, this one checks every box. Below, you will find how to plan it, prep it, paint it, transfer the image successfully, seal it, and avoid the most common mistakes that turn a charming makeover into a sticky little tragedy.
Why a painted TV tray is such a good DIY candidate
TV trays are practically built for makeovers. Their tops are small enough to finish in a weekend, their folding frames make them useful in tight spaces, and thrifted versions are usually inexpensive. Even better, they often have flat surfaces that work beautifully for paint and transferred artwork. That means you can get a high-impact visual result without refinishing an entire dresser or dining table.
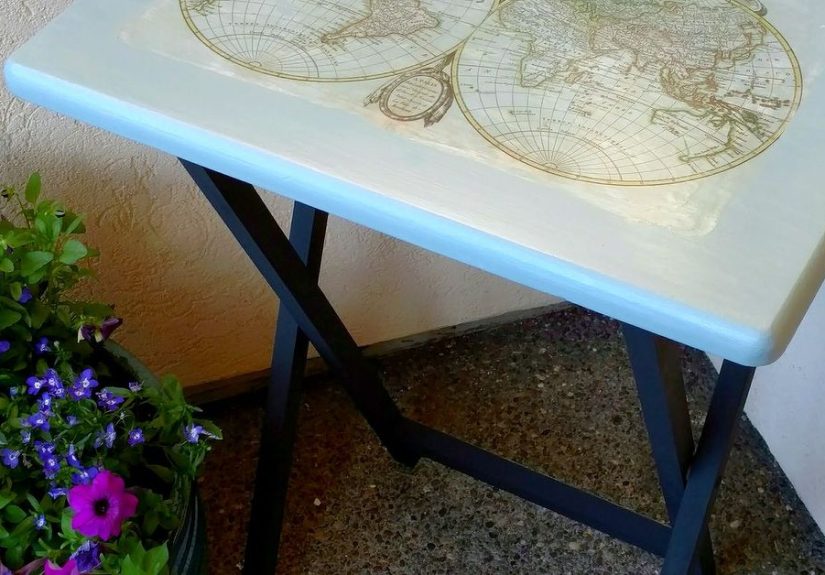
This project also works across design styles. A black tray with a sepia image transfer can look moody and vintage. A white tray with a blue botanical print feels cottage-inspired. A sage green tray with a transferred bird illustration leans garden-room chic. If your taste is modern, try a crisp neutral tray with bold typographic art. If your taste is eclectic, the only real rule is this: make it look intentional, not like a craft store exploded on it.
What “image transfer” really means
Image transfer is not exactly the same thing as decoupage. With decoupage, you glue the printed image onto the surface and seal it. With image transfer, the image itself is transferred into the finish or medium so it looks more integrated with the surface. The result usually feels softer, more vintage, and a little less “paper glued on top.”
For a painted TV tray, that subtle difference matters. A transfer can make the design look aged in, as if it belongs there. It is perfect for antique-inspired pieces, farmhouse style, French country looks, or anything that benefits from a slightly weathered, artistic finish.
There are a few methods people use, but the most approachable option for beginners is a transfer medium designed for photocopies or laser-printed images. The key detail is important: standard image-transfer methods usually work best with dry-toner copies rather than typical inkjet prints. If your design includes words, remember to reverse the image first so the final transfer reads correctly. Nothing ruins a classy tray quite like inspirational text in accidental mirror language.
Best surfaces and materials for this project
Choose the right tray
You can use a wood TV tray, MDF tray, or even a metal-and-wood combination as long as the top is in decent shape. Minor scratches are fine. Peeling veneer, deep gouges, grease buildup, or major wobble should be fixed before you start.
Recommended supplies
- Old TV tray table
- Cleaner or degreaser
- Sandpaper or sanding sponge
- Tack cloth or damp lint-free rag
- Primer, if needed
- Acrylic or furniture paint
- Laser print or photocopy of your chosen image
- Photo transfer medium
- Foam brush or soft brush
- Brayer, scraper, or old gift card for smoothing
- Soft sponge or fingertips for paper removal
- Clear protective topcoat
If the tray has a glossy or slick finish, do not skip prep. Paint sticks better when the surface is clean and lightly abraded or deglossed. If the tray top is especially smooth, primer gives you a stronger base and helps the final finish last longer.
How to prep a TV tray for paint and transfer
1. Clean like you mean it
Old furniture carries mysteries. Some are charming. Some are cooking grease. Wipe the tray thoroughly to remove dirt, grime, waxy residue, and oils from hands or kitchen use. A pretty paint job over dirty buildup is just a very decorative future failure.
2. Sand lightly
Light sanding smooths out roughness and helps primer or paint grip the surface. If the tray is wood, sand with the grain. If it is laminate or painted, a light scuff sand is usually enough. You are not trying to erase its past life completely; you are just giving the new finish a better chance at a long relationship.
3. Repair flaws
Fill dents or chips if needed, then sand smooth once dry. A transferred image will highlight the surface beneath it, so bumps, crumbs, and random ridges can become weird permanent design features.
4. Prime if necessary
Primer is especially useful on slick finishes, laminate, stained surfaces, or dark colors you want to cover. It can also help if your tray is made from MDF or mixed materials. If you want a smoother finish, lightly sand the primer once dry and wipe away the dust.
How to paint the tray for the best final look
Pick a paint color that supports the image rather than fighting it. A busy graphic on a neon background can work, but it can also look like your tray lost a dare. Neutral shades, muted colors, and classic dark tones tend to make transfers shine.
Good color ideas
- Matte black with botanical or antique label transfer
- Warm white with vintage postcard art
- Sage green with bird or fern illustrations
- Dusty blue with architectural sketches
- Charcoal with cream typography
Apply two thin coats rather than one thick coat. Thick coats take longer to dry, show brush marks more easily, and increase the risk of tackiness. Let the paint dry fully before adding the transfer. Really dry. Not “it seems fine if I squint.” Fully dry.
How to do the image transfer step by step
1. Prepare your image
Use a laser print or photocopy of the design, sized to fit the tray top. Black-and-white images often create the most convincing vintage effect, but color transfers can also work beautifully. If the image includes text, numbers, or directional elements, reverse it before printing.
2. Plan the placement
Before applying anything wet, place the image on the tray and test the layout. Centered designs feel classic. Off-center placements can feel more artistic. Border designs add structure. This is the moment to decide, not after you have coated everything and your stress level has become performance art.
3. Apply transfer medium
Brush a generous, even layer of transfer medium onto the front side of the image. Make sure the entire image is covered, including corners and edges. Patchy coverage can create patchy transfer, which is charming only when you intended it.
4. Place image face down
Lay the coated image face down onto the painted tray. Smooth it carefully using a brayer, scraper, or old card to remove bubbles and wrinkles. Work from the center outward. Too much pressure can shift the image; too little can trap air.
5. Let it dry completely
Patience is the unglamorous hero of image transfer. Give it plenty of dry time, usually overnight or around 24 hours depending on the product and humidity. Rushing this stage is the crafty equivalent of pulling a cake out of the oven because it “looks done.”
6. Wet and rub away the paper
Once dry, dampen the paper backing and let the moisture soak in briefly. Then rub gently in circular motions with your fingertips or a soft sponge. The paper will begin to roll away, revealing the transferred image underneath. Go slowly. You may need several light passes. If you get aggressive, you can rub off the image along with the paper, which is a bad surprise and not the fun kind.
7. Let it dry and assess
The image may look hazy while damp. Let it dry fully before deciding whether more paper needs to be removed. Often, a second gentle rub after drying reveals more detail. This is where the magic happens and where overconfidence becomes the villain.
How to seal a painted TV tray with image transfer
Once the transfer is complete and fully dry, seal the surface with a clear protective finish. This matters because TV trays are functional pieces. They deal with mugs, plates, laptops, plant pots, and the occasional dramatic stack of unopened mail. A good topcoat helps protect against scratches, scuffs, spills, and wear.
Choose a clear finish that works with your paint and desired sheen. Matte looks vintage and soft. Satin is a crowd-pleaser. Gloss makes colors pop but can show imperfections more clearly. Apply thin coats and follow the drying instructions. More is not always better; smoother is better.
Common mistakes to avoid
Using the wrong print type
Traditional transfer methods usually perform best with dry-toner copies or laser prints. Inkjet prints can behave differently unless you are using a specific workaround or specialty method.
Skipping surface prep
Paint and transfer mediums are not miracle workers. Dirt, gloss, and dust make adhesion weaker and finishes rougher.
Applying thick paint or sealer
Heavy coats invite drips, longer dry times, and texture issues. Thin, even coats win the race.
Rubbing too hard during paper removal
Gentle repetition beats one heroic scrub session every time.
Choosing copyrighted artwork carelessly
If you plan to display or gift your tray, it is smartest to use your own photographs, licensed designs, or public-domain artwork. It keeps the project creative and legally uncomplicated, which is exactly how a hobby should feel.
Design ideas that look especially good on TV trays
- Vintage botanical tray: Paint the tray olive, cream, or black and transfer fern illustrations or flower studies.
- French market style: Use grain sack stripes, label art, café text, or old signage.
- Family memory tray: Transfer a favorite photo in sepia or black and white for a personal accent table.
- Travel-inspired tray: Use maps, city sketches, stamps, or postcard graphics.
- Modern typography tray: Pair a clean background with oversized lettering or a simple phrase.
You can also lightly distress the edges after painting to give the tray a more timeworn look. Done carefully, it adds character. Done recklessly, it looks like the tray lost a fight with your sandpaper.
Is this project beginner-friendly?
Yes, especially if you break it into stages: prep one day, paint the next, transfer after that, then seal. The small scale makes it approachable, and even imperfect transfers often look charming because the style naturally leans vintage, handmade, and slightly weathered. That is the lovely loophole of this project: a little imperfection can actually improve the finished look.
It is also a smart project for anyone experimenting with furniture upcycling. You learn useful skills in one piece: cleaning, prep sanding, priming, painting, image placement, transfer technique, and topcoating. Once you finish a tray successfully, a stool, side table, or small cabinet will not feel nearly as intimidating.
Final thoughts
A painted TV tray with image transfer is one of those DIY projects that punches above its weight. It starts with a humble, practical object and turns it into something decorative, useful, and personal. That combination is rare. Plenty of projects are pretty but impractical. Plenty are useful but boring. This one gets to be both.
The secret is not fancy equipment. It is thoughtful prep, the right image, patient drying, and a protective finish that lets the piece survive real life. Done well, your tray becomes more than a surface for snacks or a laptop. It becomes a conversation piece with a story, which is a very nice upgrade for something that once spent its life supporting frozen dinners.
Experience section: what this project feels like in real life
One of the most interesting things about making a painted TV tray with image transfer is how quickly it changes your opinion of “small” furniture. At the beginning, a TV tray can seem almost too ordinary to deserve attention. It is folding furniture. Utility furniture. The kind of piece people buy because they need a surface, not because they are chasing beauty. But somewhere between the first coat of paint and the moment the image starts to reveal itself under damp fingertips, the tray stops feeling ordinary. It starts feeling chosen.
The experience is also surprisingly satisfying because every stage gives you a visible improvement. Cleaning removes years of dullness. Sanding makes the top feel more refined. Paint changes the personality instantly. Then the image transfer adds that final layer of story, and suddenly the tray has mood. It has style. It has opinions. It is no longer saying, “I hold soup.” It is saying, “I belong in this room, and yes, I do look expensive.”
There is also a very human lesson in the transfer process itself: you cannot rush it. The drying time teaches patience. The paper-removal stage rewards gentleness instead of brute force. If you go too fast, you lose detail. If you slow down, the image becomes richer and more interesting. That makes the project feel less like assembly and more like collaboration between you and the materials. You prepare the conditions, but the final reveal still has a little magic to it.
Another common experience is that the tray often ends up being used in more ways than expected. People start by imagining movie-night snacks or coffee service, but once the tray looks beautiful, it begins a second career. It becomes a bedside table for small spaces, a balcony plant stand, a mini desk for journaling, a laptop perch, or a decorative corner accent. That versatility makes the effort feel worthwhile because the result is not just decorative. It becomes part of daily life.
And maybe that is the biggest charm of the project. A painted TV tray with image transfer is not flashy in an obvious way. It is quietly impressive. It carries the warmth of a handmade object, the function of a useful table, and the individuality of custom art. For many DIYers, that combination is the sweet spot. You get the satisfaction of rescuing something old, the fun of making design choices, and the pleasure of ending with a piece that feels personal. Not bad for a little folding table that once had absolutely no main-character energy.


