
Table of Contents >> Show >> Hide
- Before You Start: What an EGR Valve Does and Why It Gets Dirty
- Tools, Supplies, and Safety Gear You’ll Need
- Step-by-Step: How to Clean Your EGR Valve in 12 Steps
- Step 1: Let the Engine Cool and Park Safely
- Step 2: Disconnect the Negative Battery Terminal
- Step 3: Locate the EGR Valve
- Step 4: Disconnect Electrical Connectors and Vacuum Hoses
- Step 5: Remove Mounting Bolts and Lift Out the EGR Valve
- Step 6: Inspect the Valve and Passages for Carbon Buildup
- Step 7: Pre-Clean with a Brush to Remove Loose Deposits
- Step 8: Spray with EGR/Carb Cleaner and Let It Soak
- Step 9: Scrub, Rinse, and Repeat as Needed
- Step 10: Clean the Mating Surfaces and Intake Passages
- Step 11: Reinstall the EGR Valve with New Gasket (If Needed)
- Step 12: Reconnect the Battery and Test-Drive
- Can You Clean an EGR Valve Without Removing It?
- When It’s Time to Replace Instead of Clean
- Real-World EGR Cleaning Experiences and Pro Tips (Extra )
If your car is idling like it just chugged three espresso shots, guzzling more gas than usual, or flashing the
dreaded check engine light, your EGR valve might be begging for attention. The exhaust gas recirculation (EGR)
valve is a small but mighty part that helps reduce nitrogen oxide (NOx) emissions by sending a portion of exhaust
gas back into the combustion chamber. When it clogs with carbon, your engine can run rough, lose power, and fail
emissions tests.
The good news? With some basic tools, the right cleaner, and a free afternoon, you can often clean your EGR valve
yourself and restore smoother performance. This guide walks you through 12 clear steps“with pictures” in mindso
you’ll know exactly what each stage should look like in your own garage.
Before You Start: What an EGR Valve Does and Why It Gets Dirty
Modern engines use EGR systems to reduce combustion temperatures and cut NOx emissions. The valve opens under
specific conditions to let metered exhaust gas into the intake. This cools the combustion process, improves
efficiency, and helps your car meet emissions standards.
Over time, soot and carbon build up in the EGR valve and its passages. That sticky gunk can cause the valve to:
- Stick open (too much exhaust gas entering, causing rough idle and stalling)
- Stick closed (too little EGR, higher combustion temps, engine knock, NOx emissions jump)
- Move sluggishly (inconsistent performance and weird driveability issues)
Common symptoms of a faulty or dirty EGR valve include rough idle, loss of power, increased fuel consumption,
engine knocking, failed emissions tests, and a glowing check engine light.
If those sound familiar, a thorough cleaning could be exactly what your engine needs.
Tools, Supplies, and Safety Gear You’ll Need
Before you grab the nearest screwdriver, set yourself up with the right gear:
Basic tools
- Socket set and ratchet (metric or SAE depending on your car)
- Open-end or box wrenches
- Screwdrivers (Phillips and flathead)
- Needle-nose pliers (for hose clamps and connectors)
- Small wire brush and/or soft-bristle brush or old toothbrush
- Rags or shop towels
Chemicals and cleaners
- Dedicated EGR or carburetor/throttle body cleaner (solvent-based)
- Rust penetrant (handy for stuck bolts)
EGR and carb cleaners are strong solvent aerosolsoften highly flammable, irritating to skin and eyes, and harmful
if inhaled in large amounts. They can cause dizziness, skin dryness, and environmental harm if misused. Always read
the label and safety data sheet: wear gloves, eye protection, and work in a well-ventilated space away from open
flames.
Safety equipment
- Mechanic’s gloves or chemical-resistant gloves
- Safety glasses or goggles
- Mask or respirator if you’re working in a less-ventilated area
And of course, you’ll want your vehicle’s repair manual or a trusted online guide specific to your year, make, and
model. That will show the exact location of your EGR valve and any special procedures.
Step-by-Step: How to Clean Your EGR Valve in 12 Steps
Step 1: Let the Engine Cool and Park Safely
Pop the hood only when the engine has cooled down. A hot exhaust manifold plus metal parts equals burned fingers.
Park on a flat surface, set the parking brake, put the transmission in park (or in gear for a manual), and chock
the wheels if you want extra security.
Picture idea: Shot of the car parked, hood open, with gloves and tools laid out neatly on a fender cover.
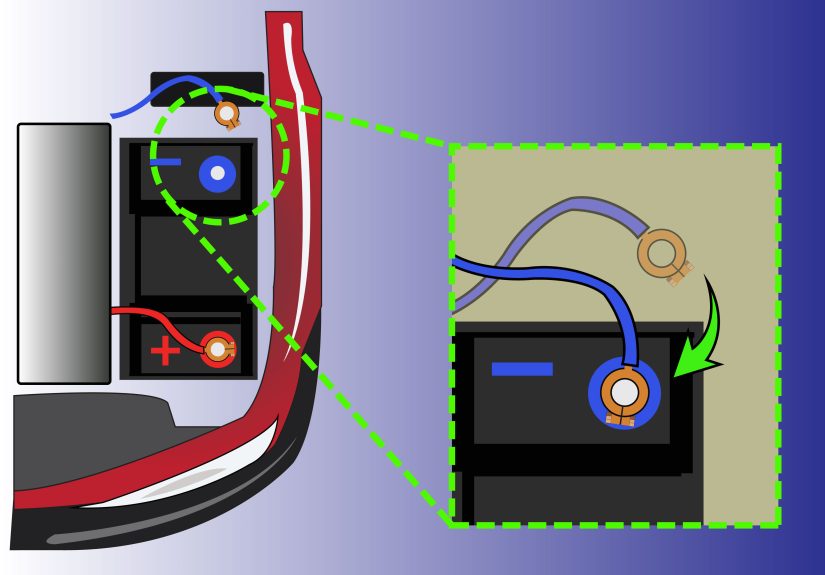
Step 2: Disconnect the Negative Battery Terminal
As a safety precaution, disconnect the negative battery terminal to prevent accidental shorts or electrical issues
while you’re unplugging connectors near the EGR valve. This is standard advice in most professional DIY cleaning
guides.
Picture idea: Close-up of a hand loosening the negative battery clamp with a wrench.
Step 3: Locate the EGR Valve
The EGR valve is usually bolted to or near the intake manifold, with a metal tube coming from the exhaust side. On
many engines, it’s a small round or rectangular unit with an electrical connector and/or vacuum line attached.
Check your manual or a labeled diagram if you’re unsureevery engine layout is a little different.
Picture idea: Engine bay with the EGR valve circled or highlighted.
Step 4: Disconnect Electrical Connectors and Vacuum Hoses
Carefully unplug any electrical connectors, pressing the tabs rather than yanking the wires. If the valve uses
vacuum hoses, release the clamps and twist the hoses gently to break them loose.
It’s smart to label connectors or snap a few phone photos for reference. Future-you will be very grateful when it’s
time to put everything back.
Step 5: Remove Mounting Bolts and Lift Out the EGR Valve
Spray a bit of rust penetrant on the mounting bolts if they look crusty, and give it a few minutes to work. Then
use the appropriate socket or wrench to remove the bolts holding the EGR valve to the intake or mounting bracket.
Gently wiggle the valve freedon’t pry so hard that you damage the sealing surfaces.
Picture idea: The valve in hand, showing the carbon-encrusted side facing the intake.
Step 6: Inspect the Valve and Passages for Carbon Buildup
Now you’ll see the problem up close. Look for:
- Heavy, flaky, or crusty black carbon inside the valve openings
- Restricted passages in the intake manifold where the valve mounts
- Sticking pintle or plunger that doesn’t move smoothly
Excessive carbon buildup here is a classic reason for rough idle, stalling, and poor engine performance.
Step 7: Pre-Clean with a Brush to Remove Loose Deposits
Before dousing the valve in chemicals, gently loosen and knock off dry carbon with a small wire brush, brass brush,
or old toothbrush. Work over a drip pan or some cardboard so you don’t coat your driveway in soot. This makes the
chemical cleaner more effective and reduces how much gunk ends up in your sink or trash.
Avoid using anything so aggressive that it could scratch or gouge the valve seat or pintle. A small brass brush or
soft brush is usually enough.
Step 8: Spray with EGR/Carb Cleaner and Let It Soak
Place the valve on rags or in a small metal tray. Shake your EGR/carb cleaner, then spray generously into the
valve’s passages, onto the pintle, and around any carbon-coated surfaces. Let it soak for several minutes to soften
the deposits.
Follow the product’s instructionsmany recommend working outdoors or in a well-ventilated garage and keeping the
spray away from sparks or open flames due to high flammability.
Picture idea: The EGR valve lying on a rag with cleaner visibly foaming or wetting the carbon.
Step 9: Scrub, Rinse, and Repeat as Needed
After soaking, use your brush again to scrub away the softened carbon. For stubborn areas, alternate between
spraying cleaner and brushing. Some DIYers use a soak methodimmersing the valve in a non-corrosive cleaning mix
for several hours, then rinsing and dryingbut always confirm your valve’s materials can handle that approach.
When the valve passageways look clear and the pintle moves freely, you’re in a good place to stop. Don’t worry
about making it look brand-new; the goal is free movement and clear airflow, not showroom polish.
Step 10: Clean the Mating Surfaces and Intake Passages
Use a rag lightly dampened with cleaner to wipe the surface where the EGR valve mounts. On some engines, the
intake passage directly behind the valve is heavily clogged. Carefully spray a small amount of cleaner into that
passage (if accessible) and wipe out loosened carbon with a rag or swab.
Be conservative: you do not want big chunks of carbon breaking loose and heading straight into the cylinders.
Gentle cleaning is the name of the game.
Step 11: Reinstall the EGR Valve with New Gasket (If Needed)
Once everything is clean and dry, place a new gasket on the mounting surface if your vehicle calls for one. Set the
EGR valve into position, hand-thread the bolts, and then tighten them evenly with the ratchet. Reconnect all
electrical connectors and vacuum hoses exactly as before.
Check your manual for torque specs. Over-tightening can damage the housing or strip threads; under-tightening can
cause exhaust leaks.
Step 12: Reconnect the Battery and Test-Drive
Reattach the negative battery terminal and tighten it securely. Start the engine and let it idle. At first, it may
run a little rough while the ECU re-adjusts, but it should quickly settle into a smoother idle than before. Take
the car for a gentle test drive and pay attention to acceleration, idle quality, and any warning lights.
If your check engine light was on due to EGR issues, you may need to clear the code with an OBD-II scanner or wait
for the system to reset after several drive cycles.
Can You Clean an EGR Valve Without Removing It?
Some products promise “spray in and drive” cleaning for EGR systems. These cleaners are typically applied to the
intake while the engine is running at a specific RPM range and may help with mild deposits.
However:
- They’re less effective on heavily clogged valves.
- They don’t allow you to visually confirm that the valve is moving freely.
- You can’t inspect or clean the gasket, connector pins, or mounting surfaces.
Think of non-removal cleaners as maintenance or a mild cleanup, not a cure-all. If your car has serious EGR
symptomsrough idle, stalling, strong fuel smell, or repeated emissions test failuresa full removal and cleaning
(or replacement) is usually the better move.
When It’s Time to Replace Instead of Clean
Cleaning is great when the problem is mostly carbon buildup. But if:
- The valve’s electrical actuator fails tests
- The pintle is badly corroded or seized even after cleaning
- The valve body is cracked or damaged
…then replacement is usually the smarter, longer-term solution. Many DIYers combine EGR valve replacement with
cleaning the related intake passages so the new part doesn’t immediately get fouled by old deposits.
If you’re not comfortable assessing the component’s condition, a professional mechanic can test the valve and help
you decide whether cleaning or replacing gives you the best value.
Real-World EGR Cleaning Experiences and Pro Tips (Extra )
The theory is nice, but what does EGR cleaning really look like in everyday driveways and home garages? Car owners
who’ve done this job a few times tend to share the same handful of lessonslearned the hard wayabout what works,
what doesn’t, and what they wish they’d known before they loosened the first bolt.
1. Take more photos than you think you need
It’s easy to be confident at the beginning: “It’s just one valve and a couple of hoses, how complicated can it be?”
Then, forty-five minutes later, you’re staring at three connectors and a mystery bracket, wondering which way the
harness was routed from the factory. Snap clear pictures at each stageespecially before you disconnect anything.
Those reference shots can save you from guess-and-check reassembly and accidental pinched wires.
2. Budget time for stuck bolts
In many climates, the EGR valve lives right next to hot, moisture-prone components, which means corrosion is just a
way of life. DIYers often say that half the job is just persuading crusty fasteners to move. Work rust penetrant
into the threads, allow it to soak, and use the correct socket size so you don’t round the bolt heads. Slow,
steady pressure beats sudden yankswhich are more likely to snap a fastener and turn a Saturday project into a
week-long ordeal.
3. Don’t get aggressive with sharp tools
When you first see a valve that’s almost completely choked with carbon, the urge to break out a pick or a sharp
screwdriver is real. But scratching sealing surfaces or damaging the pintle can make things worse than before you
started. Experienced home mechanics recommend using softer toolsbrass brushes, plastic scrapers, and solventso
you’re removing carbon, not metal.
4. Plan where the mess will go
EGR cleaning is soot city. Carbon flakes, black sludge, and solvent drips will appear everywhere if you’re not
prepared. Laying down cardboard or an old towel on your workbench, using a catch pan, and keeping a dedicated
“dirty rag” pile nearby makes cleanup much easier. Also, don’t let the solvent run across painted body surfaces;
many cleaners are strong enough to dull or damage paint if they sit too long.
5. Pair the job with other maintenance
Many owners combine EGR cleaning with other intake-side maintenance jobs: throttle body cleaning, PCV system
inspection, or checking the air filter and intake ducting. Since you already have tools out and possibly some
components removed, it’s efficient to give the whole air and exhaust recirculation path a quick health check.
Catching a cracked hose, clogged PCV, or filthy throttle plate at the same time can help prevent new carbon from
building up as quickly.
6. Understand that results can be dramaticor subtle
On some vehicles, especially those that were nearly stalling from carbon-clogged EGR passages, the difference after
cleaning can feel like driving a different car: smoother idle, stronger acceleration, and no more stall at stop
lights. On others, the change may be more modestslightly smoother running and a small bump in fuel economy. Both
outcomes are valid. The goal is restoring proper EGR function and preventing long-term damage, not necessarily
creating a “performance upgrade” feeling.
7. Know when to stop and call a professional
Finally, even seasoned DIYers admit that sometimes it’s better to hand the job over. If you discover your EGR
valve is buried under multiple intake runners, or your car throws persistent codes even after a good cleaning, a
technician with factory-level scan tools and experience can save time and frustration. Think of DIY EGR cleaning as
one tool in your toolboxnot a requirement that you must do everything alone.
Done carefully, cleaning your EGR valve is a satisfying, confidence-building project. You’ll learn more about how
your engine manages emissions, gain a cleaner-running car, and maybe even save enough on labor to treat yourself
(and your car) to a full tank of the good fuel on the way home.


