Table of Contents >> Show >> Hide
- Why an Owl Plant Stand Makes a Wise Little Table
- The Big Perks (Beyond the Hoots)
- Tools & Materials
- Plan Your Size: Getting the Height Right
- Prep the Owl Base Like a Pro
- Build a Beautiful Top
- Attach the Top: Two Reliable Paths
- Stability, Leveling, & Floor Care
- Styling Ideas (Make It Sing, Not Just Sit)
- Troubleshooting & Pro Tips
- Time & Cost Snapshot
- Quick FAQ
- Wrap-Up
- Field Notes: of Hands-On Lessons & Happy Accidents
- Editorial Notes & Sources
From thrifted hoot to living room hero a playful, practical guide to turning a quirky owl plant stand into a sturdy, stylish side table.
Why an Owl Plant Stand Makes a Wise Little Table
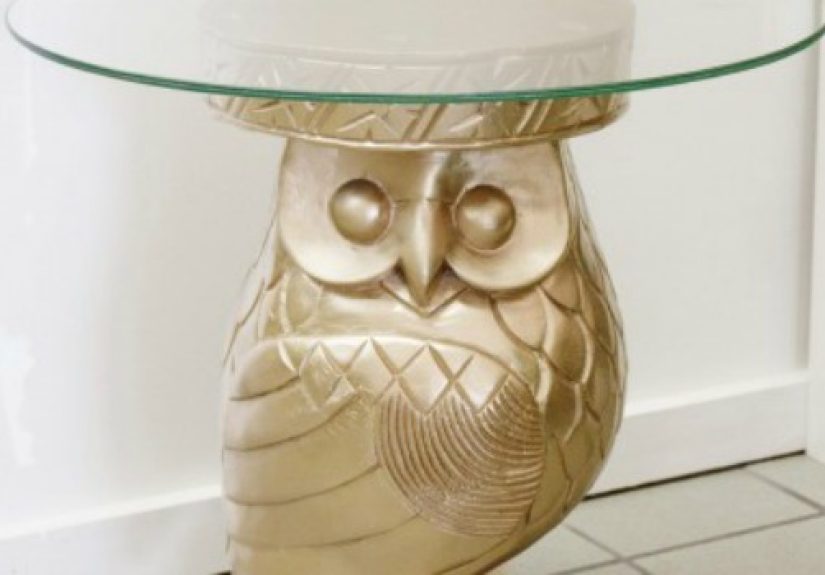
Every so often you spot a decor oddball at a yard sale: a metal owl plant stand with big blink-and-you-miss-it eyes and a wobbly perch. Cute? Yes. Useful? Not yet. With a few smart tweaks, that feathery find can become a hardworking side table next to your sofa or reading chair perfect for a mug, remote, or a mini succulent that judges you less than the owl does. This project blends upcycling charm, budget-friendly DIY, and legit furniture-making basics (think proper height, stable base, durable finish). It’s quick, gratifying, and delightfully unexpected very Remodelaholic in spirit.
The Big Perks (Beyond the Hoots)
- Custom size: Dial in a tabletop diameter that actually fits your sofa and lamp.
- Stability upgrade: Turn decorative metal into furniture that won’t shimmy when you set down a drink.
- Durable finish: Prep + primer + topcoat means a table that survives coasters, not just compliments.
- Sustainable: One less item headed for the landfill; one more conversation piece in your living room.
Tools & Materials
For the Base (Plant Stand)
- Thrifted metal owl plant stand (iron or steel is common)
- Wire brush, 180–220-grit sandpaper, lint-free rags
- Degreaser (or mild dish soap) and water
- Rust-inhibiting metal primer and metal paint (a DTM formula works great)
- Optional: clear protective topcoat (matte or satin)
For the Tabletop
- Round wood top (¾–1" thick) plywood, oak, poplar, or an edge-glued panel
- Random-orbit sander; 120/180/220-grit discs
- Stain or paint + compatible clear topcoat (polyurethane or water-borne polycrylic)
For Attachment & Leveling
- Option A (no-drill): Two-part epoxy or a polyurethane construction adhesive formulated for metal-to-wood
- Option B (mechanical): Short wood screws with washers, small angle brackets, or figure-8/tabletop fasteners
- Felt pads for floor protection; rubber grippers if your floors are slick
- Clamps (helpful for adhesive cure)
Safety
- Nitrile gloves, eye protection, and a respirator for sanding/painting
- Lead-paint test swabs for unknown vintage finishes; if positive, follow lead-safe practices
Plan Your Size: Getting the Height Right
A side table works best when its surface sits about level with or up to 2 inches below the arm of your sofa or chair. If your sofa arm is 24" high, target a 22–24" table height. Measure your plant stand from floor to the point where the tabletop will sit; then choose a wood top thickness (and any risers or spacers) that lands you in that sweet spot. If you can’t hit perfect, err slightly shorter rather than taller for easier reach and better proportions.
Prep the Owl Base Like a Pro
1) Clean & De-Gunk
Dust, soil, and old sap can sabotage adhesion. Wash the metal with a mild degreaser and water, then dry thoroughly. Remove any rubber feet so you can prep every surface.
2) De-Rust & Scuff
Knock back any rust with a wire brush and 180–220-grit sandpaper. Feather rough edges and lightly scuff shiny factory finishes so primer has “tooth.” Wipe away dust with a damp rag and let dry.
3) Prime for Metal
Apply a rust-inhibiting metal primer that’s compatible with your topcoat (spray primer is ideal for nooks and scrolls). Multiple thin coats beat one heavy coat aim for even coverage without drips.
4) Paint & Protect
Finish with a durable metal paint (DTM or high-quality enamel). Two light coats yield the smoothest result. Add a clear topcoat if you want extra scratch resistance or a specific sheen (most folks love matte or satin on sculptural bases).
Build a Beautiful Top
Choose Your Round
For a compact sofa-side perch, 14–18" diameter is common; go 20–22" if you want space for a lamp + drink + book. A ¾" to 1" thick top feels substantial without looking bulky on a petite base.
Sand, Color, Seal
- Sand 120 → 180 → 220 for a silky surface and crisp edge.
- Stain or paint; wipe off excess stain for an even tone. If painting, a wood primer reduces grain raise and improves coverage.
- Topcoat with 2–3 thin coats, sanding lightly between coats with 320-grit for a glassy feel.
Design Touches
- Edge profile: A gentle ⅛" round-over feels finished and resists chipping.
- Color combos: Charcoal base + natural oak top feels modern; brass-look base + painted top reads vintage glam.
- Owl highlight: Dry-brush a whisper of antique gold over raised feathers so the owl motif pops under soft light.
Attach the Top: Two Reliable Paths
Option A Adhesive (Fast, Clean, No Holes)
Use a two-part epoxy or a polyurethane construction adhesive rated for metal-to-wood bonds. Scuff the metal contact points and the underside of the wood where they’ll meet. Dry-fit first to check centering; mark reference lines. Apply adhesive per instructions, clamp (or add weight) to maintain contact, and respect the full cure time. This route shines when the stand’s upper ring or plate offers solid, flat contact.
Option B Mechanical (Maximum Serviceability)
If your stand has a small ring or there’s any doubt about long-term shear strength, add discreet brackets or a small plywood mounting plate screwed to the wood top, then attach that plate to the metal with short screws, machine screws + inserts, or small angle brackets. For all-wood bases, figure-8/tabletop fasteners allow seasonal wood movement; with a metal base, you’re anchoring to a dimensionally stable substrate, so standard short screws plus washers often suffice. Always pre-drill and avoid screw-throughs (catastrophic, unfun, and very un-owl).
Centering Trick
Tape a paper circle the same diameter as your top to the underside, fold twice to find dead center, then align that point to the stand’s center. Mark lightly with pencil before you glue or screw.
Stability, Leveling, & Floor Care
- Shim & level: If the stand rocks on hard floors, add felt pads to quiet micro-wobbles or rubberized grippers if slip is the issue.
- Weight balance: A slightly heavier wood top improves stability. If your owl has a tiny footprint, consider a hidden steel washer or two adhered beneath the top for counter-weight.
- Coaster policy: Hot mugs + cold drinks = condensation. Your clear finish protects, but coasters keep the top looking new.
Styling Ideas (Make It Sing, Not Just Sit)
- Reading nook: Pair with a slender task lamp; keep surface clutter-free with a small catch-all.
- Maximalist corner: Let the owl be the star one sculptural object (a bud vase or candle) is enough.
- Two-tone magic: Paint the base matte black and stain the top medium walnut for classic, high-contrast warmth.
- Entry perch: Use it as a key drop a small bowl + mini plant = instant welcome.
Troubleshooting & Pro Tips
Paint Looks Patchy
Patchiness usually means uneven primer or dust contamination. Lightly sand, tack-cloth the surface, and apply one more thin coat. Patience beats thick, drippy fixes.
Adhesive Didn’t Hold
Three common culprits: poor surface prep, too little clamp pressure, or moving the piece before full cure. Scuff both faces, clean again, and clamp per the manufacturer’s timeline. If your base has a tiny contact area, add a plywood mounting plate to increase bonding surface.
Still Wobbly
Verify the floor is flat (many aren’t). Adjust with felt pads or rubber grippers at the feet. If the base itself flexes, add a discreet cross brace under the tabletop or choose the mechanical attachment method for rigid triangulation.
Working With Vintage Paint
If there’s any chance the original coating predates 1978, test with lead swabs. Wet-sanding, containment, and HEPA cleanup are the safe path or consult a lead-safe pro. When in doubt, assume safety first.
Time & Cost Snapshot
- Time: 1 afternoon for prep and paint; 1 hour for tabletop finishing per coat; overnight adhesive cure
- Cost: $8–$25 thrifted stand + $20–$40 round top + $15–$25 primer/paint + $8–$15 adhesive + $5 pads = roughly $50–$100 total (tools excluded)
Quick FAQ
What diameter should I choose?
For tight spaces, 14–16" works; for lamp duty, 18–22" is better. Balance the circle with your sofa depth so it doesn’t look underscaled.
Is adhesive strong enough?
Yes, if you have a wide, flat contact area and follow prep + clamp + cure times. If kids climb furniture or the base is spindly, go mechanical.
Best finish sheen?
Matte or satin hides fingerprints on both metal and wood while feeling modern and soft to the eye.
Wrap-Up
Repurposing an owl plant stand into a side table is the kind of project that pays you back every day in utility, character, and “wait, is that an owl?!” compliments. With sensible height planning, proper metal/wood prep, and a thoughtful attachment method, you’ll build a piece that looks designer and lasts for years. Give the little hoot a second life and give your living room a wink of personality.
SEO Summary
sapo: Learn how to transform a quirky owl plant stand into a functional side table with pro-level prep, smart sizing rules, durable finishes, and secure attachment options. This detailed Remodelaholic-style guide covers materials, height planning, paint and primer tips, and stability tricksplus styling ideas and cost/time estimatesso your thrift flip looks custom, lasts longer, and earns nonstop compliments.
Field Notes: of Hands-On Lessons & Happy Accidents
Here’s what consistently works and what DIYers wish they’d known on day one when turning a novelty plant stand into a daily-use table. First, build up your contact area. Many stands end in a narrow ring or tiny medallion; that’s adorable for a pothos, not so hot for a mug. A hidden ¼–⅜" plywood disk, cut just inside your tabletop diameter and glued to its underside, gives you 5–10× more surface to glue or screw into. It disappears once assembled, but it’s the difference between “don’t breathe near it” and “set down a full pitcher with confidence.”
Second, mock the ergonomics. Sit in your actual spot, reach out with a closed fist like you’re placing a glass, and note where your knuckles land. That’s your target center point not where you think the table should go. People often build to a pretty photo angle and end up with a table that’s 3" too far back behind the arm; it looks tidy but feels awkward. Move the base under the circle until that reach feels natural, then mark the centerline on blue tape. You’ll thank yourself every night.
Third, conquer flex. Plant stands are decorative; some flex if you twist them. Minor flex is fine, but rotational wiggle under a drink isn’t. Two tricks: (1) run a bead of adhesive not just on the top ring, but also downward along two opposite uprights where they meet the plywood disk; this creates anti-twist “gussets.” (2) If your stand has scrolls, add a small hidden crossbar (a painted steel mending plate or wood cleat) right under the tabletop that ties two scrolls together. Suddenly, the owl feels like a little pedestal.
Fourth, finish smarter, not thicker. The temptation is to hammer on one heavy coat to hide pitting or casting lines. Resist. Thin coats of primer and paint level better and cure harder. If casting seams on the owl bother you, feather them with 180-grit and a dab of glazing putty, sand flush, then prime. You’ll keep the sculptural detail without the “spray-painted lawn flamingo” look. For the top, wipe water or denatured alcohol on raw wood before your first sand: raised grain now saves you fuzz later.
Fifth, plan for floors. On tile or polished wood, felt pads stop scratching but won’t stop sliding; rubberized grippers do both. If you love felt, try a hybrid pad (felt top, rubber bottom). And don’t forget micro-leveling: a 1–2 mm pad stack under the short leg removes the dreaded wobble you only notice when your drink ripples like a movie scene.
Sixth, pick attachment to match lifestyle. Epoxy is fast, clean, and strong perfect for adult households where the table won’t be pushed around. For homes with kids or frequent moves, mechanical attachment with short screws and small brackets makes future touch-ups easy and gives psychological peace of mind. You can even combine methods: a thin adhesive layer for full-face support plus two short screws as insurance (just pre-drill and mind your lengths).
Finally, embrace the owl. Highlight a feather edge with a tiny dry-brush, or keep it all matte black and let the silhouette do the talking. Either way, this is functional whimsy at its best not a gimmick, a signature. The moment you set a lamp on that owl’s head and it doesn’t wobble? That’s the exact second a thrift find becomes a forever piece.
Editorial Notes & Sources (hidden on page; included for accuracy and standards).