
Table of Contents >> Show >> Hide
- What Is a Puzzle Ring, Exactly?
- Before You Start: Set Yourself Up for Success
- Simple Ways to Solve a Puzzle Ring: 9 Steps
- Step 1: Separate the bands and study their shapes
- Step 2: Find the two outer bands
- Step 3: Hold the outer bands in a loose diamond shape
- Step 4: Identify the first inner band and place it across the frame
- Step 5: Add the second inner band and create the “X”
- Step 6: Check the crossover before you keep going
- Step 7: Rotate one outer band into its groove
- Step 8: Swing the final outer band into place and lock the ring
- Step 9: Test the ring and memorize the pattern
- Common Mistakes That Make Puzzle Rings Harder Than They Need to Be
- Helpful Tips for Fit, Care, and Everyday Wear
- Why People Love Puzzle Rings Anyway
- What the Experience of Solving a Puzzle Ring Is Really Like
- Conclusion
If you have ever taken off a puzzle ring and watched it collapse into a tiny metallic identity crisis, welcome to the club. One second it is a beautiful ring. The next, it is four slippery bands lying on the table like they have never met. The good news? Solving a puzzle ring is absolutely learnable. The better news? Once you understand the pattern, it stops feeling like sorcery and starts feeling like a neat little hand puzzle you can actually win.
This guide walks through the classic beginner-friendly method for solving a standard four-band puzzle ring in 9 simple steps. Along the way, you will learn how to spot the outer bands, how to avoid the most common mistakes, and how to keep your sanity intact while the ring tries to test your character. We will also cover care tips, sizing notes, and the real-life experience of learning to solve one, because puzzle rings are equal parts jewelry, patience exercise, and humble pie.
What Is a Puzzle Ring, Exactly?
A puzzle ring is a ring made from multiple interlocking bands that fit together in a specific way to form one wearable ring. The most common beginner style has four bands, though more complex versions can have six, eight, or even more. These rings are often associated with Turkish puzzle-ring legends, but their deeper design story is a little murkier. Modern sellers often connect them to old romantic folklore, while museum and antique-jewelry sources point to earlier interlocking rings, such as Renaissance gimmel rings, as close historical relatives.
That means puzzle rings are not just pretty conversation starters. They also belong to a long tradition of symbolic, interlocking jewelry. In plain English, they are meaningful rings with a side hustle as brain teasers.
Before You Start: Set Yourself Up for Success
Before jumping into the 9 steps, give yourself a better solving environment. Work on a soft towel or cloth instead of a hard countertop. That keeps the bands from sliding away and helps prevent scratches. Good light also matters. So does patience. Puzzle rings respond poorly to brute force and surprisingly well to calm hands.
It also helps to know this guide is designed for the classic four-band style. Many rings follow a similar pattern, but not every puzzle ring locks together exactly the same way. If your ring is an unusual design, gem-set style, or a higher-band model, the logic will still help, but the exact sequence may vary.
Simple Ways to Solve a Puzzle Ring: 9 Steps
Step 1: Separate the bands and study their shapes
Do not start by randomly jamming pieces together like you are late for a game show. Spread the bands out and look at them. On most four-band puzzle rings, the bands are not identical. Some have more notches, humps, grooves, or bars than others. That is not decorative chaos. Those differences are the roadmap.
Look for bands that seem more open or more rounded on one side. Also notice which bands appear to have deeper cutouts or longer bars. Once you see those shape differences, the ring stops looking like four rebellious noodles and starts looking like a system.
Step 2: Find the two outer bands
Most classic four-band guides begin by identifying the two outside bands first. These are usually the bands with the outer curves that will eventually form the exterior sides of the ring. On many designs, they also have the smoother or more rounded edges facing outward when the ring is finished.
Set those two outer bands in front of you and ignore the other two for a moment. If you start with the wrong bands, the ring will refuse to cooperate and may make you question your basic motor skills. Start with the outer pair and life gets much easier.
Step 3: Hold the outer bands in a loose diamond shape
Take the two outer bands and hold them so they form a loose frame or diamond. One sits on the left, one on the right. They should not be locked yet. You are just building the skeleton of the ring.
Keep your grip light. If you squeeze too hard, the other bands will be harder to place later. If you hold too loosely, everything will fall apart and roll off the table in a tiny act of revenge. Aim for “firm but polite.”
Step 4: Identify the first inner band and place it across the frame
Now grab one of the remaining inner bands. On many standard four-band rings, this band has a gap, hump, or notch that sits across the two outer bands. Lay it into the loose frame so it bridges the structure rather than hanging off to one side.
You are not closing the ring yet. You are building the middle of it. If the band keeps slipping, that is normal. Puzzle rings love drama in the early stages. Just reposition it until it sits naturally within the outer frame.
Step 5: Add the second inner band and create the “X”
This is the moment where the ring starts making sense. Take the last band and rotate it into place so the two inner bands cross and form an X-like pattern. In many standard solutions, this crisscross is the key to everything. Without it, nothing locks.
Use a finger, pinky, or thumb to hold that crossed center steady. If the inner bands sit flat and parallel instead of crossing properly, back up and reset. A bad X leads to a bad lock, and a bad lock leads to twenty minutes of muttering at jewelry.
Step 6: Check the crossover before you keep going
Before you move on, pause. This step saves time. Look closely at the crossover point. One band should sit above while the other slips below in the correct groove. If both bands are riding at the same level, or if one looks twisted, the ring is not ready to close.
This is where many beginners go wrong. They think they are one move away from success when they are actually three moves deep into the wrong arrangement. Do a quick visual check now and you will spare yourself a lot of unnecessary rearranging later.
Step 7: Rotate one outer band into its groove
Once the X is stable, begin feeding one outer band into the groove created by the inner pair. Rotate it gently. The movement should feel more like threading than forcing. If the band resists, stop. Puzzle rings usually do not need muscle. They need alignment.
You may notice that the structure suddenly starts looking like a real ring again. That is your reward for not panicking in step 5. Keep the center steady while you guide the outer band into place, and the whole shape becomes much more stable.
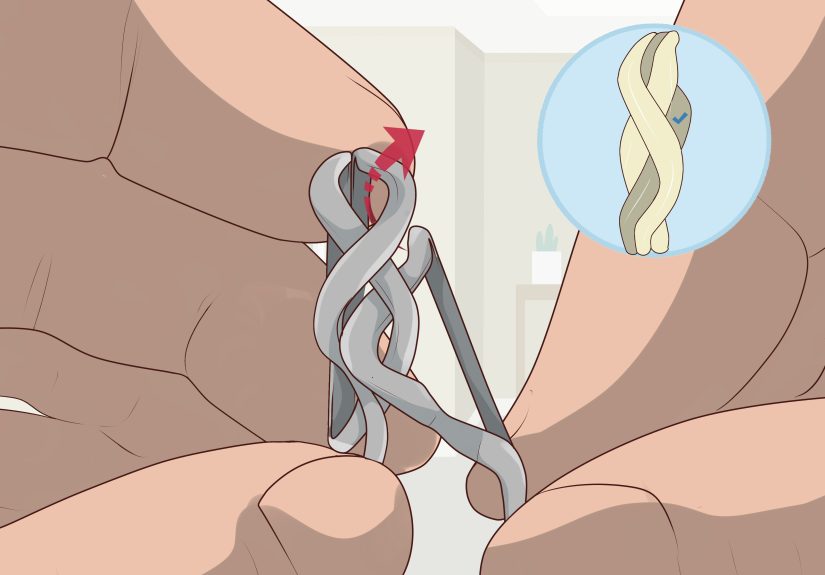
Step 8: Swing the final outer band into place and lock the ring
Now rotate the remaining outer band away, down, or around into its final groove, depending on your ring’s pattern. This is the last major locking move. When it works, the ring usually tightens into a clean circular shape and the bands stop acting like strangers at a party.
If the last band will not seat properly, do not force it. Go back to the center and check the X again. In most cases, the problem is not the final band. It is an earlier crossover that shifted slightly while you were rotating the others.
Step 9: Test the ring and memorize the pattern
Once the ring is assembled, gently turn it in your hand and check that the bands sit evenly. The finished ring should feel stable, symmetrical, and comfortable. If it looks lopsided or one band seems higher than the others, it may not be fully solved.
Before you put it on, take a photo or make a quick mental note of the finished arrangement. That little habit makes future reassembly much easier. Solving a puzzle ring once is satisfying. Solving it a second time without inventing new curse words is even better.
Common Mistakes That Make Puzzle Rings Harder Than They Need to Be
Starting with random bands: The classic method works best when you identify the two outer bands first. If you skip that, the ring becomes a guessing game.
Forcing the metal: If something needs real pressure, it is probably misaligned. Puzzle rings are designed to fit, not be wrestled.
Ignoring the center crossover: A sloppy X in the middle causes most failed attempts.
Trying to solve it in your lap, over a sink, or while distracted: Respect the ring. It can smell fear.
Assuming every puzzle ring is identical: Many four-band rings follow a similar pattern, but decorative differences can change the final move sequence.
Helpful Tips for Fit, Care, and Everyday Wear
Puzzle rings are often wider than a simple plain band, which means they can feel tighter on the finger. If you are shopping for one, remember that wider bands usually fit more snugly than narrow ones. If you already own one and it feels a little tighter than expected, that is not unusual.
For cleaning, stick with gentle care. Warm water, mild dish soap, and a soft brush are the safe-and-sensible approach for many metal and gemstone jewelry pieces. Dry the ring carefully and store it in a soft-lined pouch or separate compartment so the bands do not get scratched by other pieces.
It is also smart to remove your ring before swimming, applying lotion, or doing physical work. Puzzle rings are sturdy, but they are still jewelry. They do not need to accompany you into a chlorinated pool, a weight room, or a dishwashing marathon.
Why People Love Puzzle Rings Anyway
Because they are memorable. A plain band is lovely, but a puzzle ring has a built-in story. It is part symbol, part skill, part object lesson in patience. It also invites interaction in a way most jewelry does not. People ask about it. They try it on. They accidentally take it apart. Suddenly you have a conversation starter and an afternoon activity.
There is also something satisfying about a ring that asks you to participate. You do not just wear it. You learn it. And once you know the pattern, the ring feels a little more personal, like a secret handshake you earned.
What the Experience of Solving a Puzzle Ring Is Really Like
For most people, the experience of learning to solve a puzzle ring follows a very familiar emotional timeline. First comes confidence. You look at the separated bands and think, “How hard can this be?” Then comes confusion. Then denial. Then the brief and humbling phase in which you start suspecting the ring may have been invented by a highly educated goblin. After that, if you keep going, something wonderful happens: your hands begin to notice patterns before your brain can explain them.
That is the magic of puzzle rings. They do not just reward logic. They reward touch, rhythm, and repetition. The first few attempts are usually clumsy because you are trying to memorize everything at once: which band is the outer one, which notch faces up, where the X needs to cross, and which piece has to slide under instead of over. It feels like a lot. But once you understand the basic architecture, the whole experience changes.
Many first-time solvers describe the breakthrough moment the same way. The ring suddenly stops fighting. The bands stop slipping around like they are auditioning for a magic trick. Instead, they begin to settle into one another. You rotate one band, then another, and the structure starts to hold. That moment is oddly satisfying because it feels physical and visual at the same time. You are not just “figuring it out.” You are feeling the geometry click into place.
There is also a strange little bond that forms between the wearer and the ring. Once you have assembled it yourself, the ring seems less like a decorative object and more like a tiny mechanical companion. You know its personality now. You know it behaves well when you line up the outer bands first. You know it turns stubborn when the middle crossover is off. You know exactly how long it takes before frustration begins tapping you on the shoulder. That familiarity is part of the appeal.
People also tend to get faster with practice in a way that feels almost sneaky. On day one, solving the ring can take twenty minutes and a dramatic speech. A week later, you can do it in two minutes while carrying on a conversation. Eventually, experienced wearers often develop their own micro-techniques: a preferred finger position, a favorite way to anchor the center, or a habit of tilting the ring toward the light to check the crossover. Those tiny rituals make the process feel personal.
And yes, there is a social side to it. If you wear a puzzle ring long enough, someone will absolutely ask to see it. Someone else will definitely take it apart “just for a second.” Then they will hand it back to you with the slightly haunted expression of a person who has made a preventable mistake. This is your time to shine. You can either become the calm, capable hero who reassembles it with ease, or you can join them in the shared spiral. Both are valid. One is just better for your reputation.
In the end, the experience of solving a puzzle ring is not really about perfection. It is about familiarity. The ring teaches you to slow down, pay attention, and trust the pattern rather than force the outcome. That is probably why puzzle rings stay interesting long after the novelty wears off. They offer a tiny challenge with a tangible reward. And in a world full of disposable distractions, there is something refreshing about a piece of jewelry that asks for patience and gives back satisfaction.
Conclusion
Solving a puzzle ring gets much easier once you stop treating it like random metal and start treating it like a pattern. Find the two outer bands, build the frame, create the inner X, rotate carefully, and let alignment do the hard work. That is the core idea. The first attempt may feel fiddly, but the second is better, the third is faster, and before long you will be solving your ring like it owes you rent.
If your goal is to wear a puzzle ring confidently, the best strategy is simple: learn the standard sequence, practice a few times on a soft surface, and memorize the finished shape. Once you do that, this unusual little ring becomes far less intimidating and far more fun.


