Table of Contents >> Show >> Hide
- Before You Start: Chocolate Candy Basics (So It Looks Fancy, Not Fussy)
- 12 Easy Chocolate Candy Recipes
- 1) 3-Ingredient Oreo Truffles (No-Bake Crowd Magnet)
- 2) Classic Chocolate Truffles (The “I’m Fancy” Starter Pack)
- 3) Homemade Peanut Butter Cups (No Thermometer, No Problem)
- 4) Peppermint Bark (Holiday Energy, Any Month You Want)
- 5) Mix-and-Match Chocolate Bark (The Clean-Out-the-Pantry Candy)
- 6) Chocolate-Dipped Pretzels (Sweet-and-Salty, Zero Stress)
- 7) Chocolate Turtles (Caramel + Pecans + Chocolate = Instant Legend)
- 8) Saltine Toffee Crack (A.K.A. “Why Is This So Addictive?”)
- 9) Chocolate-Covered Almonds (Snackable, Giftable, Surprisingly Elegant)
- 10) Rocky Road Candy (Marshmallow, Nuts, Chocolate… Done)
- 11) Chocolate Haystacks (No-Bake Clusters for Busy Humans)
- 12) Chocolate-Covered Cherries (Classic Candy Shop Vibes)
- How to Store Homemade Chocolate Candies (So They Stay Pretty)
- Common Candy-Making “Oops” (And How to Fix Them)
- Real-Life Kitchen Experiences With Easy Chocolate Candy Recipes (The Fun, the Flops, and the Fixes)
- SEO Tags
If you love chocolate candy but don’t love the idea of owning a copper pot and a candy thermometer “just for fun,” you’re in the right kitchen.
These easy chocolate candy recipes are designed for real life: weeknights, bake sales, holiday trays, “I forgot I said I’d bring dessert”
emergencies, and the kind of gift boxes that make you look wildly organized (even if you were absolutely not).
You’ll find plenty of no-bake chocolate treats, plus a few quick oven-assisted favorites. Most are beginner-friendly, and every recipe has
simple swaps so you can customize flavors without launching a full-scale candy-making saga.
Before You Start: Chocolate Candy Basics (So It Looks Fancy, Not Fussy)
Pick the right chocolate
- Chocolate bars or wafers melt smoother than many chips (chips often include stabilizers to hold their shape).
- Dark chocolate (around 60–70%) gives a richer flavor and usually melts more reliably for dipping.
- White chocolate is delicious but dramatickeep heat low and stir often.
Melt it gently (aka: don’t roast it into sadness)
- Microwave method: short bursts, stir between rounds, and stop while a few small pieces remainstirring finishes the job.
- Double boiler: keep the bowl dry and avoid steam/water droplets (water can make chocolate turn thick and grainy).
Quick candy workflow
- Line pans with parchment (your future self will thank you).
- Prep toppings first (because melted chocolate waits for no one).
- Chill when neededbut don’t store finished candies long-term in a humid fridge unless the recipe calls for it.
12 Easy Chocolate Candy Recipes
1) 3-Ingredient Oreo Truffles (No-Bake Crowd Magnet)
Why you’ll love it: Tastes like a bakery bite, made with a blender and zero patience for complicated steps.
You’ll need: Oreo cookies, cream cheese (softened), melted semisweet chocolate (plus optional sprinkles).
How to make: Crush cookies into fine crumbs. Mix with cream cheese until it becomes a thick “cookie dough.” Roll into small balls, chill until firm, dip in melted chocolate, then chill again until set.
Pro tip: If the mixture feels sticky, chill 10–15 minutes before rolling. If it feels crumbly, keep mixingwarm hands help.
2) Classic Chocolate Truffles (The “I’m Fancy” Starter Pack)
Why you’ll love it: Ganache + cocoa powder = instant sophistication. No one needs to know it’s basically chocolate and cream.
You’ll need: Chopped bittersweet or semisweet chocolate, warm heavy cream, vanilla (optional), cocoa powder or toppings (nuts, coconut, sprinkles).
How to make: Pour warm cream over chopped chocolate, let sit a minute, then stir until glossy. Chill until scoopable, roll into balls, then coat in cocoa or toppings.
Variation ideas: Add espresso powder, orange zest, peppermint extract, or a spoonful of peanut butter.
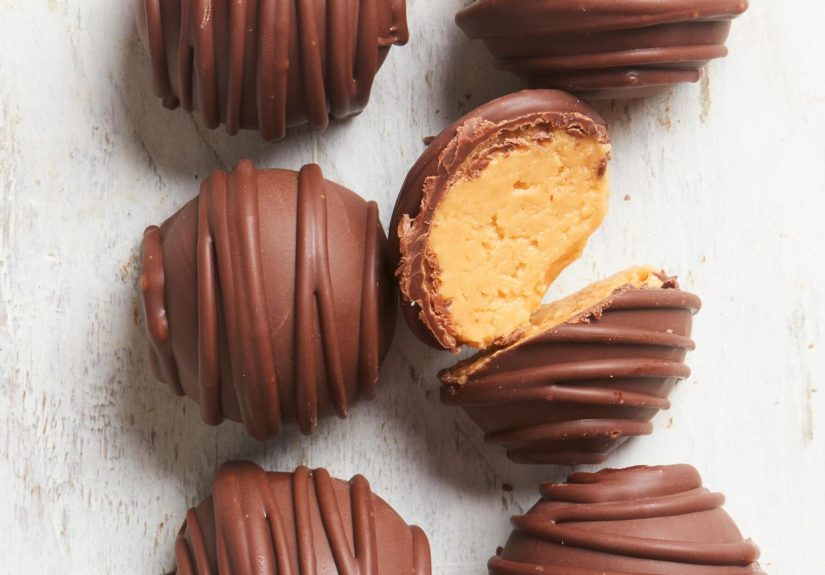
3) Homemade Peanut Butter Cups (No Thermometer, No Problem)
Why you’ll love it: Sweet-salty perfection with that classic “snap” around a creamy center.
You’ll need: Melted chocolate, peanut butter, powdered sugar, a pinch of salt, mini muffin liners.
How to make: Spoon a little melted chocolate into each liner and swirl up the sides. Chill briefly. Mix peanut butter + powdered sugar + salt into a thick filling. Add a small dollop of filling, then top with more chocolate. Chill until firm.
Pro tip: For a softer center, reduce powdered sugar slightly; for a firmer “store-bought” bite, add a bit more.
4) Peppermint Bark (Holiday Energy, Any Month You Want)
Why you’ll love it: Two layers, one pan, instant festive vibes. Also excellent for “I need a gift in 30 minutes.”
You’ll need: Dark or semisweet chocolate, white chocolate, peppermint extract (optional), crushed candy canes.
How to make: Spread melted dark chocolate in a lined pan; chill until just set. Mix crushed peppermint into melted white chocolate, spread over the dark layer, sprinkle more candy on top, and chill until firm. Break into shards.
Pro tip: Keep peppermint extract minimaltoo much can taste like brushing your teeth at a rock concert.
5) Mix-and-Match Chocolate Bark (The Clean-Out-the-Pantry Candy)
Why you’ll love it: The most customizable candy on earth. Sweet, salty, chewy, crunchyyour choice.
You’ll need: Melted chocolate (dark, milk, or white) + toppings (nuts, dried fruit, pretzels, toasted coconut, toffee bits, flaky salt).
How to make: Spread melted chocolate on parchment. Add toppings while chocolate is still wet. Chill or let set at cool room temp, then break into pieces.
Flavor combos: Dark chocolate + dried cherries + pistachios; milk chocolate + pretzels + peanut butter chips; white chocolate + cranberries + toasted coconut.
6) Chocolate-Dipped Pretzels (Sweet-and-Salty, Zero Stress)
Why you’ll love it: Minimal ingredients, maximum snackability. Crunchy, chocolatey, and gone in five minutes.
You’ll need: Pretzels (twists or rods), melted chocolate, optional toppings (nuts, sanding sugar, sprinkles, crushed peppermint).
How to make: Dip pretzels halfway into melted chocolate, let excess drip off, place on parchment, add toppings, and chill or let set.
Pro tip: Use a fork to lift dipped pretzelsyour fingers deserve better.
7) Chocolate Turtles (Caramel + Pecans + Chocolate = Instant Legend)
Why you’ll love it: Chewy caramel, crunchy pecans, chocolate coatingthis combo has never let anyone down.
You’ll need: Pecans, soft caramels (or caramel bits), a splash of cream or water (if melting caramels), melted chocolate.
How to make: Arrange pecans in little “clusters.” Melt caramels gently, spoon over pecans, let cool until set, then drizzle or dip in melted chocolate. Let set again.
Pro tip: Let caramel cool a bit before adding chocolate, or the chocolate can look streaky (still tasty, just less “gift box glossy”).
8) Saltine Toffee Crack (A.K.A. “Why Is This So Addictive?”)
Why you’ll love it: Crisp crackers + quick toffee + melted chocolate = the snack you “taste-test” until it’s gone.
You’ll need: Saltine crackers, butter, brown sugar, chocolate chips, optional chopped nuts or flaky salt.
How to make: Line a rimmed baking sheet with foil and parchment. Cover with crackers. Boil butter + brown sugar briefly until bubbling and glossy, pour over crackers, bake a few minutes, then sprinkle chocolate chips on top. Once melty, spread chocolate, add toppings, cool, and crack into pieces.
Safety note: Hot toffee is lava in a baking sheet disguisemove carefully and keep kids/pets at a safe distance.
9) Chocolate-Covered Almonds (Snackable, Giftable, Surprisingly Elegant)
Why you’ll love it: It’s basically the best trail mix component, upgraded into candy form.
You’ll need: Roasted almonds, melted chocolate, optional cocoa powder or powdered sugar for a finished coating.
How to make: Stir almonds into melted chocolate until coated. Spread on parchment, separating clusters if you want individual pieces. Chill until set.
Pro tip: A tiny pinch of flaky salt on dark chocolate almonds makes the flavor pop like it just got a standing ovation.
10) Rocky Road Candy (Marshmallow, Nuts, Chocolate… Done)
Why you’ll love it: Big texture, big flavor, no complicated steps. The candy equivalent of a cozy blanket.
You’ll need: Melted chocolate (often with a little butter or condensed milk for smoothness), mini marshmallows, nuts (almonds, walnuts, peanuts), optional crushed cookies.
How to make: Stir marshmallows and nuts into melted chocolate mixture, press into a lined pan, chill until firm, then cut into squares.
Variation ideas: Add dried cherries, crushed pretzels, or swirl in a spoonful of peanut butter.
11) Chocolate Haystacks (No-Bake Clusters for Busy Humans)
Why you’ll love it: Fast, forgiving, and easy to customizeperfect for cookie trays or after-school snacks.
You’ll need: Melted chocolate, shredded coconut, quick oats (optional), optional peanut butter or chopped nuts.
How to make: Mix coconut (and oats, if using) into melted chocolate until evenly coated. Drop spoonfuls onto parchment, then chill until set.
Pro tip: Toast the coconut first for a deeper flavoryour kitchen will smell like a fancy dessert shop.
12) Chocolate-Covered Cherries (Classic Candy Shop Vibes)
Why you’ll love it: Sweet cherry center + chocolate shell = a treat that feels special, even when it’s homemade.
You’ll need: Maraschino cherries (well-drained and patted dry), a simple fondant-like dough (often butter + corn syrup + powdered sugar), melted chocolate.
How to make: Wrap each cherry in a thin layer of the dough, chill until firm, then dip in melted chocolate. Let set on parchment.
Pro tip: Dry cherries thoroughlyextra moisture can keep coatings from setting neatly.
How to Store Homemade Chocolate Candies (So They Stay Pretty)
- Cool, dry place: Most chocolate candies prefer a cool room-temperature spot away from sunlight and heat.
- Chill when needed: Truffles and cream-cheese fillings do best in the fridge; bring to room temp briefly before serving for best texture.
- Layer carefully: Use parchment between layers to prevent sticking and scuffing.
Common Candy-Making “Oops” (And How to Fix Them)
My chocolate turned thick and grainy.
That’s usually moisture or overheating. If you were dipping candy, start over with fresh chocolate and keep tools bone-dry.
If you just need a sauce, you can often rescue seized chocolate by whisking in a bit more warm liquid to form a smooth ganache.
My bark looks streaky or dusty.
That’s often “bloom” (cocoa butter or sugar crystals rising). It’s still safe and tastyjust less glossy.
Next time, keep chocolate from extreme temperature swings and store it in a cool, dry place.
Real-Life Kitchen Experiences With Easy Chocolate Candy Recipes (The Fun, the Flops, and the Fixes)
In home kitchens, chocolate candy tends to fall into two categories: the kind that looks like it belongs in a boutique candy box, and the kind that looks like
you wrestled a chocolate fountain and lost. The good news is that both types usually taste amazingand the gap between them is smaller than you think.
One of the most common “first-timer” moments happens right at the melting stage. You start confident. You microwave. You walk away “for just a second.”
You come back, and your chocolate has the texture of beach sand and the mood of a teenager who’s been asked to do dishes. That’s why so many test kitchens
and experienced bakers recommend short bursts and frequent stirring: chocolate keeps heating even after the microwave stops, and stirring spreads that heat
before it turns into scorching.
Another very normal experience: you make truffles, chill the ganache, and then discover it’s either (1) too soft and sticky or (2) so firm it could be used
as driveway gravel. Temperature is usually the culprit. Warm rooms soften ganache fast; cold fridges firm it aggressively. The “sweet spot” is letting it chill
until scoopable, rolling quickly with cool hands, and popping the tray back into the fridge if things start getting melty. If you want truffles to look especially
neat, roll them once, chill again, then roll a second time before coatinglike giving them a little spa day between steps.
Then there’s bark: the most forgiving candy… until you add toppings. People often underestimate how quickly chocolate sets, especially in a cool kitchen. That’s
why the best bark makers set up toppings firstnuts chopped, candy canes crushed, flaky salt readyso the moment the chocolate spreads, the toppings can go on
immediately. And if you’ve ever put your bark in the fridge and pulled it out to find tiny droplets of moisture on the surface, you’ve met condensation. It won’t
ruin the flavor, but it can dull the shine. Letting bark set in a cool, dry spot (when possible) often helps it stay prettier.
A fun “experience upgrade” many candy-makers discover is the power of texture contrast. The same melted chocolate behaves very differently depending on what you
stir into it: marshmallows create chewy pockets (hello, rocky road), coconut adds delicate crunch (haystacks), and pretzels deliver that salty snap that makes
you reach for “just one more.” Once you realize this, candy-making turns into a build-your-own-adventure story: pick a base (dark/milk/white chocolate), pick a
crunch (nuts/pretzels/toffee bits), pick a chew (dried fruit/marshmallows), and finish with a tiny flourish (salt, drizzle, sprinkles).
Finally, don’t underestimate the “gift effect.” Homemade candies don’t need to be perfect; they need to be intentional. A mix of two or three candiessay,
peppermint bark, pretzel rods, and Oreo truffleslooks abundant and festive. Add parchment separators, a simple label (“Made with love and questionable
self-control”), and suddenly your kitchen project looks like a professional candy assortment. That’s the real magic of easy chocolate candy recipes: they’re
simple enough to make on a weeknight, but impressive enough to make people ask, “Wait… you made these?”