Table of Contents >> Show >> Hide
- Before You Start: What “Private” Really Means on Twitch
- Way #1 (Best for Testing): Use Twitch Stream Test Mode (Bandwidth Test Mode) in OBS
- Way #2 (Best for Limited Audience): Start a Subscriber Stream (If Your Channel Has Access)
- Way #3 (Best for Everyday Privacy): Lock Down VODs, Clips, and Chat so Your Stream Stays “Low-Exposure”
- FAQ: “So… Can I Make My Twitch Stream Truly Private?”
- Real-World Experiences: What It’s Like Trying to “Go Private” on Twitch (About )
- Conclusion
Twitch is basically the Internet’s front porch: if you go live, people can wander by. That’s the point… and also the problem
when you’re just trying to test your audio levels without broadcasting your keyboard clacks to the world.
Here’s the good news: while Twitch doesn’t offer a simple “Private Stream” button for everyday live broadcasts, you
can get pretty close depending on what you mean by “private.” On a PC or Mac, you can:
- Test your stream without appearing live (the closest thing to truly private on Twitch)
- Limit who can watch (subscriber streams, when available)
- Lock down replays and exposure (VOD/clip settings + chat controls + account privacy choices)
Below are three easy, real-world methodsplus exactly when to use each oneso you can keep your stream under wraps without
turning your setup into a NASA launch sequence.
Before You Start: What “Private” Really Means on Twitch
When most people say “private stream,” they usually mean one of these:
1) “I want to test my setup without anyone seeing it.”
This is the most common and the easiest to do properly (and quietly).
2) “I want only a specific group to watch.”
Twitch isn’t built like a Zoom meeting, but subscriber streams can act like a limited-access event if your channel has the feature.
3) “I’m okay being live, but I don’t want clips/VODs floating around.”
You can absolutely reduce the footprint of your broadcast by controlling VOD publishing, clip creation, and chat access.
Way #1 (Best for Testing): Use Twitch Stream Test Mode (Bandwidth Test Mode) in OBS
If your goal is to practice, troubleshoot, or fine-tune your stream without appearing online to viewers,
Twitch’s stream test option is your best friend. This is the closest you’ll get to a “private stream” on Twitchbecause you’re
literally sending video to Twitch’s ingest servers without publicly going live.
When to use this
- Testing mic levels, filters, overlays, alerts, scenes, or a new capture card
- Checking bitrate stability before a big stream
- Making sure your “Starting Soon” screen doesn’t accidentally show your desktop chaos
How to do it on PC or Mac (OBS Studio)
- Open OBS Studio on your PC or Mac.
- Go to Settings > Stream.
- Select Twitch as the service and connect your Twitch account (or use your stream key).
-
Enable Bandwidth Test Mode (if OBS shows the checkbox). If you’re entering a stream key manually, you can
run a test by appending:
?bandwidthtest=true
to the end of your stream key. - Click Start Streaming in OBS.
How to confirm you’re truly “not live”
Don’t just trust vibes. Use Twitch Inspector to verify your stream test is running and to review stability metrics
like bitrate and dropped frames. If you’re in test mode, you should not show as live on your channel, and viewers shouldn’t get go-live notifications.
Common mistakes (and how not to faceplant)
-
Forgetting to remove test mode: You’ll stream for 20 minutes and wonder why chat is empty. (It’s because you’re
not actually live. Congrats on the privacy, though.) - Testing “privacy” by going live with no title: That’s not private. That’s just mysterious.
-
Using the wrong account: If you want a totally separate practice space, consider making a dedicated test account
(and never share stream keys).
Pro tip: Treat Stream Test Mode like a dress rehearsal. Run it every time you change your encoder settings,
add a new overlay package, or switch networks. It’s cheaper than panic.
Way #2 (Best for Limited Audience): Start a Subscriber Stream (If Your Channel Has Access)
If you’re an Affiliate/Partner (or otherwise eligible) and have access to Subscriber Streams, this is the
most straightforward way to limit who can watch your live stream on Twitch itself. Subscriber Streams are designed for
your most dedicated viewerssubscribersand can also include VIPs and moderators depending on your settings.
When to use this
- Subscriber hangouts, coaching sessions, private Q&As
- Behind-the-scenes content you don’t want fully public
- Early access streams (new game, new format, new haircutwhatever your lore requires)
How to start a Subscriber Stream (PC or Mac)
- Open Twitch in your browser and go to your Creator Dashboard.
- Find your Stream Manager / Stream Information area (where you set title, category, tags, etc.).
- Under Audience, choose Subscribers for your stream.
- Decide whether VIPs and Moderators can view (some setups allow toggling their access).
- Go live as usual from OBS/Streamlabs Desktop/your encoder.
Make it even more private: Subscriber-only archives (VODs)
Live access is one thing, but your past broadcasts are another. If you enable VOD storage, Twitch can
automatically publish VODs unless you change those settings. Eligible channels can also enable
Subscriber-only archives so saved broadcasts aren’t publicly viewable.
Reality check
Subscriber Streams are the closest Twitch gets to “limited access,” but they’re not a magic invisibility cloak for every account.
Availability depends on your channel’s monetization status and feature access. If you don’t see Subscriber Streams options, you may not be eligible yet.
Way #3 (Best for Everyday Privacy): Lock Down VODs, Clips, and Chat so Your Stream Stays “Low-Exposure”
Sometimes you don’t need an invite-only streamyou just want to stop your broadcast from turning into a searchable scrapbook.
This is where Twitch’s VOD settings, clip settings, and chat controls
do the heavy lifting.
Step A: Decide what happens after you go live (VOD privacy)
On Twitch, VODs (past broadcasts) are controlled in your Creator Dashboard stream settings. You generally have two privacy goals:
- Goal 1: Don’t save VODs at all (no archive, no replay)
- Goal 2: Save VODs, but keep them from being publicly accessible (unpublish or limit access, where available)
Option 1: Turn off VOD saving (fastest)
- Creator Dashboard > Settings > Stream
- Find VOD Settings
- Toggle Store past broadcasts OFF
This is great for privacy, but remember: no stored VOD means fewer ways to repurpose content later. If you’re building a channel,
consider recording locally in OBS instead (recording is private to your computer).
Option 2: Save VODs, then unpublish the ones you don’t want public
If you want the safety net of saving broadcasts but you don’t want them publicly accessible, use your
Video Producer tools to manage visibility (publish/unpublish). This gives you control per videouseful if
most streams are public, but one stream was a “messy practice day.”
Step B: Disable clipsor limit who can create them
Clips are wonderful for growth and terrible for accidental moments. (Yes, that includes the time your mom walked in and asked
why you were “talking to strangers about a dragon.”)
You can manage clip creation in your Creator Dashboard’s Clips Settings. Depending on your preferences, you can:
- Disable clips entirely (most private)
- Allow clips, but restrict who can create them (less public)
Quick path
- Creator Dashboard > Settings > Stream
- Find the Clips section
- Toggle Enable Clips OFF, or limit clip creation to specific viewer groups (if available)
Heads up: Turning off clips doesn’t automatically stop VODs, and turning off VODs can affect clip creation.
Think of them like siblings: related, but definitely not identical.
Step C: Restrict chat access (and reduce random drive-bys)
Even if your stream is visible, you can make it feel “private” by limiting who can interact. Twitch offers:
- Followers-only chat (optionally requiring a minimum follow duration)
- Subscribers-only chat (for channels with subscriptions)
Two easy ways to enable it
-
From chat tools: Use Twitch chat commands (helpful if you need to flip settings fast mid-stream).
Examples include commands like /followers and /subscribers. - From dashboard moderation tools: Set follower-only rules in moderation preferences, including how long someone must follow before chatting.
This won’t make the stream invisible, but it does reduce unwanted attention and keeps “practice streams” from turning into
unplanned talk shows.
Bonus: Review your account privacy controls
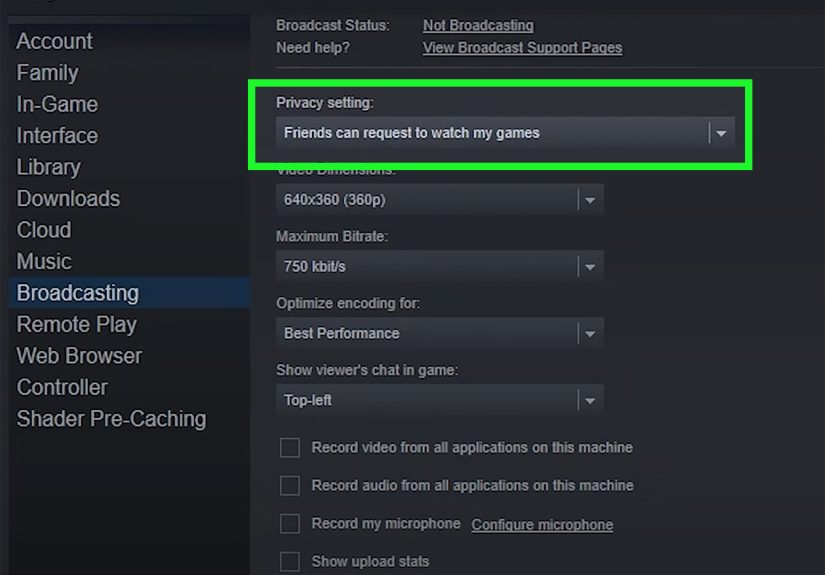
Twitch also provides account-level privacy controls that affect what people can see and how they can interact with you. These are worth
reviewing if your “private stream” goal is really about keeping personal info and activity exposure low.
A 60-second “privacy tune-up” checklist
- Use Stream Test Mode when practicing (best privacy)
- Decide whether to store past broadcasts (VODs) or keep streams unarchived
- Disable or restrict clips
- Turn on followers-only or subscribers-only chat if needed
- Double-check your privacy controls and communication settings
FAQ: “So… Can I Make My Twitch Stream Truly Private?”
Can I password-protect a Twitch live stream?
For typical live streams, Twitch isn’t designed for password-protected, invite-only broadcasts. If your goal is practice, use
Stream Test Mode. If your goal is limited audience on Twitch, Subscriber Streams (when available) are the closest option.
If I disable VODs, is my live stream private?
Nodisabling VOD storage mainly affects what happens after you stream. It reduces long-term visibility, but it doesn’t hide you while you’re live.
If I disable clips, am I safe from being clipped?
Disabling clips prevents new clip creation through Twitch’s clip tools, which helps a lot. But the best privacy is still:
don’t show sensitive info on screen (notifications, filenames, messages), and test your scenes in Stream Test Mode.
Real-World Experiences: What It’s Like Trying to “Go Private” on Twitch (About )
The first time most people try to “make Twitch private,” they discover a slightly funny truth: Twitch is amazing at live streaming,
but it’s not built like a private meeting room. So streamers end up learning privacy the same way we learn cookingby making one
small mistake and immediately deciding to become a professional.
A very common experience is using your main account to test settings, hitting “Go Live,” and realizing (too late) that your channel
sent notifications to followers. Suddenly your five-minute audio test has an audience, and you’re narrating gain levels like you’re
commentating an Olympic sport: “And on the left channel we see a brave little waveform…”
That’s why Stream Test Mode feels like discovering a secret door in a video game. You can run the stream, check stability, and tweak
OBS settings without showing up as live. Many streamers build a ritual around it: new scene? test mode. New microphone? test mode.
Different Wi-Fi network? test mode. It becomes the calm “pre-flight checklist” that prevents the chaotic “why is my camera upside down?”
moment from happening in public.
Subscriber Streams bring a different kind of privacy experience: it’s less “invisible” and more “bouncer at the door.” Streamers who
use it often describe it as a cozy, smaller-room vibe where conversation is easier and trolling drops off. But there’s a tradeoff:
limiting access also limits discovery. If you’re trying to grow, you probably won’t want every stream behind a subscriber wall.
The sweet spot for many creators is using Subscriber Streams for special eventslike monthly hangouts, coaching, portfolio reviews,
or behind-the-scenes sessionsand keeping regular streams public.
Then there’s the “privacy after the fact” learning curveVODs and clips. Streamers often don’t realize that saving past broadcasts can
automatically create a long tail of visibility. A stream you thought was a casual practice can become the thing people watch later,
especially if clips are enabled. Some creators love that; others realize they’d rather keep practice streams unarchived and record locally
for personal review. The “aha” moment usually happens when someone says, “I watched your replay,” and you respond, “You watched my what?”
The most practical takeaway streamers learn is that privacy is a system, not a single setting. Test privately when you can. Limit access
when you need to. And if you’re live publicly, control the leftovers: VOD publishing, clip creation, and chat interaction. Once you set it
up, it’s surprisingly low-maintenanceand you can go back to focusing on what matters most: making content (and pretending you’re not
silently adjusting audio sliders every three minutes).
Conclusion
If you want a “private” Twitch stream on PC or Mac, start by choosing your privacy goal. For true behind-the-scenes practice,
Stream Test Mode is the MVP. If you need a limited audience on Twitch, Subscriber Streams are your best option
(when available). And for everyday privacy, lock down your broadcast’s footprint by managing VODs, clips, chat modes, and your
broader Twitch privacy controls.
In short: Twitch may not have a big red “PRIVATE” switchbut with the right settings, you can absolutely keep your stream under control.