Table of Contents >> Show >> Hide
- Why Make DIY Gift Wrapping Paper?
- Best Materials for Homemade Gift Wrapping Paper
- Easy DIY Gift Wrapping Paper Ideas
- How to Wrap Gifts So DIY Paper Looks Polished
- Creative Gift Toppers for DIY Wrapping Paper
- DIY Wrapping Paper Ideas by Occasion
- Eco-Friendly Tips for DIY Gift Wrapping Paper
- Common Mistakes to Avoid
- of Real-Life Experience: What DIY Gift Wrapping Paper Teaches You
- Conclusion
- SEO Tags
There is a special kind of panic that happens when you find the perfect gift, look around the house, and realize your only wrapping options are a crumpled grocery bag, last year’s snowman paper, and a suspiciously tiny square of ribbon. Good news: that panic can become a craft project. Even better news: DIY gift wrapping paper can look more personal, more stylish, and more thoughtful than store-bought paperwithout requiring a professional craft room, a glitter hazmat suit, or a second mortgage.
Making your own wrapping paper is one of the easiest ways to turn a simple gift into something memorable. It lets you customize colors, patterns, messages, and textures for birthdays, holidays, weddings, baby showers, graduations, and “I saw this and thought of you” moments. It can also be budget-friendly and eco-conscious, especially when you reuse paper, decorate kraft paper, skip plastic bows, or turn fabric and scraps into beautiful packaging.
This guide walks through creative, practical, and beginner-friendly ways to make homemade wrapping paper that looks intentionalnot like you wrapped a candle during a power outage. You will find materials, step-by-step methods, design ideas, sustainability tips, troubleshooting advice, and real-life experience notes to help your gifts look charming, polished, and full of personality.
Why Make DIY Gift Wrapping Paper?
DIY wrapping paper is not just about saving money, though it can absolutely help. It is about creating a small moment before the gift is even opened. The outside becomes part of the present. A hand-stamped pattern, a doodled border, a child’s painted design, or a handwritten message can make even a modest gift feel one-of-a-kind.
It Adds a Personal Touch
Store-bought wrapping paper is convenient, but it is made for everyone. Homemade wrapping paper can be made for one person. For a book lover, you might decorate kraft paper with tiny hand-drawn books. For a gardener, you can add pressed leaves or botanical stamps. For a friend who loves coffee, use brown paper with white paint pen doodles of mugs, beans, and sleepy little clouds saying, “Do not speak until espresso.”
It Can Be More Sustainable
Many glossy, glittery, foil-coated, or plastic-laminated papers are difficult to recycle. DIY gift wrap gives you more control over materials. Plain kraft paper, paper shopping bags, newspaper, fabric scraps, old maps, children’s artwork, and reusable ribbons can all become attractive alternatives. You can also reduce tape use by folding carefully, tying with twine, or using reusable fabric wrapping techniques.
It Is Budget-Friendly
A large roll of kraft paper can wrap many gifts and works for nearly every occasion. Change the decorations, and the same base paper becomes birthday wrap, Christmas wrap, rustic wedding wrap, baby shower wrap, or elegant minimalist packaging. Instead of buying five different rolls, you buy one neutral base and let your imagination do the outfit changes.
Best Materials for Homemade Gift Wrapping Paper
You do not need fancy supplies to make beautiful custom wrapping paper. In fact, some of the best materials are already hiding in drawers, closets, recycling bins, and that one mysterious craft box everyone has but no one wants to organize.
Paper Bases
Start with a simple base that is easy to fold and decorate. Kraft paper is the all-purpose champion because it is sturdy, neutral, and works with stamps, markers, paint, twine, ribbon, greenery, and stickers. White butcher paper is great for bright designs and kids’ artwork. Plain printer paper works for small gifts. Brown paper bags can be cut open and reused. Newspaper creates a vintage look, especially when paired with black ribbon or red twine. Old maps, sheet music, calendar pages, and book pages can create unique themed wrapping for the right recipient.
Decorating Tools
Useful tools include rubber stamps, ink pads, paint pens, acrylic paint, markers, washi tape, stickers, stencils, sponges, potatoes for stamping, cookie cutters, leaves, buttons, twine, ribbon, paper scraps, and hole punches. A ruler and pencil help with neat patterns. Scissors and double-sided tape help create cleaner seams. If you want a polished finish, a bone folder or the dull edge of a butter knife can sharpen creases.
Natural Embellishments
Nature is basically a free craft store with better lighting. Try small sprigs of rosemary, pine, eucalyptus, dried orange slices, pressed flowers, cinnamon sticks, seed packets, or tiny pinecones. Keep decorations flat enough for stacking or shipping, and make sure fresh greenery is added close to gifting time so it does not wilt dramatically like it just heard bad news.
Easy DIY Gift Wrapping Paper Ideas
The best DIY wrapping paper ideas are simple enough to repeat, flexible enough for different occasions, and attractive enough that people pause before tearing into the gift. Here are several methods that work well for beginners and experienced crafters alike.
1. Hand-Stamped Kraft Paper
Hand-stamped kraft paper is a classic because it looks charming with very little effort. Lay the paper flat on a protected surface. Choose a stamp, dip it lightly in ink or paint, and press evenly across the paper. Repeat the design in rows, diagonals, clusters, or random spacing.
For a polished pattern, use a pencil and ruler to mark faint guidelines. For a handmade look, embrace slight variations. Small hearts, stars, leaves, flowers, snowflakes, initials, paw prints, or simple dots all work beautifully. Black ink on brown paper feels modern and rustic. White ink looks wintry and elegant. Metallic gold or silver adds a festive touch without going full disco ball.
2. Potato-Stamped Wrapping Paper
Potato stamping is delightfully old-school and still works like magic. Cut a potato in half, press a small cookie cutter into the cut side, and carefully trim around the shape so the design stands raised. Pat the potato dry, brush it with paint, and stamp it onto kraft or white paper.
This method is great for kids with adult supervision during cutting. Try trees for Christmas, hearts for Valentine’s Day, stars for birthdays, circles for modern polka dots, or simple leaf shapes for fall. The slightly imperfect edges make the paper look handmade in the best way.
3. Paint Splatter Paper
Paint splatter wrapping paper is perfect for anyone who likes modern design and does not mind a little controlled chaos. Place kraft or white paper outdoors or on a well-covered surface. Dip an old toothbrush or stiff paintbrush into watered-down acrylic paint, then flick the bristles gently over the paper.
Use one color for a clean look or two to three colors for a party feel. Black splatter on white paper looks artsy. Gold splatter on brown paper feels festive. Bright colors on white paper are fun for birthdays. Let the paper dry completely before wrapping, unless you enjoy giving gifts that also fingerprint the recipient.
4. Marker Doodle Wrapping Paper
If you can draw a line, a dot, or a wobbly star, you can make doodle wrapping paper. Wrap the gift first, then draw directly onto the package, or decorate the paper flat before wrapping. Try repeated patterns such as tiny flowers, arrows, candles, confetti, balloons, leaves, smiley faces, hearts, snowflakes, or abstract squiggles.
For a personal version, write the recipient’s name repeatedly in different lettering styles. You can also add inside jokes, favorite quotes, song titles, or tiny illustrations related to the gift. This turns the wrapping into a mini scrapbook page, minus the pressure of being good at scrapbooking.
5. Washi Tape Pattern Paper
Washi tape is the shortcut to looking crafty when your energy level says “microwave dinner.” Use plain paper as the base, then create stripes, grids, borders, faux ribbons, triangles, stars, or geometric patterns with tape. Because washi tape comes in endless colors and prints, it can match almost any theme.
For a neat look, run tape horizontally and vertically like ribbon. For a playful design, cut small pieces and arrange them like confetti. For a modern style, use black-and-white tape on kraft paper. Washi tape also works well for sealing small folds, attaching tags, or decorating plain envelopes.
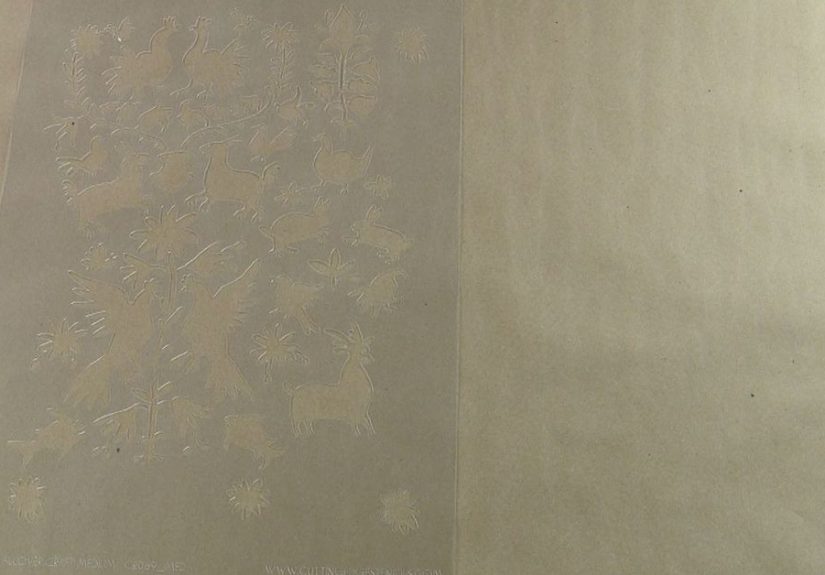
6. Stenciled Gift Wrap
Stencils make DIY wrapping paper look crisp and professional. Lay your paper flat, place the stencil on top, and dab paint through it with a sponge brush or stiff stencil brush. Use a small amount of paint to avoid bleeding under the stencil. Lift carefully, move the stencil, and repeat.
Try stars, botanicals, snowflakes, letters, monograms, or simple geometric shapes. Stenciled kraft paper pairs beautifully with jute twine, raffia, cotton ribbon, or a handmade tag. Let the paper dry fully before folding, or the design may smudge during wrapping.
7. Recycled Paper Bag Wrap
Paper shopping bags are surprisingly useful for DIY gift wrap. Cut along one side seam and remove the bottom panel. Turn the printed side inward so the plain brown side faces out. Then decorate with stamps, markers, stickers, or ribbon.
This method is ideal for small to medium gifts. If the bag has handles, save them for future gift tags or loops. Some bags already have attractive patterns or logos that can be incorporated creatively. A luxury store bag, for example, can become a chic gift wrap base when paired with simple black ribbon.
8. Newspaper, Magazine, and Map Wrapping
Newspaper wrapping can look intentional when styled well. Use pages with mostly text for a vintage look, or choose comic pages for playful gifts. Old maps are excellent for travel lovers, graduation gifts, road trip presents, or Father’s Day gifts. Magazine pages can be pieced together for small packages or used as decorative bands over plain paper.
Finish recycled paper wrapping with solid ribbon, twine, or a bold tag. The key is contrast. If the paper is busy, keep the topper simple. If the paper is plain, add a more decorative bow or embellishment.
9. Kids’ Artwork Wrapping Paper
Children’s artwork makes some of the sweetest DIY wrapping paper. Give kids white or kraft paper and let them paint, draw, stamp, or add stickers. Grandparents, teachers, parents, and relatives usually love receiving gifts wrapped in art made by little hands.
For a cleaner final result, limit the color palette to two or three colors. For maximum joy, let the kids do whatever they want and call it abstract expressionism. Either way, the wrapping becomes part of the gift.
10. Fabric-Inspired Paper Wrap
You can create the look of fabric without using fabric. Draw plaid lines with markers, stamp tiny floral patterns, use sponge dots for a block-print effect, or create a repeating stripe pattern with paint. These designs look beautiful on rectangular boxes and can be customized by season.
For a cozy holiday look, draw red and green plaid on kraft paper. For spring, stamp small flowers in soft colors. For birthdays, use bright stripes and confetti dots. For weddings, keep the design minimal with soft neutrals and delicate botanical shapes.
How to Wrap Gifts So DIY Paper Looks Polished
Even the most beautiful paper can look messy if the wrapping is rushed. Fortunately, a few simple techniques make homemade gift wrap look much more professional.
Measure Before Cutting
Place the box upside down on the paper. Pull the paper over the box to make sure it overlaps by about one to two inches. On the ends, the paper should reach a little more than halfway down each side of the box. Too much paper creates bulky folds; too little paper creates the kind of gap that makes everyone pretend not to notice.
Use Sharp Creases
Crisp edges make any package look cleaner. Run your fingers along each fold, then sharpen it with a ruler, bone folder, or the back of a butter knife. This small step gives homemade wrapping paper a boutique-style finish.
Hide the Seam
Wrap the gift upside down so the seam lands on the bottom. Fold the raw edge of the paper under before taping for a cleaner line. Double-sided tape can make the package look especially neat because it hides the adhesive.
Keep Decorations Balanced
If your wrapping paper has a bold pattern, use a simple topper. If your paper is plain, add a stronger focal point such as a ribbon, greenery sprig, paper bow, ornament, or handmade tag. The goal is balance, not a gift that looks like it fought a craft drawer and lost.
Creative Gift Toppers for DIY Wrapping Paper
Gift toppers are the accessories of the wrapping world. They can make basic paper look expensive and add texture, color, and personality.
Paper Bows and Rosettes
Use leftover paper scraps to make bows, rosettes, folded fans, or curled ribbons. Cut strips of paper, loop them into bow shapes, and secure them with tape or glue. For a rosette, accordion-fold a strip of paper, join the ends, and press the center flat.
Handmade Gift Tags
Gift tags can be made from cardstock, cereal boxes, old greeting cards, kraft paper scraps, or cut-up shopping bags. Punch a hole at the top and tie with twine or ribbon. Add a stamped initial, small drawing, or handwritten message.
Natural Details
Greenery, dried citrus, cinnamon sticks, small pinecones, and pressed leaves add a beautiful handmade look. They work especially well with kraft paper, newspaper, and minimalist white wrap. Keep natural toppers small and secure them with twine.
Reusable Extras
Try tying on a small ornament, cookie cutter, keychain, hair clip, bookmark, mini notepad, or seed packet. The topper becomes a bonus gift, which is always charming because everyone loves a surprise add-on.
DIY Wrapping Paper Ideas by Occasion
One of the biggest advantages of homemade wrapping paper is that it can be adapted for any event. You do not need a closet full of seasonal rolls; you need a few base materials and some clever styling.
Birthday Gifts
Use white paper with colorful marker confetti, balloon doodles, bright washi tape, or paint splatters. Add a bold tag with the recipient’s name. For kids, let them decorate the paper with stickers or stamps. For adults, try a cleaner design with one accent color and a sleek ribbon.
Christmas and Holiday Gifts
Kraft paper looks festive with white snowflake stamps, pine sprigs, red twine, plaid ribbon, or metallic marker lettering. You can also use potato stamps shaped like trees or stars. For a low-waste holiday approach, reuse paper bags, fabric ribbons, and tags from previous years.
Weddings and Anniversaries
Keep the palette soft and elegant. Try white paper with gold dots, kraft paper with botanical stamps, or recycled paper tied with silk-style ribbon. A handwritten tag or small pressed flower adds a romantic detail without becoming too fussy.
Baby Showers
Use pastel paint dots, tiny stars, moons, animals, or alphabet stamps. Soft cotton ribbon or yarn makes the package feel gentle and sweet. You can also use pages from an old children’s book if the style fits the theme and the book is already damaged or unwanted.
Graduations
Decorate paper with stars, school colors, motivational phrases, or map designs for students heading off to new adventures. A black-and-gold color scheme feels classic, while kraft paper with bold hand-lettering feels modern.
Eco-Friendly Tips for DIY Gift Wrapping Paper
DIY wrapping can be more sustainable when you choose materials carefully and design with reuse in mind. A few practical habits can make a big difference over time.
Choose Recyclable or Reusable Materials
Plain paper, kraft paper, paper bags, and uncoated paper are often easier to recycle than glittery, metallic, or plastic-coated wrap. Fabric wraps, scarves, tote bags, baskets, and reusable gift bags can be used again and again. Natural twine and paper tags are easier to manage than plastic bows and adhesive-heavy labels.
Skip Excess Tape When Possible
Use twine, ribbon, folding techniques, or stickers to reduce tape. For some box shapes, careful folds and a tied ribbon can hold the package closed. If you do use tape, use small pieces and avoid covering large areas of recyclable paper.
Save Scraps
Paper scraps can become gift tags, decorative bands, patchwork wrap, envelope liners, confetti, bookmarks, or small bows. Keep a small envelope or folder for usable scraps so they do not vanish into the craft supply wilderness.
Common Mistakes to Avoid
DIY wrapping paper is forgiving, but a few mistakes can make the process messier than necessary.
Using Wet Paint Too Soon
Let paint, ink, or marker dry completely before wrapping. This prevents smudges, sticking, and accidental handprints. If you are making several sheets, decorate them the day before gifting.
Overdecorating the Paper
Simple designs often look more elegant than crowded ones. Leave some blank space so the pattern can breathe. A repeated stamp, a hand-drawn border, or a single bold ribbon may be all you need.
Choosing Paper That Is Too Thick
Very thick paper can crack at the folds and become hard to tape. Very thin paper can tear. Kraft paper, butcher paper, and medium-weight recycled paper usually fold well while still feeling sturdy.
Forgetting the Recipient
The best homemade wrapping paper matches the person, not just the holiday. A minimalist friend may love clean black-and-white paper. A cheerful friend may prefer bright colors. A sentimental family member may treasure wrapping decorated with a child’s drawing or handwritten message.
of Real-Life Experience: What DIY Gift Wrapping Paper Teaches You
The first time you make DIY gift wrapping paper, you may expect it to be a neat little craft session. In reality, it often starts with confidence, takes a brief detour through “Why is there paint on my elbow?” and ends with something surprisingly beautiful. That is part of the fun. Homemade gift wrap has a way of reminding you that thoughtful does not have to mean perfect.
One of the most useful lessons is that simple materials usually work best. A roll of kraft paper, a black marker, and some twine can create a package that looks stylish enough for a boutique shelf. The trick is restraint. When people first start making wrapping paper, they often want to use every stamp, every sticker, every ribbon, and possibly a pinecone the size of a small helmet. But the packages that get the most compliments are often the simplest: tiny white stars on brown paper, a sprig of rosemary, and a handwritten tag.
Another experience many DIY wrappers discover is that making paper in batches saves time. Instead of decorating one sheet per gift, roll out a long section of paper and create a repeating pattern across the whole thing. Stamp stars across six feet of kraft paper. Splatter paint over a large piece of white paper. Let kids draw on a big section while you drink coffee nearby and pretend not to worry about the washable markers. Once the paper dries, roll it back up and cut pieces as needed.
DIY gift wrapping paper also makes you better at noticing what you already have. A brown paper bag becomes rustic wrap. A magazine page becomes a decorative belly band. Leftover yarn becomes ribbon. A broken holiday card becomes a gift tag. A scrap of fabric becomes a reusable bow. Suddenly, the recycling bin looks less like trash and more like a supply closet with commitment issues.
There is also a small emotional payoff. People notice handmade wrapping. They may not say, “Ah yes, excellent ink distribution on this potato stamp,” but they will often pause, smile, and comment that the package feels special. That moment matters. It says you took a little extra time. You thought about the presentation. You made the gift feel personal before it was opened.
For families, DIY wrapping can become a tradition. Kids can stamp paper for grandparents. Friends can host a wrapping night with snacks, paper rolls, and craft supplies. Couples can make simple paper together for holiday gifts. Even if the results are uneven, they carry a story. Store-bought paper is pretty, but handmade wrapping paper can hold fingerprints, jokes, memories, and tiny signs of effort.
The best advice from experience is this: do not aim for flawless. Aim for thoughtful, clean, and fun. Let the ink be slightly uneven. Let the doodles have personality. Let the ribbon be reused. Let the paper say, “I made this for you,” because that message is more memorable than perfect corners. Though, to be fair, perfect corners are nice too.
Conclusion
DIY gift wrapping paper is one of the easiest ways to make a present feel personal, creative, and meaningful. With simple supplies like kraft paper, stamps, markers, paint, twine, recycled bags, and paper scraps, you can create custom gift wrap for birthdays, holidays, weddings, baby showers, graduations, and everyday surprises. The process is flexible, affordable, and often more eco-friendly than buying glossy single-use paper.
Whether you choose potato stamps, hand-lettered messages, paint splatters, recycled newspaper, kids’ artwork, or elegant stenciled patterns, homemade wrapping paper turns presentation into part of the gift. It does not need to be perfect. It only needs to feel intentional. And when someone pauses before opening your gift because the wrapping is too cute to tear, you will know your DIY mission was a success.