
Table of Contents >> Show >> Hide
- Before You Add Calcium: Test and Observe
- 1. Use Garden Lime (Calcitic or Dolomitic)
- 2. Add Gypsum for Calcium Without Raising pH
- 3. Work in Crushed Eggshells (Slow and Steady)
- 4. Apply Bone Meal at Planting Time
- 5. Enrich Soil with Compost and Manure
- 6. Sprinkle Wood Ash (Carefully)
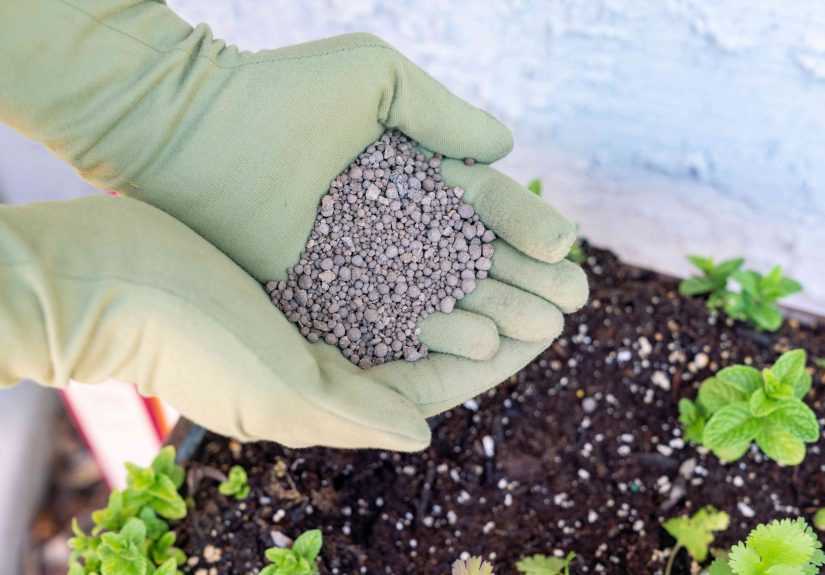
- 7. Use Calcium-Rich Granular Fertilizers
- 8. Try Calcium Foliar Sprays for Quick Support
- 9. Improve Watering and Root Health to Boost Calcium Uptake
- Putting It All Together: How to Choose the Right Calcium Method
- Real-World Experiences: What Gardeners Notice When They Add Calcium
- Conclusion
If your tomatoes are getting blossom-end rot, your peppers look sulky, or your brassicas flop over instead of standing tall, your garden might be sending a message: “Hey, I need more calcium!”
Calcium is like the structural engineer of plant nutrition. It helps build strong cell walls, supports root growth, and keeps fruits and foliage from collapsing under stress. The good news? There are many ways to add calcium to soil safely and effectivelywithout turning your garden into a chemistry lab.
Below, we’ll walk through nine proven methods to boost calcium in garden soil, how to choose the right one for your plants, and what mistakes to avoid. Grab your soil test (or your gardening notebook) and let’s get into it.
Before You Add Calcium: Test and Observe
Before you rush to dump lime or crushed eggshells on everything, pause for a moment. In many parts of the United States, garden soils already contain plenty of calcium. The problem is often uptake, not total supplythings like irregular watering, damaged roots, or extreme soil pH can stop plants from using the calcium that’s already there.
That’s why a soil test is your best first step. It can tell you:
- Current soil pH (too low or too high affects calcium availability)
- Existing calcium and magnesium levels
- How much lime or other amendmentsif anyyou actually need
Once you have that information, you can pick the best calcium source from the nine options below.
1. Use Garden Lime (Calcitic or Dolomitic)
Garden limealso called agricultural lime or calcium carbonateis the classic way to add calcium to soil. It pulls double duty by both supplying calcium and raising soil pH, making acidic soil more neutral.
When garden lime is a good choice
- Your soil test shows low pH (below about 6.0)
- You’re growing crops that prefer near-neutral soil (most vegetables, lawn grasses, herbs)
- Your soil test indicates low calcium
Calcitic vs. dolomitic lime
- Calcitic lime: Mostly calcium carbonate; best when magnesium levels are already adequate.
- Dolomitic lime: Contains both calcium and magnesium; useful if your soil test shows low magnesium.
How to apply lime
- Follow the soil test recommendation for pounds per 1,000 square feet.
- Spread evenly, then work it into the top 6–8 inches of soil.
- Apply several months before planting if possible; lime works gradually.
Important: Do not add lime “just in case.” Over-liming can push pH too high and lock up other nutrients, creating new problems.
2. Add Gypsum for Calcium Without Raising pH
If your soil is already neutral to alkaline but still needs calcium, gypsum (calcium sulfate) is your friend. Unlike lime, gypsum provides calcium without significantly changing soil pH.
When gypsum makes sense
- Your soil test shows adequate or high pH but low calcium.
- You’re gardening in heavy clay and want to improve soil structure over time.
- You’re growing crops that dislike high pH but still need calcium.
How to use gypsum
- Follow package directions or soil test amounts (often a few pounds per 100 square feet).
- Broadcast over the soil surface and lightly work into the top few inches.
- Water well after application to move calcium into the root zone.
Think of gypsum as a “pH-neutral calcium boost” that plays nicely with most garden soils.
3. Work in Crushed Eggshells (Slow and Steady)
Eggshells are a favorite among DIY gardeners, and they do contain calcium carbonatesimilar to very, very slow-release lime. But there are a few caveats.
How to prep eggshells properly
- Rinse shells to remove egg residue.
- Air-dry, then bake lightly if you want to sanitize.
- Crush very finelyideally to a coarse powder, not big chunky pieces.
Finely crushed shells break down faster, exposing more surface area to soil microbes and moisture.
Best ways to use eggshells
- Mix small amounts into compost as a long-term calcium source.
- Work fine eggshell powder into the topsoil before planting heavy feeders like tomatoes and peppers.
- Use as part of an overall soil health strategynot as your only calcium solution.
Real talk: Eggshells are great for gradual calcium release over seasons, but they won’t magically fix blossom-end rot overnight. They’re more of a “slow savings account” than an emergency loan.
4. Apply Bone Meal at Planting Time
Bone meal is made from ground animal bones and is rich in phosphorus and calcium. It’s usually used as a root-zone fertilizer for flowering plants and root crops.
When bone meal works well
- Soil test shows low phosphorus and modest calcium needs.
- You’re planting bulbs, root crops, or long-season veggies like tomatoes and peppers.
- You prefer organic, slow-release fertilizers.
How to apply bone meal
- Follow label instructionsmore is not better.
- Mix into the planting hole or row, a few inches below seeds or transplant roots.
- Water thoroughly to start the breakdown process.
Because bone meal releases nutrients slowly, it’s best added ahead of time rather than in an emergency situation.
5. Enrich Soil with Compost and Manure
High-quality compost and well-rotted manure are like multivitamins for your soil. While they’re not calcium supplements per se, many organic materials contain modest amounts of calcium and help improve soil structure, water retention, and microbial lifeall of which support better calcium uptake.
Tips for using compost and manure
- Apply 1–2 inches of finished compost over beds each year and work it into the top layer.
- Use only well-rotted manure to avoid burning plants and introducing too much soluble salt.
- Rotate where heavy applications go so you don’t overload one area with nutrients.
Healthy, organic-matter-rich soil is much better at delivering calcium and other nutrients right where roots need them.
6. Sprinkle Wood Ash (Carefully)
If you heat with a wood stove or enjoy backyard bonfires, you may already have a free calcium source on hand: wood ash. Hardwood ashes contain calcium carbonate and potassium, and they raise soil pH.
When wood ash is appropriate
- Your soil is on the acidic side and your soil test says raising pH is okay.
- You’re growing plants that prefer neutral to slightly alkaline soil (many vegetables, some ornamentals).
How to use wood ash safely
- Use small amountstypically no more than 10–20 pounds per 1,000 square feet per year.
- Spread thinly and mix into the soil; don’t leave thick piles.
- Avoid using around acid-loving plants (blueberries, azaleas, rhododendrons, camellias).
Wood ash is powerful stuff. Think of it as a “seasoning,” not the main course.
7. Use Calcium-Rich Granular Fertilizers
Some commercial fertilizers are formulated to deliver extra calcium along with nitrogen and other nutrients. One common example is calcium nitrate, which provides both calcium and a quickly available form of nitrogen.
Pros of calcium-containing fertilizers
- Fast-acting; results may be noticed more quickly than with organic sources.
- Useful for heavy-feeding crops that need plenty of nitrogen and calcium.
- Can be applied as a side-dress during the growing season.
Cons and cautions
- Easy to overdo the nitrogen, causing lush foliage but fewer fruits.
- Can contribute to salt buildup if used excessively.
- Not ideal for gardeners trying to stick to fully organic inputs.
Read the label carefully and use these products as a targeted tool, not a default habit.
8. Try Calcium Foliar Sprays for Quick Support
Calcium foliar sprays are liquid products sprayed directly on leaves or developing fruits. They’re often marketed for preventing blossom-end rot in tomatoes and peppers.
What foliar sprays can and cannot do
- They can provide a short-term boost of calcium to young tissues.
- They cannot fully fix serious root or watering problems.
- They work best as a supplement alongside good soil management and consistent moisture.
How to use foliar calcium sprays
- Follow the mixing directions exactlystronger is not better.
- Spray in the early morning or evening to avoid leaf burn.
- Focus on young leaves and forming fruits, where calcium demand is highest.
Think of foliar sprays as a “band-aid plus” while you address deeper soil and watering issues.
9. Improve Watering and Root Health to Boost Calcium Uptake
Here’s the twist: sometimes you don’t need to add any calcium at all. You just need to help plants use the calcium already in the soil.
Practices that improve calcium uptake
- Water consistently. Avoid the cycle of bone-dry soil followed by a flood, which disrupts nutrient uptake.
- Mulch beds. Organic mulch helps keep soil moisture more even and protects shallow roots.
- Avoid root damage. Don’t cultivate too close to plant stems or yank weeds aggressively.
- Don’t over-fertilize with magnesium or potassium. Excessive amounts can compete with calcium uptake.
Many cases of blossom-end rot in tomatoes, for example, are linked to water stress more than to a true lack of calcium in the soil. Fixing your watering routine can sometimes do more than any bag of amendment.
Putting It All Together: How to Choose the Right Calcium Method
With nine different ways to add calcium to soil, it’s easy to feel overwhelmed. Here’s a simple decision path:
- Step 1: Get a soil test for pH, calcium, and magnesium.
- Step 2: If pH is low and calcium is low, choose lime (calcitic or dolomitic as recommended).
- Step 3: If pH is neutral or high but calcium is low, consider gypsum.
- Step 4: Layer in compost, manure, and small amounts of eggshells or bone meal for long-term soil health.
- Step 5: For urgent crop needs, use calcium-containing fertilizers or foliar sprays plus better watering habits.
Long term, your best strategy is a combination of tested amendments, consistent moisture, and organic matter. That’s the trio that keeps calcium available and your plants happy.
Real-World Experiences: What Gardeners Notice When They Add Calcium
The science is important, but gardeners also learn a lot from what they see season after season. Here are some common experiences people report when they start managing calcium more intentionally in their garden soil.
Tomatoes stop “mysteriously” rotting on the bottom
One of the most dramatic changes gardeners notice is a reduction in blossom-end rot. When someone switches from random hose watering to a steady routinesay, deep watering once or twice a week, plus mulchwhile also making sure calcium is adequate, those blackened tomato bottoms often start to disappear. It’s rarely just one thing; it’s the combination of steady moisture and decent calcium levels that does the trick.
Plants look sturdier and less floppy
Because calcium is crucial for cell walls, improving calcium availability often shows up as sturdier stems and better leaf structure. Gardeners sometimes describe plants as looking “less flimsy” or “more upright” after a season of soil improvement with compost, lime (as needed), and balanced fertilizers. Brassicas like cabbage and broccoli especially seem to benefit from good calcium and consistent moisture.
Soil feels easier to work over time
Gypsum and organic matter don’t just supply nutrients; over time, they can improve the physical feel of your soil. Clay soils that once felt like bricks may gradually become more crumbly as calcium helps flocculate clay particles and organic matter feeds soil life. That doesn’t happen in a week, but gardeners who stick with compost plus appropriate calcium sources often find that digging and planting get easier every year.
Fewer “mystery deficiencies” once soil is balanced
When the soil is strongly acidic or overloaded with one nutrient (like magnesium from repeated Epsom salt applications), plants can start showing all kinds of odd deficiency symptoms. By returning to the basicssoil testing, using lime or gypsum only as needed, adding compost, and avoiding overuse of single-ingredient supplementsmany gardeners see those mystery problems fade away. Tomatoes, peppers, and squash tend to grow more evenly, with fewer random yellowing or distorted leaves.
Expectations become more realistic
Another big shift is psychological. Once gardeners understand that crushed eggshells won’t fix a serious calcium problem overnight, they stop expecting miracles from one ingredient. Instead, they treat eggshells as a nice slow-release addition to compost, bone meal as a thoughtful planting-time boost, and lime or gypsum as tools guided by a soil testnot as magic dust.
This mindset change leads to more patient, strategic gardening. Instead of reacting to every yellow leaf with a new product, gardeners start with the soil, build organic matter, water consistently, and then layer in calcium sources that make sense for their specific conditions.
Incremental changes add up
Calcium management is rarely about one dramatic fix. It’s more like nudging your soil in the right direction, season after season. A scoop of compost here, a carefully measured lime application there, some crushed eggshells in the compost bin, a better watering schedule, and maybe gypsum in that stubborn clay bedall of these small choices add up.
After a few years of paying attention to soil tests, pH, organic matter, and calcium sources, many gardeners find that plant problems become less frequent and easier to troubleshoot. The garden still has good years and bad years (weather will always have opinions), but the baseline health of the soiland the plantssteadily improves.
If you’re just starting, don’t feel like you have to use all nine methods at once. Pick one or two that fit your soil test and your budget, improve your watering routine, and build from there. Calcium isn’t glamorous, but in the background, it plays a huge role in turning “meh” gardens into satisfying, productive ones.
Conclusion
Adding calcium to soil isn’t about throwing everything white and powdery onto your beds and hoping for the best. It’s about understanding what your soil already has, what your plants actually need, and which amendments will move you toward healthy, balanced conditions. With a good soil test, smart use of lime or gypsum, slow-steady help from compost, bone meal, and eggshells, plus good watering habits, you can give your plants all the calcium they need to stand tall and produce abundant harvests.
SEO Summary & Metadata
sapo: Worried about blossom-end rot, weak stems, or tired-looking plants? Calcium might be the missing piece in your garden’s soil health puzzle. In this in-depth guide, you’ll learn nine practical ways to add calcium to soilusing lime, gypsum, bone meal, compost, eggshells, fertilizers, and moreplus how to improve watering and root health so plants can actually use that calcium. We’ll walk through when each method works best, what to avoid, and how real-world gardeners see their soil and harvests improve once they start managing calcium the smart way.


