
Table of Contents >> Show >> Hide
- Quick Navigation
- Prep: What You’ll Need (and Why Crisp Bills Matter)
- Is It Legal to Fold Money?
- The Classic 4-Petal Dollar-Bill Flower (Beginner-Friendly)
- Step 1: Make the center guideline crease
- Step 2: Fold the four corners toward the center crease
- Step 3: Bring the long edges to the center
- Step 4: Fold the strip in half to form one petal unit
- Step 5: Repeat until you have four identical units
- Step 6: Stack and bind the center
- Step 7: Open the petals
- Shaping Tricks: Make It Look Like a Flower (Not Like Paperwork)
- Bouquet Ideas: Turn One Flower into a “Wow” Gift
- Alternative Styles (Because One Flower Is Never Enough)
- Troubleshooting: Common Folding Problems (and Fixes)
- Experience Notes: What You Learn After Making a Handful (Extra ~)
- Conclusion
If cash is king, consider this your royal makeover: we’re turning a plain old dollar bill into a flower that says, “I brought you money… but I also brought you effort.” This is the ultimate glow-up for graduations, birthdays, weddings, baby showers, tips, or any moment when an envelope feels a little too “I ran out of time.”
Below you’ll learn a beginner-friendly dollar-bill flower you can build in minutes, plus bouquet tricks, a couple of alternate flower styles (including the famous money rose), and the tiny details that make the finished bloom look intentionalnot like a bill that lost an argument with your fingers.
Quick Navigation
- Prep: what you need (and why crisp bills matter)
- Is it legal to fold money?
- The Classic 4-Petal Money Flower (step-by-step)
- Shaping tricks: make it look like an actual flower
- Bouquet ideas: turn one flower into a “wow” gift
- Alternative styles: quick one-bill bloom, rose, kusudama
- Troubleshooting: common folding problems
- Experience notes (extra of real-world tips)
- Conclusion
- SEO Tags (JSON)
Prep: What You’ll Need (and Why Crisp Bills Matter)
You can fold money straight out of your wallet, but if you want your flower to look like a flower and not like it survived laundry day, do a little prep first.
Materials
- 4 dollar bills (or any denominationstart with $1s for practice)
- Floral wire, a pipe cleaner, or a thin twist tie (for the center “stem” bind)
- Wooden skewer or thin dowel (optional, if you want a sturdier stem)
- Ribbon or a small tag (optional, for gifting)
- Flat surface and your best “I can totally fold evenly” face
How to flatten wrinkled bills (without drama)
- Best low-risk method: place bills under a heavy book for a few hours.
- Fast method: crease firmly using a plastic card edge (like an old gift card).
- Extra note: money paper is a durable cotton/linen blend, so it holds creases better than regular printer papergreat for origami.
Is It Legal to Fold Money?
Folding money is generally fine. The key is avoiding actions that permanently damage the bill (and avoiding anything that makes it hard to spend later). In plain-English terms: don’t cut it, don’t glue it, don’t staple it, and don’t tape it in a way that tears fibers when removed.
There’s a U.S. law that addresses mutilating or altering bank obligations with intent to render them unfit to be reissued. Folding for a gift isn’t the same thing as trying to destroy currency, but it’s still smart to keep your craft fully reversible. Translation: make your flower beautiful and easy to “un-flower.”
The Classic 4-Petal Dollar-Bill Flower (Beginner-Friendly)
This design creates one flower using four bills. Each bill becomes one petal unit. You’ll fold four identical units, stack them, and bind the center with wire (or a pipe cleaner). It’s simple, looks impressive, and scales beautifully into a bouquet.
Step 1: Make the center guideline crease
- Lay one bill flat, face up or downeither is fine as long as you’re consistent.
- Fold it lengthwise (long edge to long edge) like a hot dog bun.
- Press the crease firmly, then unfold. You now have a center line running the long way.
Step 2: Fold the four corners toward the center crease
- Take the top-left corner and fold it inward until the corner point touches the center crease.
- Repeat with the top-right corner, then the bottom-left and bottom-right corners.
- You’re aiming for neat, symmetrical “pointed ends” that meet the center line cleanly.
Step 3: Bring the long edges to the center
- Fold the top long edge down so it meets the center crease.
- Fold the bottom long edge up so it also meets the center crease.
- Your bill should now look like a long, tidy strip with angled endslike a fancy wrapped candy, minus the sugar.
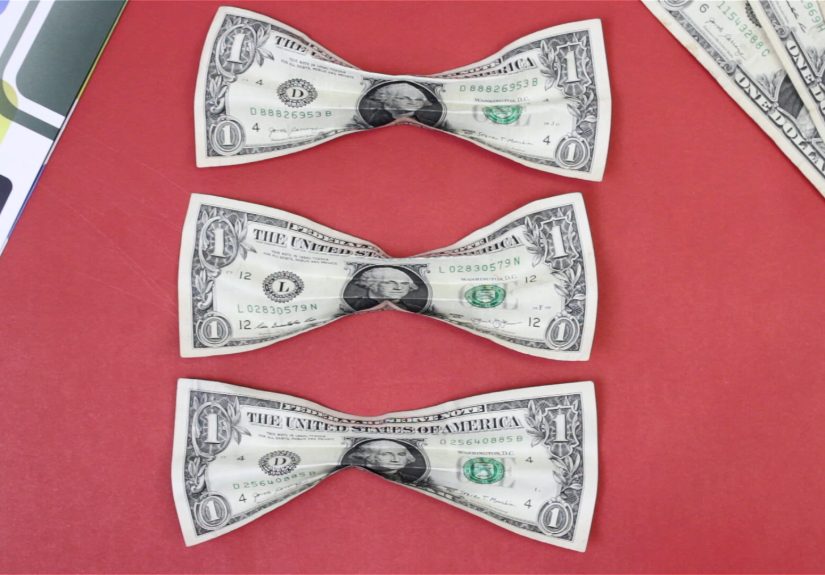
Step 4: Fold the strip in half to form one petal unit
- Fold the entire shape in half along the center crease (the long way), bringing the two folded edges together.
- Press firmly. This creates a compact unit that will become one “petal.”
Step 5: Repeat until you have four identical units
- Make three more units using the same steps.
- Try to keep them as close in size and tightness as possibleuniform petals = a better-looking flower.
Step 6: Stack and bind the center
- Stack the four units together so the folded “spines” align at the center.
- Wrap floral wire (or a pipe cleaner) around the middle tightly and twist to secure.
- If you want a longer stem, twist the wire around a wooden skewer or thin dowel as you secure the center.
Step 7: Open the petals
- Gently fan the units outward, spacing them evenly like petals around a center point.
- Adjust the angles until the flower looks balanced from the top.
Shaping Tricks: Make It Look Like a Flower (Not Like Paperwork)
The difference between “Wow!” and “What is that?” is shaping. You’re not just foldingyou’re styling.
Petal shaping mini-moves
- Curl the tips: fold the very end corners slightly backward to add a petal-like curve.
- Round the bloom: lightly pinch the base near the center tie so the petals puff outward.
- Fix “flat flower syndrome”: rotate petals so they overlap slightly when viewed from abovereal flowers don’t stand in perfect quadrants.
- Make it gift-proof: avoid overworking the bill edges; crisp creases are good, frayed corners are not.
Pro tip: symmetry is your friend (until it isn’t)
Keep folds symmetrical while building units, then make the final bloom slightly imperfect. The tiny offset and gentle curves are what make it feel organic.
Bouquet Ideas: Turn One Flower into a “Wow” Gift
One money flower is cute. A bouquet is a mic-drop. Here are easy upgrades that don’t require a craft room the size of a garage.
Easy bouquet formulas
- 3 flowers + ribbon: perfect for graduations and birthdays.
- 5–7 flowers + a vase: “I planned ahead” energy, even if you didn’t.
- Mix denominations: use $1s for “filler flowers” and one higher-denomination bloom as the centerpiece.
- Add greenery: tuck in real or faux leaves so the money flowers don’t look like they’re floating.
How to present it so it doesn’t scream “cash gift”
Add a small tag that says something like: “For something fun,” “Treat yourself,” or “Your next adventure fund.” It turns the gift into a story, not just a transaction.
Alternative Styles (Because One Flower Is Never Enough)
A quick one-bill “blossom” for emergencies
If you need a fast, cute result using one bill, this is more “paper-craft flower” than strict origami, but it’s reversible and gift-ready.
- Lay the bill horizontally.
- Fold it back-and-forth in small even pleats (like an accordion) from one short end to the other.
- Pinch the accordion at the center.
- Tie the center with a thin wire/twist tie (snug, but not so tight you crease through the fibers).
- Fan out both sides to form a circular bloom.
- Optional: twist the tie down into a “stem,” or wrap it around a skewer.
It’s not a botanical masterpiece, but it looks festive, photographs well, and takes about two minutes once you get the hang of even pleats.
The Money Rose (classic “special occasion” flex)
The money rose is the fancy cousin that shows up overdressed and somehow pulls it off. Many popular versions use five billsone bill forms the center, and the others wrap around as petals, often secured with wire. If you want a “romantic” cash gift for anniversaries or weddings, this is the vibe.
Kusudama-style money flower (modular and dramatic)
Kusudama flowers are traditionally modular paper flowers assembled without glue. When adapted to bills, they often use multiple units (commonly five) and rely on careful folding and a non-damaging center tie. This style looks amazing in clustersthink party decor, centerpieces, or a money bouquet that could realistically get invited to a photo shoot.
Troubleshooting: Common Folding Problems (and Fixes)
- Problem: My petals don’t match.
Fix: Use the bill’s printed borders as visual guides. If one unit is looser, redo ittiny differences add up once stacked. - Problem: The flower looks flat from the top.
Fix: Rotate the petal units slightly so they overlap, then curl corners back a little for depth. - Problem: The center keeps slipping.
Fix: Twist the wire tighter and pinch the units together before your final twist. If using a pipe cleaner, twist, then wrap once more. - Problem: My creases look messy.
Fix: Fold slowly, press firmly, and use a plastic card edge to sharpen creases. Crisp folds beat rushed folds every time. - Problem: I’m scared of damaging the bill.
Fix: Don’t use tape, glue, staples, or cuts. Keep everything reversible. If you’re gifting, include a note explaining how to untwist the center.
Experience Notes: What You Learn After Making a Handful (Extra ~)
Here’s the stuff nobody tells you until you’ve made a few money flowers and discovered the weirdly specific ways paper currency can humble you. Think of this as the “field guide” sectionpractical, a little opinionated, and designed to save you from rookie mistakes that make your flower look like a crumpled receipt with ambitions.
First, you learn that bill selection is half the project. A crisp bill behaves like it’s been waiting for its moment. A wrinkled bill behaves like it just got back from a music festival. The folds are harder to line up, the corners won’t stay sharp, and your flower can look tired before you even start. If all you have are wrinkly bills, pressing them under a heavy book helps a lot. Even five minutes under something solid can improve your creases. The other sneaky trick is using the bill’s printed design as a ruler: borders, seals, and numbers make excellent “fold-to-here” landmarks.
Second, you discover the truth about “even folds.” On your first attempt, you’ll swear you folded perfectly. Then you stack four petal units and suddenly one petal is taller, another is skinnier, and the whole flower looks like it has opinions about modern art. The fix is boring but effective: fold slowly and press deliberately. After each fold, run your fingernail along the crease and then run a plastic card edge along it. That extra ten seconds per fold makes the final bloom look dramatically cleaner.
Third, you get a feel for the “Goldilocks zone” of tightness. If your folds are too loose, the petals sag and the center tie slips. If they’re too tight, the flower becomes stiff and angularmore “paper star” than “flower.” The sweet spot is snug folds with gentle shaping at the end. This is where the final styling matters: curling the corners back a hair and slightly offsetting petals makes the design look organic, like a real bloom with layers.
Fourth, you learn that gifting is a whole separate skill. People love money flowers, but some recipients will stare at it like it’s a puzzle box from a fantasy movie. If you want to be kind, add a tiny note: “Twist tie unwinds to release the billsno tearing needed.” That one sentence prevents accidental ripping and turns your clever craft into a gift that’s actually usable five minutes later.
Finally, you realize money flowers are secretly about presentation and storytelling. A single bloom is cute, but when you wrap a few stems with ribbon, tuck in greenery, and add a tag (“Coffee fund,” “Adventure money,” “For your next hobby”), the whole thing feels personal. It’s the same cash, but now it has personality. And once you’ve made a bouquet for one event, you’ll start spotting excuses everywhere: teacher gifts, bridal showers, graduation parties, thank-you tips, fundraiser prizes. Suddenly you’re the person who “does that cool money flower thing,” and honestly? That’s not a bad reputation to have.
Conclusion
Folding a dollar bill into a flower is one of the easiest ways to turn a practical gift into a memorable one. Stick with crisp bills, keep everything reversible, and spend a minute shaping the petalsthose small touches create the “wow” moment. Once you can make one bloom, you can make a bouquet, mix denominations, and customize the presentation for any occasion.


